How Do You Know If Your Control Arm Is Bad
Alright, let's talk control arms. You're probably here because you suspect yours might be on their way out. They're a critical part of your suspension system, connecting the chassis to the wheel hub and allowing for controlled up-and-down movement while keeping the wheels aligned. A bad control arm can seriously impact handling, tire wear, and overall safety. So, how do you tell if yours are failing? Let's dive in.
Understanding Control Arm Function and Failure
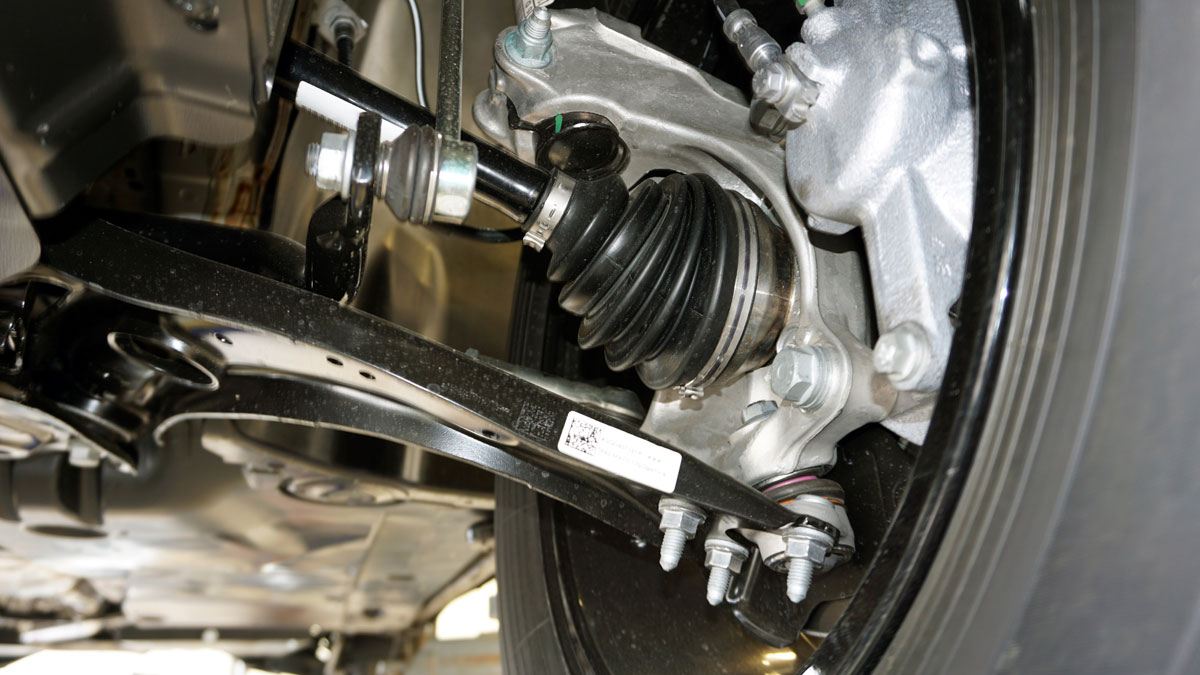
First, a quick refresher. A control arm, sometimes called an A-arm or wishbone (depending on its shape), pivots on bushings at the chassis end and connects to the steering knuckle (or wheel hub assembly) via a ball joint. This setup allows the wheel to move up and down with suspension travel while maintaining its position relative to the vehicle. The bushings provide some give, absorbing vibrations and allowing for slight movement, while the ball joint allows for steering articulation.
Control arms themselves are usually made of forged steel or aluminum, designed to withstand significant stress. However, the components that allow them to function – the bushings and ball joints – are wear items and are the most common points of failure. While the arm itself can bend or crack in extreme cases (like a severe impact), it's far more likely that you'll experience problems with the bushings or ball joint before the arm itself gives way.
Common Failure Points: Bushings
Bushings are typically made of rubber or polyurethane. They absorb vibrations and allow the control arm to pivot smoothly. Over time, they can dry rot, crack, tear, or simply wear out. Environmental factors like road salt, oil leaks, and extreme temperatures accelerate bushing degradation.
Common Failure Points: Ball Joints
Ball joints are essentially swivel joints that allow the steering knuckle to move freely. They consist of a ball stud, a socket, and a grease fitting (or a sealed design in some cases). Over time, the grease can dry out, leading to wear and play in the joint. Contaminants like dirt and water can also accelerate wear. This "play" is what ultimately causes problems.
Symptoms of a Bad Control Arm
Here’s what to look for when diagnosing a potentially faulty control arm. Remember, symptoms can overlap, and some might point to other suspension issues, so a thorough inspection is crucial.
- Clunking or Rattling Noises: This is perhaps the most common symptom. You'll typically hear it when driving over bumps, potholes, or uneven surfaces. The noise is caused by the worn-out bushings or ball joints allowing excessive movement and metal-on-metal contact.
Pay close attention to where the noise seems to be coming from – front or rear, left or right. This helps narrow down the problem.
- Vibrations in the Steering Wheel: A worn ball joint or bushing can cause vibrations, especially at higher speeds. This is because the wheel isn't being held as firmly in place as it should be. You might also notice a general "looseness" in the steering.
- Wandering or Pulling: If your car tends to wander or pull to one side, even on a flat, straight road, it could be a sign of a bad control arm. This happens because the worn components are affecting the wheel alignment. A misaligned vehicle is dangerous and will cause uneven tire wear.
- Uneven Tire Wear: As mentioned above, a bad control arm can throw off your wheel alignment, leading to uneven tire wear. Look for excessive wear on the inside or outside edges of your tires. Cupping or feathering can also be indicators of suspension problems.
- Poor Handling: Your car might feel less responsive to steering inputs, or it might feel "floaty" or unstable, especially when cornering. This is because the suspension isn't controlling the wheel movement as effectively as it should.
- Visible Damage: Sometimes, you can visually inspect the control arm and see the problem. Look for cracks in the bushings, tears, or excessive wear. Check the ball joint for signs of leakage (if it's greaseable) or excessive play.
How to Diagnose a Bad Control Arm: A Step-by-Step Guide
Okay, let's get practical. Here's how to diagnose a potentially bad control arm. Always prioritize safety. Use jack stands and wheel chocks when working under your vehicle.
- Visual Inspection:
- Park your car on a level surface and engage the parking brake.
- Jack up the car and secure it with jack stands. Never work under a car supported only by a jack.
- Remove the wheel.
- Carefully inspect the control arm, bushings, and ball joint. Look for cracks, tears, wear, and any signs of damage.
- Check the ball joint boot (the rubber cover) for tears or cracks. If the boot is damaged, the ball joint is likely contaminated and will need to be replaced.
- Bushing Test:
- Use a pry bar to gently apply pressure to the control arm near the bushings.
- Look for excessive movement or play in the bushings. A small amount of flex is normal, but excessive movement indicates wear.
- Pay attention to any cracking or tearing of the bushing material.
- Ball Joint Play Test:
- There are a couple of ways to test for ball joint play:
- The "Rock" Test (Horizontal Play): With the wheel off and the car securely on jack stands, grip the brake rotor at the 3 and 9 o'clock positions. Try to rock the wheel back and forth. If you feel any play or hear a clunking sound, the ball joint may be worn.
- The "Up-and-Down" Test (Vertical Play): Use a pry bar under the tire (carefully!) and lift upward. Observe the ball joint for any vertical movement. Any noticeable movement indicates wear.
Note: Some ball joints are designed with a slight amount of acceptable play. Consult your vehicle's service manual for specific tolerances.
- Listen Carefully:
- Have a helper turn the steering wheel while the car is off the ground.
- Listen for any squeaking, popping, or grinding noises coming from the ball joint.
When to Replace Control Arms
If you've confirmed that your control arm bushings or ball joints are worn, it's time for replacement. You have a couple of options:
- Replace the Entire Control Arm Assembly: This is often the easiest and most straightforward option. It involves removing the entire old control arm and installing a new one, complete with new bushings and ball joint. This ensures that all components are new and working correctly.
- Replace Just the Bushings or Ball Joint: This can be a more cost-effective option, but it requires more specialized tools and knowledge. You'll need a ball joint press or a bushing removal/installation tool. This option can be tricky, and it's essential to use the correct tools and techniques to avoid damaging the control arm. Furthermore, if one component is worn, the others might be nearing the end of their lifespan too.
Important Considerations:
- Wheel Alignment: After replacing any suspension component, it's crucial to get a wheel alignment. This ensures that your wheels are properly aligned, preventing uneven tire wear and ensuring optimal handling.
- Torque Specifications: Always use the correct torque specifications when tightening control arm bolts and nuts. Consult your vehicle's service manual for the correct values. Over-tightening can damage the components, while under-tightening can lead to loose parts and potential failure.
- Quality Parts: Use high-quality replacement parts from a reputable manufacturer. Cheap parts may not last as long and can compromise safety.
Diagnosing and replacing control arms can be a rewarding DIY project, but it's essential to approach it with the right knowledge and tools. If you're unsure about any aspect of the process, consult a qualified mechanic. Stay safe, and happy wrenching!