How To Replace Cabin Filter In Honda Accord
The cabin air filter, often overlooked in the realm of automotive maintenance, plays a crucial role in ensuring the quality of air circulating within your vehicle. Think of it as your car's lungs, preventing dust, pollen, pollutants, and even small debris from entering the passenger compartment. A clogged or dirty cabin filter not only reduces airflow, impacting the efficiency of your air conditioning and heating systems, but can also contribute to unpleasant odors and potentially trigger allergic reactions or respiratory issues. Replacing it is a simple, yet significant, task that improves your driving experience and overall well-being. This guide will walk you through the process of replacing the cabin filter in a Honda Accord, providing not just the 'how,' but also the 'why' behind each step.
Understanding the Cabin Filter Location and Access
In most Honda Accord models, the cabin filter is located behind the glove box. This placement offers relatively easy access, making the replacement process straightforward. However, specific model years might have slight variations. Consulting your owner's manual is always a good first step, as it provides a diagram and precise instructions tailored to your particular vehicle.
Before diving in, gather the necessary tools and materials:
- A new cabin air filter (ensure it's the correct part number for your Accord's year and model – cross-referencing with your vehicle's VIN is recommended).
- A flathead screwdriver or a trim removal tool (optional, but helpful for prying plastic panels).
- A flashlight (to illuminate the workspace).
- Gloves (to keep your hands clean).
Step-by-Step Cabin Filter Replacement
1. Preparing the Workspace
Begin by emptying the glove box. This ensures unrestricted access to the filter housing. Next, locate the glove box damper, a small arm typically on the right-hand side that controls the smooth opening and closing of the glove box. Disconnecting this damper is usually necessary to fully lower the glove box. Most dampers are held in place by a small clip or hook. Gently detach it using your fingers or a small flathead screwdriver. Avoid excessive force, as these dampers are often made of plastic and can be easily broken.
2. Releasing the Glove Box Retainers
With the damper disconnected, you'll need to release the glove box retainers. These retainers are usually located on either side of the glove box and prevent it from swinging down completely. They are typically designed as small tabs or arms that need to be pushed inward or rotated to disengage. Again, a flashlight can be helpful for clear visibility. Some models might require a slight squeeze of the glove box sides to release the retainers. The mechanism varies slightly by year, but the underlying principle remains the same: allow the glove box to swing fully downward, revealing the cabin filter housing.
3. Accessing the Cabin Filter Housing
Behind the lowered glove box, you will see the cabin filter housing, usually a rectangular plastic cover secured by clips or screws. The design of the housing cover can vary slightly depending on the Accord's model year. Some covers are held in place by simple pressure clips that can be released by pressing inward on the tabs. Others might require a small screwdriver to loosen screws or release more intricate locking mechanisms. Carefully examine the cover to determine the type of fastener and use the appropriate tool. Patience and gentle manipulation are key to avoiding damage to the plastic components.
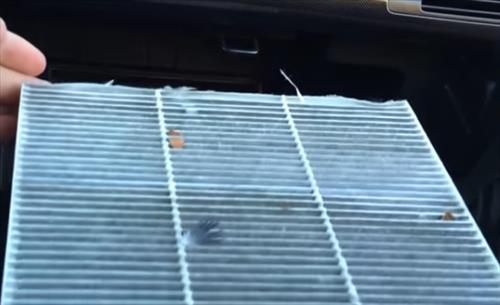
4. Removing the Old Cabin Filter
Once the housing cover is removed, you'll see the old cabin filter. Note the direction of airflow, usually indicated by an arrow printed on the filter frame. This is crucial for installing the new filter correctly. Gently slide the old filter out of the housing. You might be surprised (and perhaps a bit disgusted) by the amount of accumulated debris – leaves, dust, insects – that the filter has trapped. This underscores the importance of regular replacement.
Before installing the new filter, take a moment to inspect the filter housing for any loose debris. You can use a small vacuum cleaner or a brush to clean out any remaining dust or leaves. This ensures optimal performance of the new filter.
5. Installing the New Cabin Filter
Now, take your new cabin filter and carefully slide it into the housing, ensuring that the airflow arrow on the filter aligns with the airflow direction indicated on the housing (or the direction you noted when removing the old filter). Forcing the filter is not recommended. If it doesn't slide in easily, double-check the alignment and ensure that the filter is the correct size and type for your vehicle. A properly seated filter will fit snugly within the housing.
6. Reassembling the Cabin Filter Housing and Glove Box
With the new filter in place, reattach the housing cover, ensuring that the clips or screws are securely fastened. Then, carefully reattach the glove box retainers. This often involves aligning the tabs and pushing them into place until they click. Finally, reconnect the glove box damper, ensuring that it is properly seated in its mounting point. Test the glove box to ensure that it opens and closes smoothly. If it doesn't, double-check the retainers and the damper connection.
7. Final Checks and Disposal
Once everything is reassembled, perform a final check to ensure that the glove box is functioning correctly and that there are no loose parts or unusual noises. Dispose of the old cabin filter properly, ideally by recycling it if facilities are available. Finally, take a moment to appreciate the improved air quality within your vehicle. You've successfully completed a simple, yet impactful, maintenance task.
The Science Behind Cabin Filter Replacement
Beyond the practical steps, understanding the underlying principles makes the process even more rewarding. Cabin filters are typically made of pleated paper or a synthetic material designed to trap particulate matter. Over time, these filters become clogged, reducing their efficiency. This not only restricts airflow but also forces the blower motor to work harder, potentially shortening its lifespan. Furthermore, a dirty filter can become a breeding ground for mold and bacteria, contributing to unpleasant odors and potentially impacting the health of occupants. Regularly replacing the cabin filter ensures optimal air quality, efficient HVAC system performance, and a healthier driving environment.
Frequency of Replacement
While the recommended replacement interval can vary depending on driving conditions and manufacturer recommendations, a good rule of thumb is to replace the cabin filter every 12,000 to 15,000 miles or once a year. If you frequently drive in dusty or polluted environments, you may need to replace it more often. Regular inspection can also help determine the condition of the filter and whether replacement is necessary.
Troubleshooting Common Issues
While the cabin filter replacement process is generally straightforward, some common issues can arise:
- Difficulty releasing the glove box retainers: Ensure you are applying pressure in the correct direction and using the appropriate tool. Refer to your owner's manual for specific instructions.
- Incorrect filter size: Double-check the part number and cross-reference it with your vehicle's VIN.
- Damaged plastic components: Avoid excessive force and use gentle manipulation. If a component breaks, it may need to be replaced.
- Unusual noises after reassembly: Check that all components are securely fastened and properly aligned.
By understanding the process, the underlying principles, and potential troubleshooting steps, you can confidently tackle this maintenance task and enjoy the benefits of cleaner, fresher air in your Honda Accord. This small investment of time and effort contributes significantly to the overall comfort, health, and longevity of your vehicle.