Installation Of A 4.636 Final Drive Gear Set In A Nissan R200 Differential
Installation Of A 4.636 Final Drive Gear Set In A Nissan R200 Differential
The Nissan R200 differential is a popular choice for many Nissan enthusiasts, particularly those looking to upgrade the performance of their vehicles. One common modification is the installation of a new final drive gear set. A 4.636 final drive ratio, in particular, is often chosen to improve acceleration and low-end torque. This article provides a general guide to installing a 4.636 final drive gear set in a Nissan R200 differential. However, it is crucial to understand that this is a complex procedure that should only be undertaken by experienced mechanics or those with a strong mechanical aptitude and access to the necessary tools. Incorrect installation can lead to differential failure and potential damage to your vehicle.
Disclaimer
This guide is for informational purposes only and should not be considered a substitute for professional mechanical advice. The author and publisher assume no responsibility for any damage or injury that may result from attempting this procedure. Always consult with a qualified mechanic before undertaking any automotive repairs or modifications. If you are not comfortable with any of the steps outlined below, seek professional assistance.
Understanding Final Drive Ratios
Before diving into the installation process, it's essential to understand what a final drive ratio is and how it affects your vehicle's performance. The final drive ratio is the ratio between the number of teeth on the ring gear and the number of teeth on the pinion gear in your differential. This ratio determines how many times the pinion gear must rotate to turn the ring gear (and therefore the wheels) once.
A higher final drive ratio (like 4.636) means that the pinion gear rotates more times for each rotation of the ring gear. This results in increased torque multiplication, leading to quicker acceleration. However, it also means that the engine will be running at a higher RPM at a given speed, potentially impacting fuel economy and top speed. Conversely, a lower final drive ratio (like 3.54) will result in lower RPMs at a given speed, improving fuel economy and potentially increasing top speed, but sacrificing acceleration.
Choosing the right final drive ratio depends on your specific needs and driving style. A 4.636 ratio is generally favored for racing, drifting, or any situation where maximizing acceleration is the priority. For daily driving or long highway commutes, a lower ratio might be a better choice.
Tools and Materials Required
The following tools and materials are typically required for a 4.636 final drive gear set installation in a Nissan R200 differential:
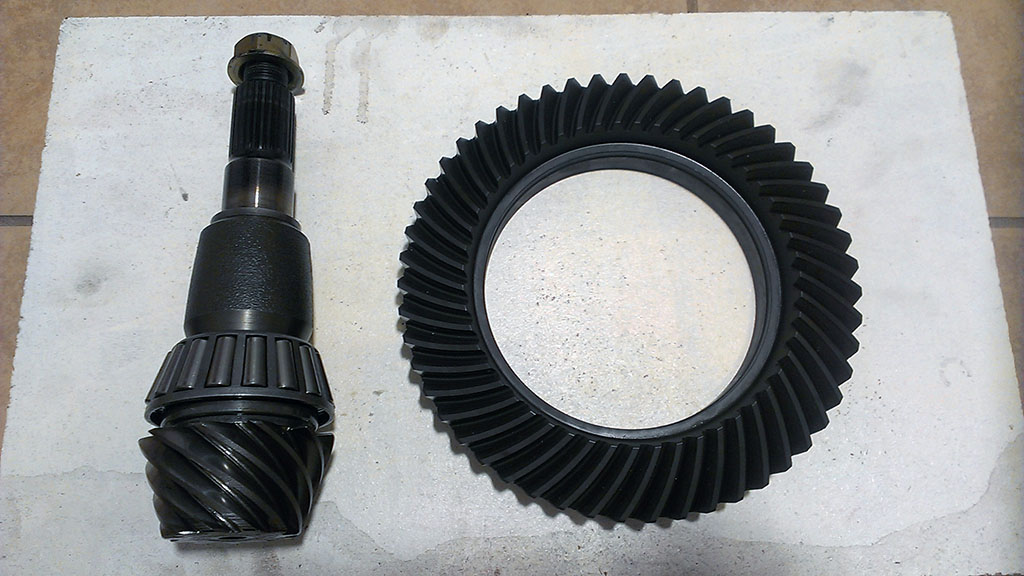
- New 4.636 final drive gear set (ring gear and pinion gear)
- New differential bearings (pinion and carrier bearings)
- New pinion seal
- Differential fluid
- Bearing press
- Dial indicator with magnetic base
- Torque wrench (capable of measuring low and high torque values)
- Case spreader (specific to the R200 differential, if required)
- Pinion depth setting tools (shims, etc.)
- Ring gear bolt locking compound
- Various sockets and wrenches
- Pry bars
- Hammer
- Punch or drift
- Brake cleaner
- Shop rags
- Safety glasses
- Gloves
Ensure you have all the necessary tools and materials before starting the installation process. Trying to complete the job with inadequate tools can lead to frustration, damage to components, and potential injury.
Installation Procedure (General Outline)
The following is a general outline of the installation procedure. Specific steps may vary depending on the year and model of your Nissan R200 differential. Always consult a reputable service manual for your specific vehicle before proceeding.
Step 1: Differential Removal
Remove the differential from the vehicle. This typically involves disconnecting the driveshaft, axles, and any supporting hardware. Drain the existing differential fluid.
Step 2: Disassembly
Carefully disassemble the differential. This includes removing the differential cover, carrier assembly, and pinion gear. Pay close attention to the order of components and their orientation. Take pictures or make notes to aid in reassembly. The pinion nut often requires significant force to remove.
Step 3: Bearing Removal and Installation
Remove the old bearings from the pinion gear and carrier assembly using a bearing press. Inspect the bearing surfaces for any signs of wear or damage. Install the new bearings onto the pinion gear and carrier assembly using the bearing press. Ensure the bearings are seated correctly.
Step 4: Pinion Depth Adjustment
This is arguably the most critical step in the installation process. Pinion depth refers to the distance between the pinion gear and the ring gear. Proper pinion depth is essential for correct gear mesh and long-term durability. Use pinion depth setting tools (shims) to achieve the correct pinion depth as specified in the service manual. This often requires multiple iterations of assembly, measurement, and adjustment.
Step 5: Ring Gear Installation
Clean the ring gear and the differential carrier. Heat the ring gear (according to manufacturer's instructions) and carefully install it onto the differential carrier. Secure the ring gear to the carrier using new ring gear bolts and locking compound, torquing them to the specification in the service manual. Ensure the bolts are tightened in a crisscross pattern to evenly distribute the load.
Step 6: Carrier Preload Adjustment
Install the carrier assembly into the differential housing. Adjust the carrier preload using shims or adjusters to achieve the correct amount of resistance when rotating the carrier. This helps to maintain proper gear mesh and prevent premature wear. A case spreader might be needed for this step to ease carrier installation.
Step 7: Gear Mesh Pattern Check
Apply a thin coat of gear marking compound to the ring gear teeth. Rotate the pinion gear to create a gear mesh pattern. Inspect the pattern to ensure it is centered on the ring gear teeth. Adjust pinion depth and carrier preload as needed to achieve the correct gear mesh pattern. This step is crucial for ensuring long-term reliability.
Step 8: Pinion Nut Torque
Install a new pinion seal. Install the pinion gear and nut, and crush the crush sleeve until the proper torque is achieved. Proper torque helps with pinion preload. The torque specification should be found in the service manual for your vehicle.
Step 9: Final Assembly
Reassemble the differential cover and any other components that were removed during disassembly. Apply a new gasket or sealant to the differential cover before installation.
Step 10: Differential Installation and Fluid Fill
Reinstall the differential into the vehicle. Reconnect the driveshaft, axles, and any supporting hardware. Fill the differential with the recommended type and amount of differential fluid. Check for leaks.
Important Considerations
- Service Manual: Always refer to the service manual for your specific vehicle. The service manual will provide detailed instructions, torque specifications, and other critical information.
- Cleanliness: Maintain a clean work environment. Dirt and debris can contaminate the differential and cause premature wear.
- Torque Specifications: Always use a torque wrench and torque all bolts to the specified torque values. Overtightening or undertightening bolts can lead to component failure.
- Gear Mesh Pattern: The gear mesh pattern is a critical indicator of proper setup. Take the time to carefully inspect and adjust the gear mesh pattern.
- Break-In Procedure: Follow a proper break-in procedure after installing the new gear set. This typically involves driving conservatively for the first few hundred miles to allow the gears to properly mesh and wear in. Avoid hard acceleration and excessive loads during the break-in period.
Troubleshooting
If you encounter any problems during the installation process, consult a qualified mechanic. Some common issues include:
- Noise: Excessive noise from the differential can indicate improper gear mesh, worn bearings, or low fluid level.
- Vibration: Vibration can be caused by unbalanced components, loose hardware, or a damaged driveshaft.
- Leaks: Leaks can be caused by a damaged seal or gasket.
Conclusion
Installing a 4.636 final drive gear set in a Nissan R200 differential can be a rewarding upgrade for those seeking improved acceleration. However, it is a complex procedure that requires specialized tools, knowledge, and experience. By following the steps outlined in this guide and consulting a reputable service manual, you can increase your chances of a successful installation. If you are not comfortable with any of the steps, seek professional assistance from a qualified mechanic. Remember to prioritize safety and take your time to ensure the job is done correctly. Proper installation and maintenance are key to ensuring the long-term performance and reliability of your Nissan R200 differential.