2008 Honda Civic Headlight Bulb Replacement
Replacing a headlight bulb on a 2008 Honda Civic might seem daunting, but it's a straightforward task that most car owners can tackle with basic tools and a little patience. A properly functioning headlight is crucial for safe driving, especially at night or in inclement weather. This guide provides a comprehensive walkthrough, catering to both DIY enthusiasts and professional mechanics, ensuring a successful bulb replacement on your 2008 Honda Civic.
Understanding Your 2008 Civic's Headlight System
The 2008 Honda Civic typically uses an H11 bulb for the low beams and a 9005 (HB3) bulb for the high beams. While variations might exist depending on the specific trim level (e.g., Si models may have slightly different setups), these are the most common. Before starting, always verify the correct bulb type for your specific vehicle by consulting your owner's manual or a reliable online parts database. Using the wrong bulb can lead to improper fitment, reduced light output, and even damage to the headlight assembly or electrical system.
Tools and Materials Needed
To replace your headlight bulb, you'll need the following:
- New H11 or 9005 (HB3) headlight bulb(s) (depending on which beam you're replacing)
- Gloves (to protect the bulb and your hands)
- Small flathead screwdriver (may be needed to release clips)
- Possibly a ratchet with an extension and a socket (depending on access)
- Work light or flashlight
Important Safety Note: Always disconnect the negative battery terminal before working on any electrical components. This prevents accidental shorts and potential electrical shock.
Step-by-Step Headlight Bulb Replacement
- Access the Headlight Assembly: Open the hood of your 2008 Honda Civic. Locate the headlight assembly on the side you're replacing the bulb on. Depending on the model and any aftermarket modifications, you may need to remove some plastic covers or air intake components to gain clear access to the back of the headlight housing.
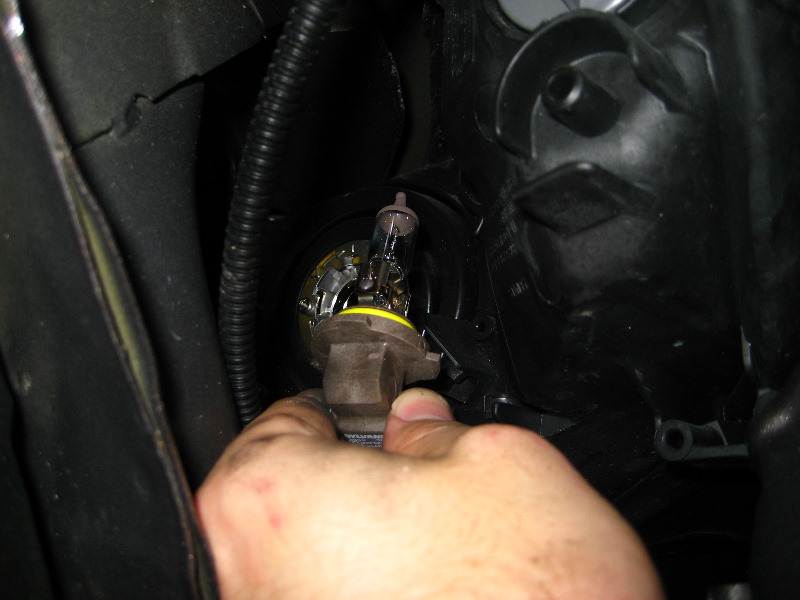
- Remove the Electrical Connector: Locate the electrical connector attached to the back of the headlight bulb. Gently squeeze the connector's release tab (if present) and pull the connector straight back. Avoid pulling on the wires, as this could damage the connector or wiring harness.
- Remove the Bulb Retaining Mechanism: The bulb is held in place by either a wire clip or a rotating collar.
- Wire Clip: If there's a wire clip, gently press inwards and unhook it from its securing points. Remember the orientation of the clip for reinstallation.
- Rotating Collar: If there's a rotating collar, rotate it counterclockwise to release the bulb.
- Remove the Old Bulb: Carefully remove the old headlight bulb. Avoid touching the glass portion of the new bulb with your bare hands. The oils from your skin can create hot spots on the bulb, shortening its lifespan and potentially causing premature failure. If you do touch the bulb, clean it with rubbing alcohol before installation.
- Install the New Bulb: Align the new bulb with the opening and insert it into the headlight housing. Ensure the bulb is seated correctly and securely.
- Secure the Bulb Retaining Mechanism:
- Wire Clip: Reattach the wire clip, ensuring it's properly secured.
- Rotating Collar: Rotate the collar clockwise to lock the bulb in place.
- Reconnect the Electrical Connector: Reconnect the electrical connector to the back of the bulb. Make sure it clicks into place, indicating a secure connection.
- Test the Headlight: Before reassembling anything, reconnect the negative battery terminal and turn on the headlights to ensure the new bulb is working correctly. If the bulb doesn't light up, double-check the connections and the bulb's orientation.
- Reassemble: Reinstall any plastic covers or air intake components that were removed to access the headlight assembly.
Troubleshooting and Additional Tips
- Bulb Doesn't Work: If the new bulb doesn't work, check the fuse for the headlights. A blown fuse is a common cause.
- Condensation in Headlight: If you notice condensation inside the headlight housing, it may indicate a leak in the seal. Consider replacing the headlight assembly or resealing it.
- Upgrade Considerations: While replacing your bulbs, you might consider upgrading to LED headlight bulbs. However, ensure that the LED bulbs are compatible with your 2008 Honda Civic's electrical system and are properly focused to avoid blinding other drivers. Incorrectly installed or designed LEDs can cause glare and compromise safety.
By following these steps, you can successfully replace the headlight bulb on your 2008 Honda Civic and maintain optimal visibility for safe driving. Remember to consult your owner's manual or a trusted mechanic if you encounter any difficulties.