2010 Honda Crv Belt Tensioner Replacement
The 2010 Honda CR-V: a paragon of reliability and practicality. But even the most dependable steeds require occasional maintenance. A common chore many CR-V owners face is the dreaded belt tensioner replacement. Let's dive into what you need to know, exploring the subtle differences between models and engines to keep your CR-V humming smoothly.
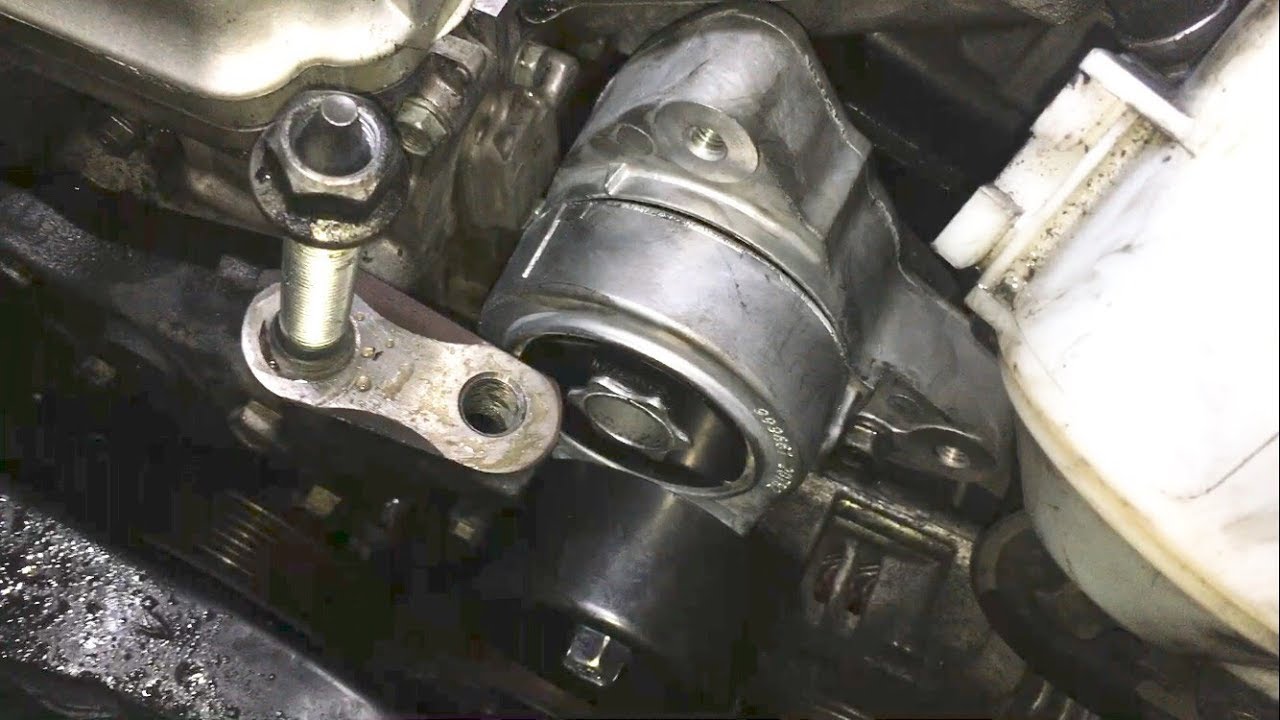
Understanding the 2010 CR-V Belt Tensioner
The belt tensioner, a seemingly simple component, plays a crucial role in maintaining proper accessory drive belt tension. This ensures the alternator, power steering pump, and AC compressor all function optimally. A failing tensioner can lead to belt slippage, noise (a tell-tale squealing), and ultimately, a breakdown. The 2010 CR-V came with primarily two engine options impacting the tensioner: the 2.4L i-VTEC inline-4 (K24Z1) and the less common, export-only 2.0L i-VTEC inline-4 (R20A).
Engine-Specific Considerations
While the overall function remains the same, slight variations exist between the tensioners used on the 2.4L and 2.0L engines. The 2.4L is far more prevalent in the US and Canada, so that's our main focus. However, owners of the 2.0L models should verify parts compatibility carefully, as sourcing components can be more challenging. Accessing the tensioner on the 2.4L is generally straightforward, but the 2.0L's tighter engine bay (depending on trim and market) can present slightly increased difficulty.
Specification Comparison
| Component | 2.4L i-VTEC (K24Z1) | 2.0L i-VTEC (R20A) |
|---|---|---|
| Part Number (OEM Example) | 31170-RZA-A01 | 31170-R1A-A01 (Verify Application) |
| Pulley Diameter (Approximate) | ~70mm | ~70mm (May Vary) |
| Mounting Bolts | Typically 12mm or 14mm | Typically 12mm or 14mm |
| Estimated Labor Time (DIY) | 1-2 Hours | 1.5-2.5 Hours (Potentially More Difficult Access) |
DIY vs. Professional Installation
Replacing the belt tensioner on a 2010 CR-V is within reach for the moderately skilled DIY mechanic. However, certain considerations apply. You'll need basic hand tools, including a socket set, wrenches, and potentially a breaker bar if bolts are seized. Crucially, you'll need to know how to properly relieve tension on the belt and ensure it's routed correctly upon reinstallation. Improper belt routing can lead to serious engine damage.
DIY Replacement: Pros & Cons
- Pros: Cost savings on labor, satisfaction of performing the repair yourself, opportunity to inspect other components (e.g., belt condition, pulleys).
- Cons: Requires mechanical skill and tools, potential for errors leading to further damage, time commitment.
Professional Installation: Pros & Cons
- Pros: Guaranteed workmanship, reduced risk of errors, convenient and time-saving.
- Cons: Higher cost due to labor charges, potential for upselling of unnecessary services.
Real-World Driving Impressions After Replacement
A properly functioning belt tensioner makes a noticeable difference. After replacement, expect smoother engine operation, the disappearance of any squealing or chirping noises, and improved performance from accessories like the power steering and air conditioning. A worn tensioner can cause the belt to slip, reducing the efficiency of these components. Many owners report a significant improvement in AC cooling performance after replacing a failing tensioner, especially in hot climates.
Prior to replacement, many owners also complain about a vibrating noise emanating from the engine bay, especially at idle or low RPMs. This is a common symptom of a failing tensioner, and its absence post-replacement is a strong indicator of a successful repair.
Choosing the Right Replacement Part
When sourcing a replacement tensioner, you have options: OEM (Original Equipment Manufacturer), aftermarket, or even used parts. While OEM parts generally offer the best quality and fitment, they also come with a premium price tag. Reputable aftermarket brands can provide a cost-effective alternative, but it's crucial to research brands and read reviews to ensure quality and durability. Steering clear of unbranded or excessively cheap options is generally advisable, as they may fail prematurely.
Consider replacing the accessory drive belt at the same time. Since you're already accessing the area, it's a good opportunity to replace a wear item that likely has similar mileage to the old tensioner. This can save you time and labor in the long run.
Tips and Tricks
- Penetrating Oil is Your Friend: Spraying penetrating oil on the tensioner mounting bolts a day or two before the repair can significantly ease removal.
- Torque to Spec: Always torque the mounting bolts to the manufacturer's specified torque. Overtightening can damage the tensioner or engine block.
- Belt Routing Diagram: Before removing the old belt, take a picture or sketch a diagram of the belt routing. This will prevent confusion during reinstallation.
Replacing your 2010 Honda CR-V's belt tensioner is a manageable task that can significantly improve your driving experience and prevent costly breakdowns. With the right tools, knowledge, and a little patience, you can keep your CR-V running smoothly for years to come.
Remember to always consult your vehicle's repair manual for specific instructions and torque specifications.
Final Note: So, aftermarket or OEM tensioner – what's *really* the best choice for the long haul? Let the debate begin!