
2012 Chevy Cruze Valve Cover Torque Specs
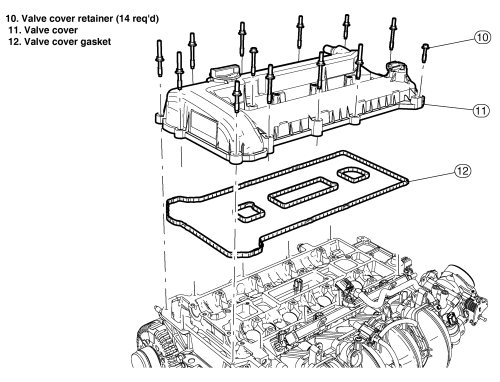
Hey folks, having a bit of trouble with your 2012 Chevy Cruze's valve cover? Leaks around the valve cover gasket are a common issue, and often, the problem stems from improper torque. Overtightening can warp the cover, while undertightening won't create a proper seal. Let's get you sorted out!
Understanding the Problem: Why Torque Matters
The valve cover's job is to seal the top of the engine, preventing oil from leaking out and protecting the valve train from debris. Achieving a proper seal relies heavily on consistent and accurate torque applied to the valve cover bolts. Think of it like this: each bolt needs to apply an equal amount of clamping force to compress the gasket evenly. If one bolt is too tight, it can distort the gasket and the valve cover itself. Conversely, a loose bolt will leave a gap, allowing oil to seep out. This is why using the correct torque specifications is absolutely crucial.
Common symptoms of a valve cover leak include:
- The unmistakable smell of burning oil.
- Visible oil leaks around the valve cover gasket. You might see oil dripping down the engine block.
- Low oil level. You'll need to check your dipstick regularly.
- Oil residue on spark plugs.
- Rough engine running or misfires (in severe cases, if oil fouls the spark plugs).
The 2012 Chevy Cruze Valve Cover Torque Specs (1.4L Turbo)
Alright, let's get down to brass tacks. For the 2012 Chevy Cruze with the 1.4L turbocharged engine (the most common engine), the valve cover torque specification is:
89 lb-in (inch-pounds) or 10 Nm (Newton-meters).
Make absolutely sure you're using inch-pounds (lb-in), not foot-pounds (lb-ft). There's a big difference! Foot-pounds are a much larger unit of measurement, and you'll easily overtighten the bolts if you make that mistake.
Why are Inch-Pounds Used?
Valve cover bolts are typically small and designed to be tightened with precision. Using foot-pounds would make it difficult to achieve the required low torque value accurately.
Tools You'll Need
To tackle this job, you'll need a few essential tools:
- Torque Wrench: This is the most important tool. Get one that reads in inch-pounds and is accurate. A 1/4" drive torque wrench is ideal for this application. Make sure it's properly calibrated.
- Socket Set: You'll need the correct size socket for the valve cover bolts. Typically, this is a 10mm socket. A deep socket might be helpful if space is tight.
- Ratchet: To drive the socket.
- Extension: An extension can help you reach those hard-to-get-to bolts.
- New Valve Cover Gasket: If you're removing the valve cover, it's always a good idea to replace the gasket. A fresh gasket will ensure a proper seal.
- Cleaning Supplies: Brake cleaner or degreaser to clean the valve cover and cylinder head mating surfaces.
- Rags: For cleaning up any spills.
- Gloves: To protect your hands.
Step-by-Step Guide to Replacing and Torquing the Valve Cover
Here's a general guide to replacing and torquing the valve cover. Always consult your vehicle's repair manual for specific instructions and safety precautions.
- Disconnect the Negative Battery Cable: Safety first! Disconnecting the battery prevents any accidental electrical shorts.
- Remove Any Obstructions: You might need to remove air intake components, hoses, or wiring harnesses to access the valve cover. Take pictures as you go to remember where everything goes.
- Remove the Valve Cover Bolts: Carefully loosen and remove the valve cover bolts. Keep track of them, as they might be different lengths.
- Remove the Valve Cover: Gently pry the valve cover off. It might be stuck due to the old gasket. Avoid using excessive force to prevent damage.
- Clean the Mating Surfaces: Thoroughly clean the valve cover and cylinder head mating surfaces. Remove any old gasket material, oil, or debris. Use a plastic scraper if necessary to avoid scratching the aluminum.
- Install the New Valve Cover Gasket: Place the new gasket onto the valve cover. Make sure it's properly seated in the groove.
- Reinstall the Valve Cover: Carefully position the valve cover onto the cylinder head.
- Install the Valve Cover Bolts: Hand-tighten the valve cover bolts in a star pattern. This helps to distribute the pressure evenly.
- Torque the Bolts to Specification: Using your torque wrench, tighten the bolts to 89 lb-in (10 Nm) in a star pattern. Go in small increments (e.g., 45 lb-in then 89 lb-in) to ensure even clamping.
- Reinstall Any Removed Components: Reconnect any hoses, wiring harnesses, or air intake components that you removed earlier.
- Reconnect the Negative Battery Cable: Reconnect the negative battery cable.
- Start the Engine and Check for Leaks: Start the engine and let it run for a few minutes. Carefully inspect the valve cover for any oil leaks.
Important Considerations & Best Practices
- Torque Sequence: While a star pattern is a good general guideline, consult your vehicle's repair manual for the specific torque sequence recommended for your Cruze.
- Bolt Condition: Inspect the valve cover bolts for any damage or corrosion. Replace any damaged bolts.
- Valve Cover Condition: Check the valve cover for any cracks or warping. A warped valve cover won't seal properly, even with a new gasket and correct torque.
- Don't Over-Tighten: Overtightening can strip the threads in the cylinder head or warp the valve cover.
- Use a Quality Gasket: Don't cheap out on the gasket. A high-quality gasket will provide a better seal and last longer.
- Let the Engine Cool: Work on the engine when it's cold to avoid burns.
Estimated Repair Cost
The cost of this repair can vary depending on whether you do it yourself or take it to a mechanic. Here's a rough estimate:
- DIY: $20-$50 for a new valve cover gasket, plus the cost of tools if you don't already have them.
- Mechanic: $150-$300, including parts and labor. This can vary depending on the shop's labor rate and the complexity of the job. If the valve cover itself needs replacing, the cost will be higher. A new valve cover can range from $50-$200 depending on the brand and source.
When to Seek Professional Help
While this is a repair you can often tackle yourself, there are times when it's best to consult a professional mechanic:
- If you're not comfortable working on your car.
- If you don't have the necessary tools.
- If you suspect there's more serious damage to the engine.
- If you've tried replacing the gasket and torquing the bolts correctly, but the leak persists.
By following these guidelines and using the correct torque specifications, you should be able to resolve your 2012 Chevy Cruze's valve cover leak. Good luck, and happy wrenching!