
2015 Chevy Cruze Valve Cover Torque Specs
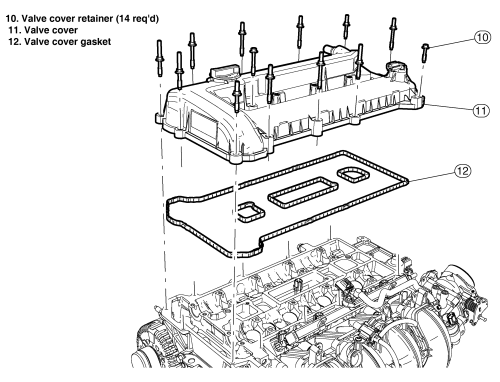
Alright, let's dive into the often-overlooked, but critically important, topic of valve cover torque specs for the 2015 Chevy Cruze. Whether you're replacing a leaky gasket, performing some engine maintenance, or just curious about the inner workings of your 1.4L turbo (likely the engine we're discussing, though these principles apply broadly), understanding the correct torque is crucial to prevent leaks, damage, and future headaches. Ignoring torque specifications is a surefire way to create more problems than you solve.
Understanding Torque and Why It Matters
First, let's clarify what we mean by torque. Torque is a twisting force that tends to cause rotation. In the context of tightening bolts, it's the amount of force applied multiplied by the distance from the axis of rotation (i.e., the length of the wrench). Torque is measured in units like Newton-meters (Nm) or pound-feet (lb-ft). We'll primarily use lb-ft in this article, as that's the most common unit found on torque wrenches in the US.
Why is precise torque so essential? Because the valve cover, when properly sealed, prevents oil leaks, maintains proper crankcase pressure, and keeps contaminants out of the engine. Over-tightening can damage the valve cover itself, strip the threads in the cylinder head (a very bad situation!), or crush the gasket, leading to leaks. Under-tightening, of course, also leads to leaks.
2015 Chevy Cruze (1.4L Turbo) Valve Cover Torque Specs
Now, for the numbers you came here for. For the 2015 Chevy Cruze equipped with the 1.4L turbocharged engine (engine code LUJ or LUV, check your VIN if unsure), the valve cover torque specification is 89 in-lbs or 7.4 ft-lbs.
Note the difference between inch-pounds (in-lbs) and foot-pounds (ft-lbs)! These are different units and easily confused. An inch-pound is a much smaller unit of torque. Make sure your torque wrench is set to the correct units. Using a foot-pound setting when you should be using inch-pounds will almost certainly result in over-torquing and damage.
Important Consideration: Always consult your specific vehicle's service manual for the most accurate information. While the 1.4L turbo is common, there might be slight variations or revisions depending on the production date or specific trim level. If you have access to AlldataDIY, Mitchell OnDemand, or a similar repair database, that's your best resource.
Tools You'll Need
To properly torque the valve cover, you'll need the following tools:
- Torque Wrench: A 1/4" or 3/8" drive torque wrench that can accurately measure torque in the range of 5-10 ft-lbs (or equivalent in Nm). A digital torque wrench is a great investment for its accuracy and ease of use. Beam-type torque wrenches are also acceptable, but require more careful reading.
- Socket Set: A socket set with the appropriate size socket for the valve cover bolts. Typically, this is a metric socket, likely around 8mm or 10mm.
- Extension: A socket extension can be helpful to reach some of the valve cover bolts.
- Clean Rags: To clean any oil or debris from the mating surfaces.
- New Valve Cover Gasket (Optional but Recommended): If you're removing the valve cover, it's best practice to replace the gasket.
- Service Manual (Highly Recommended): For torque specs, bolt tightening sequence, and other important information specific to your vehicle.
The Correct Tightening Sequence
Just as important as the torque specification is the tightening sequence. Tightening bolts in the wrong order can distort the valve cover and cause leaks. The ideal tightening sequence will distribute the clamping force evenly across the gasket surface.
While a specific diagram is best found in your service manual, a general rule of thumb for valve covers with multiple bolts is to tighten them in a criss-cross pattern, starting from the center and working your way outwards. Imagine drawing an "X" repeatedly across the valve cover, gradually tightening each bolt. This ensures even pressure across the gasket.
General Criss-Cross Example: (This is a simplified example; your specific valve cover may have more or fewer bolts, so consult your service manual.)
- Start with the center bolt.
- Tighten the bolt diagonally opposite the center bolt.
- Tighten a bolt near one end.
- Tighten the bolt at the opposite end, diagonally across.
- Continue this criss-cross pattern until all bolts are snug.
Important: Do not fully tighten any bolt in the first pass. Tighten all bolts to about half the specified torque in the correct sequence. Then, repeat the sequence and tighten all bolts to the full specified torque.
Step-by-Step Procedure
Here's a general outline of the procedure. Always refer to your vehicle's service manual for detailed instructions specific to your model.
- Preparation: Disconnect the negative battery cable. Allow the engine to cool completely. This is crucial to avoid burns and ensure accurate torque readings.
- Removal: Carefully remove any components obstructing access to the valve cover, such as hoses, wiring harnesses, or the air intake. Label and photograph everything before disconnecting it to ensure correct reassembly.
- Cleanliness: Thoroughly clean the valve cover and cylinder head mating surfaces. Use a clean rag to remove any old gasket material, oil, or debris. Be extremely careful not to get any debris inside the engine.
- Gasket Installation: If replacing the gasket, install the new gasket onto the valve cover. Ensure it is properly seated in the groove. Some gaskets require a sealant to be applied. Check your service manual or the gasket packaging for instructions.
- Valve Cover Installation: Carefully position the valve cover onto the cylinder head, aligning it with the bolt holes.
- Bolt Installation: Install the valve cover bolts by hand, tightening them until they are snug but not tight.
- Torqueing: Using your torque wrench, tighten the bolts in the specified criss-cross sequence to the torque specification of 7.4 ft-lbs (89 in-lbs). Remember to tighten in stages, first to half torque, then to full torque.
- Reassembly: Reconnect all components that were removed during the removal process. Ensure all hoses and wiring harnesses are securely attached.
- Final Check: Double-check that everything is properly connected and tightened.
- Reconnect Battery: Reconnect the negative battery cable.
- Start Engine: Start the engine and check for leaks around the valve cover. Monitor the engine for any unusual noises or issues.
Potential Problems and Solutions
Here are some common issues you might encounter and how to address them:
- Stripped Threads: If you over-tighten a bolt and strip the threads in the cylinder head, you'll need to repair the threads. Options include using a thread repair kit (like a Helicoil) or, in more severe cases, replacing the cylinder head. This is a complex repair, and you might want to consult a professional mechanic.
- Leaks After Installation: If you still have leaks after installing the valve cover, double-check the following:
- Torque: Ensure all bolts are torqued to the correct specification.
- Tightening Sequence: Verify that you followed the correct tightening sequence.
- Gasket Condition: Inspect the gasket for damage or improper installation.
- Mating Surfaces: Make sure the mating surfaces are clean and free of debris.
- Valve Cover Cracks: Inspect the valve cover itself for cracks or damage.
- Broken Bolts: If a bolt breaks during tightening, use a bolt extractor to remove the broken piece from the cylinder head.
Final Thoughts
Torquing the valve cover on your 2015 Chevy Cruze might seem like a simple task, but it's a critical one. Paying attention to the torque specifications, using the correct tools, and following the correct tightening sequence will ensure a proper seal and prevent future problems. Always prioritize accuracy and cleanliness, and don't hesitate to consult a service manual or a professional mechanic if you're unsure about any step in the process. Good luck, and happy wrenching!