
7 Pin Rv Connector Wiring
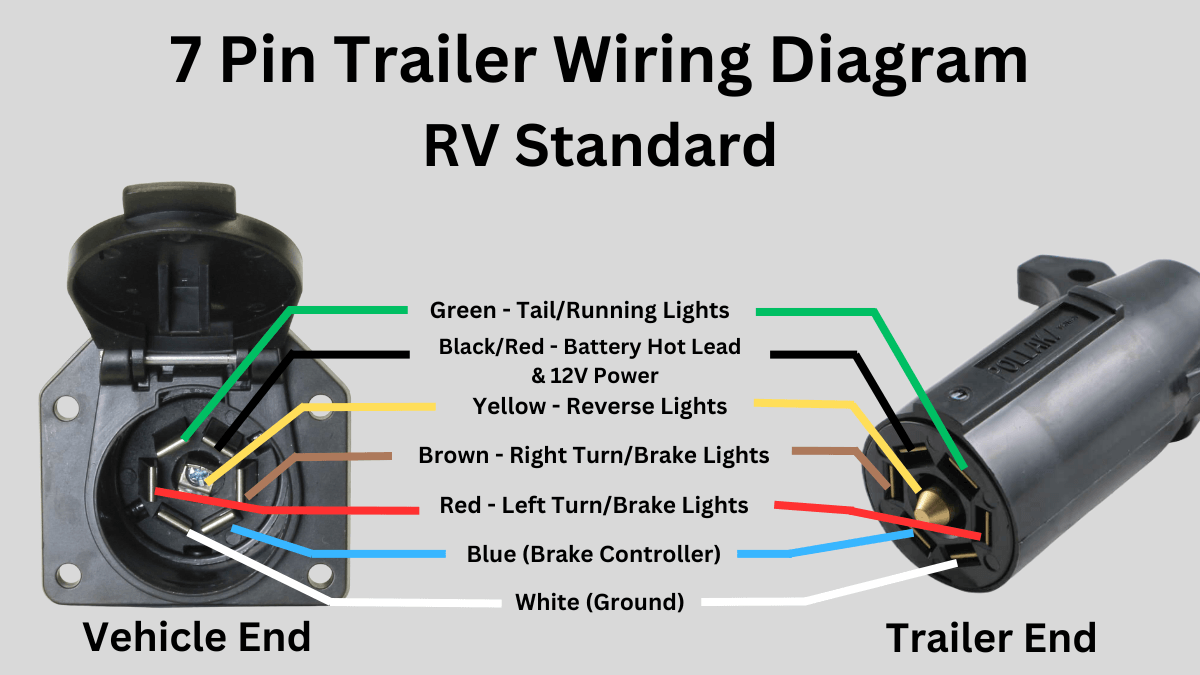
The 7-pin RV connector, also known as a 7-way blade connector, is the unsung hero connecting your tow vehicle to your trailer. It’s a crucial component for safe and legal towing, providing power for essential trailer functions like lights, brakes, and auxiliary charging. Understanding its wiring is paramount for DIY maintenance, troubleshooting, and ensuring a safe journey on the road.
The 7 Pins: A Detailed Breakdown
Let's dive into the specifics of each pin's function within the 7-pin RV connector. The standard configuration follows the SAE J560 standard, ensuring compatibility across different vehicle and trailer manufacturers. It's important to note that while this is the standard, slight variations might exist, so always double-check your vehicle's documentation.
1. Ground (White Wire)
The white wire serves as the ground connection for the entire electrical system. A secure and clean ground is absolutely critical for proper function of all other circuits. A poor ground can lead to flickering lights, brake controller malfunction, and overall electrical instability. Regularly inspect and clean the ground connection, ensuring it's free from corrosion and securely fastened to the vehicle and trailer frame. Consider using dielectric grease to prevent future corrosion.
2. Tail Lights (Brown Wire)
The brown wire controls the tail lights, running lights, and side marker lights on your trailer. These lights are essential for visibility, especially during nighttime driving. If your trailer lights are dim or not working, start by checking the connection at the 7-pin connector and tracing the brown wire for any breaks or shorts. LED upgrades for tail lights are increasingly popular due to their longevity and lower power consumption.
3. Left Turn/Stop Light (Yellow Wire)
The yellow wire handles the left turn signal and left brake light on the trailer. This dual functionality means the same wire carries both signals. This is a common point of failure, particularly if the trailer wiring is exposed to the elements. Ensure proper insulation and protection of this wire to prevent shorts. If you're experiencing issues with the left turn signal or brake light, this should be one of the first wires you inspect.
4. Right Turn/Stop Light (Green Wire)
Mirroring the function of the yellow wire, the green wire controls the right turn signal and right brake light on the trailer. Similar to the yellow wire, its dual purpose makes it susceptible to problems. Regularly checking these lights before each trip is crucial for safety and avoiding potential legal issues.
5. Electric Brakes (Blue Wire)
The blue wire is responsible for activating the electric brakes on your trailer. This is a critical safety feature, especially for heavier trailers. This wire connects to the brake controller in your tow vehicle. The brake controller sends a proportional voltage signal to the trailer brakes based on the deceleration rate of the tow vehicle. It's crucial to have a properly functioning brake controller and a secure connection on the blue wire. Consider investing in a quality brake controller with features like gain adjustment and diagnostics.
6. 12V Auxiliary Power (Red or Black Wire)
The red or black wire (check your vehicle's wiring diagram to confirm the color) provides a 12V DC power source to the trailer. This power can be used to charge the trailer battery, operate interior lights, or power other 12V appliances. It's usually connected directly to the tow vehicle's battery through a fuse or circuit breaker. Ensure the fuse or circuit breaker is properly sized to prevent overloading the circuit. Many modern trailers utilize this connection to maintain battery charge while driving, ensuring the breakaway system remains operational. Some manufacturers utilize a black wire here while others use red, so verifying its proper location is important.
7. Reverse Lights (Purple or Center Pin)
The purple wire, or the center pin in some configurations, activates the reverse lights on the trailer. This wire is connected to the reverse light circuit of the tow vehicle. It's generally a smaller gauge wire as reverse lights typically draw less current than other trailer lights. While less critical than brake or tail lights, working reverse lights improve visibility during backing maneuvers and can be helpful in low-light situations.
Troubleshooting Common Wiring Issues
Diagnosing wiring problems in a 7-pin RV connector requires a systematic approach and a few essential tools. A multimeter is indispensable for checking voltage, continuity, and ground. A test light can also be helpful for quickly identifying if a circuit is receiving power. Begin by visually inspecting the connector and wiring for any signs of damage, corrosion, or loose connections.
- No Lights: Check the ground connection first. A bad ground is the most common cause of lighting problems. Then, check the tow vehicle fuses that control the trailer light circuits.
- Flickering Lights: This is often caused by a loose connection or a corroded contact. Clean the pins on both the vehicle and trailer connectors and apply dielectric grease to prevent further corrosion.
- Brake Controller Not Working: Verify the blue wire connection and ensure the brake controller is properly configured. Check the brake magnets on the trailer for wear or damage.
- Blown Fuses: A blown fuse indicates an overload or short circuit. Identify the cause of the short before replacing the fuse, otherwise, it will likely blow again.
When troubleshooting, it's helpful to use a 7-pin trailer tester. This device plugs into the tow vehicle's connector and allows you to test each circuit independently, simplifying the diagnostic process. Trailer testers are relatively inexpensive and can save you considerable time and frustration.
DIY Maintenance and Repair Tips
Regular maintenance of your 7-pin RV connector can prevent many common problems. Here are a few DIY tips:
- Clean the Connectors: Use a wire brush or sandpaper to clean the pins on both the vehicle and trailer connectors.
- Apply Dielectric Grease: This prevents corrosion and helps ensure a good electrical connection.
- Inspect the Wiring: Look for any signs of damage, wear, or loose connections. Repair or replace any damaged wires.
- Secure the Wiring: Use zip ties or electrical tape to secure the wiring and prevent it from rubbing against sharp edges.
- Consider a Replacement: If the connector is heavily corroded or damaged, consider replacing it entirely. Replacement connectors are readily available and relatively inexpensive.
Upgrading to LED Lighting
Replacing incandescent trailer lights with LED lights offers several advantages. LEDs are more energy-efficient, brighter, and last significantly longer. They also draw less current, which can reduce the strain on your tow vehicle's electrical system. When upgrading to LEDs, be sure to use LED-compatible flasher relays to ensure proper turn signal function.
Safety First: Breakaway Systems
The breakaway system is a critical safety feature that activates the trailer brakes if the trailer becomes detached from the tow vehicle. This system typically consists of a small battery and a switch that is connected to the tow vehicle. If the trailer becomes detached, the switch is pulled, activating the trailer brakes. Ensure the breakaway battery is fully charged and the switch is functioning properly. Regularly test the breakaway system to ensure it is working correctly.
Conclusion
Understanding the wiring of your 7-pin RV connector is essential for safe and enjoyable towing. By following the troubleshooting tips and maintenance guidelines outlined in this article, you can ensure your trailer lights, brakes, and other electrical systems are functioning properly. Remember, when in doubt, consult a qualified automotive electrician or trailer repair specialist. Proper trailer wiring is not just about convenience; it's about safety and responsibility on the road.