Ac High And Low Pressure Chart
Hey there! Experiencing some trouble with your car's AC? Nothing's worse than a sweltering ride when you're counting on that cool air. A key diagnostic tool that experienced mechanics, and even savvy DIYers, use to troubleshoot AC problems is an AC high and low pressure chart. This chart, along with a manifold gauge set, can give you valuable insights into what's happening inside your system. Let's break down how to use this chart effectively and get your AC blowing cold again.
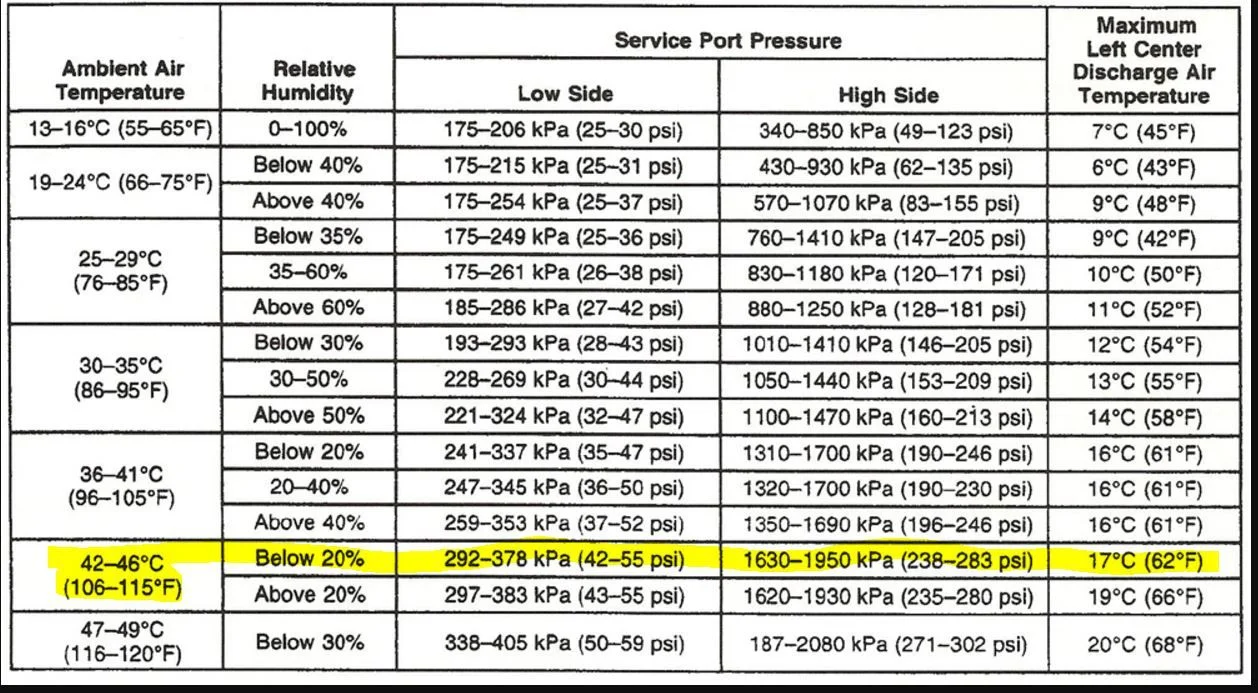
Understanding AC High and Low Pressure Readings
Before we dive into the charts, let's establish some foundational knowledge. Your car's AC system works by circulating refrigerant. This refrigerant absorbs heat from inside your car and releases it outside. The pressure of the refrigerant changes depending on where it is in the system. You'll be concerned with the high-side and low-side pressures.
- High-Side Pressure: This refers to the pressure in the system after the refrigerant has been compressed by the compressor. It's typically measured near the condenser, which is usually located in front of the radiator.
- Low-Side Pressure: This pressure is measured after the refrigerant has passed through the expansion valve or orifice tube and is entering the evaporator, located inside your car's dashboard.
The pressure readings you get will vary based on several factors, most notably the ambient temperature outside. That's why those handy AC pressure charts are crucial - they provide a guideline for what your pressures should be based on the outside temperature.
Tools You'll Need
To properly diagnose your AC system using pressure readings, you'll need a few key tools:
- Manifold Gauge Set: This is the heart of the operation. It consists of two gauges (one for high pressure, one for low pressure), hoses, and connectors that attach to your AC system's service ports. Ensure your gauge set is compatible with the type of refrigerant your vehicle uses (R-134a is most common, but newer vehicles may use R-1234yf).
- AC Thermometer: An accurate thermometer is essential for measuring the vent temperature inside the car and the ambient temperature outside.
- Wrench Set/Sockets: You might need these to access the service ports or remove any covers.
- Safety Glasses and Gloves: Refrigerant can be harmful, so always protect your eyes and skin.
- AC High and Low Pressure Chart: You can find these charts online (search for "R-134a pressure chart" or "R-1234yf pressure chart" depending on your refrigerant) or in some automotive repair manuals. Be sure to use a chart specific to your refrigerant type!
Using the AC Pressure Chart: A Step-by-Step Guide
Here's how to use the AC pressure chart to diagnose common problems:
- Safety First! Wear safety glasses and gloves. Work in a well-ventilated area.
- Locate the Service Ports: Your car's AC system has two service ports – one for the high side and one for the low side. They usually have caps labeled "H" (high) and "L" (low). They are often different sizes to prevent accidental cross-connection.
- Connect the Manifold Gauge Set: Attach the corresponding hoses from your manifold gauge set to the service ports. The high-side hose (usually red) goes to the high-side port, and the low-side hose (usually blue) goes to the low-side port. Make sure the connections are secure.
- Start the Engine and Turn on the AC: Start your car's engine and turn the AC to the maximum cooling setting with the fan on high. Let the system run for a few minutes to stabilize.
- Measure Ambient Temperature and Vent Temperature: Use your AC thermometer to measure the ambient temperature outside your car and the air temperature coming out of the vents inside.
- Read the Gauges: Observe the high-side and low-side pressure readings on your manifold gauge set. Write them down.
- Consult the AC Pressure Chart: Find the row on the chart that corresponds to the ambient temperature you measured. The chart will show a range of acceptable pressures for both the high and low sides.
- Compare Your Readings: Compare your gauge readings to the acceptable ranges on the chart. This is where the diagnosis begins!
Interpreting the Readings: Common Problems and Solutions
Here's a breakdown of what different pressure readings might indicate and some potential solutions. Important: AC system work can be complex. If you are not comfortable working with refrigerant, it's always best to consult a qualified mechanic.
Low Side: Low; High Side: Low
Possible Causes:
Low refrigerant level is the most likely culprit here. There might be a leak in the system.
Possible Solutions:
- Refrigerant Recharge: If the refrigerant is simply low, you can try recharging the system with the appropriate type of refrigerant. Many auto parts stores sell DIY recharge kits. However, be cautious! Overcharging the system can be just as harmful as undercharging.
- Leak Detection: If the refrigerant is consistently low, you need to find and repair the leak. Common leak locations include the compressor, condenser, evaporator, hoses, and fittings. A UV dye test, where dye is injected into the system and then viewed with a UV light, can help pinpoint leaks.
Approximate Repair Costs: A DIY recharge kit might cost $20-$50. A professional leak detection and repair can range from $100 to several hundred dollars, depending on the location and severity of the leak.
Low Side: High; High Side: High
Possible Causes:
Overcharged system, a blockage in the system (like a clogged expansion valve), or a faulty condenser.
Possible Solutions:
- Refrigerant Recovery: If the system is overcharged, you'll need to recover some of the refrigerant. This requires specialized equipment and should be done by a professional.
- Expansion Valve/Orifice Tube Replacement: A clogged expansion valve or orifice tube restricts refrigerant flow. Replacing this component can restore proper system function.
- Condenser Inspection and Replacement: A damaged or clogged condenser can't efficiently dissipate heat, leading to high pressures. Inspect the condenser for damage and replace if necessary.
Approximate Repair Costs: Refrigerant recovery typically costs $50-$100. Expansion valve replacement can range from $150-$300. Condenser replacement can be $200-$500, including parts and labor.
Low Side: Normal; High Side: Low
Possible Causes:
A failing AC compressor. The compressor isn't generating enough pressure.
Possible Solutions:
- Compressor Replacement: Unfortunately, a failing compressor usually needs to be replaced. This is a more involved repair.
Approximate Repair Costs: Compressor replacement is one of the more expensive AC repairs, typically ranging from $500 to $1000+, including the compressor, labor, and potentially other components like the receiver drier.
Low Side: Very Low (Vacuum); High Side: Very High
Possible Causes:
This is a serious issue and often indicates a blockage combined with a failing compressor. The low side is being starved, while the high side is being over-pressurized because the refrigerant can't flow properly.
Possible Solutions:
- Full System Inspection: This scenario requires a thorough inspection of the entire AC system to identify the blockage and the extent of the compressor damage.
- Component Replacement: Expect to replace the compressor, the component causing the blockage (likely the expansion valve or receiver drier), and potentially other parts like hoses that may have been damaged.
Approximate Repair Costs: This is usually one of the most expensive AC repairs, easily exceeding $1000, as it often involves multiple component replacements and extensive labor.
Important Considerations
- Refrigerant Type: Always use the correct type of refrigerant for your vehicle. Using the wrong refrigerant can damage the system.
- System Contamination: If your AC system has been open to the atmosphere for an extended period, it may be contaminated with moisture and air. This can damage the compressor and other components. A vacuum pump is needed to evacuate the system before recharging.
- Electrical Issues: Don't overlook electrical problems! A faulty AC clutch, pressure switch, or wiring can also prevent the AC from working properly. A multimeter can be helpful in diagnosing these issues.
- Vent Temperature: Don't rely solely on pressure readings. The vent temperature is another important indicator of AC system performance. Ideally, the vent temperature should be significantly lower than the ambient temperature (typically 40-50 degrees Fahrenheit lower).
Disclaimer: This information is intended for general guidance only. Diagnosing and repairing AC systems can be complex. If you're not comfortable working on your car's AC, it's always best to consult a qualified mechanic. They have the tools, knowledge, and experience to accurately diagnose the problem and perform the necessary repairs safely and effectively.
Hopefully, this breakdown of AC high and low pressure charts has given you a better understanding of how to diagnose your AC issues! Good luck getting your AC back in tip-top shape!