Air Conditioner Pressure Chart R134a
Keeping your car's air conditioning system in peak condition is crucial for comfortable driving, especially during those sweltering summer months. A vital aspect of AC maintenance involves understanding and monitoring the system's pressure using an R134a pressure chart. This article delves into the intricacies of R134a AC systems, pressure readings, troubleshooting, and best practices for maintaining optimal cooling performance.
Understanding R134a and Automotive AC Systems
R134a, or 1,1,1,2-Tetrafluoroethane, became the standard refrigerant in automotive air conditioning systems following the phase-out of R12 in the mid-1990s. Its widespread adoption stems from its lower ozone depletion potential compared to its predecessor. A typical automotive AC system using R134a consists of several key components:
- Compressor: The heart of the system, responsible for compressing the refrigerant gas.
- Condenser: Dissipates heat from the high-pressure, high-temperature refrigerant gas, turning it into a high-pressure liquid. Located typically in front of the radiator.
- Receiver-Drier/Accumulator: Filters out moisture and debris from the refrigerant and stores liquid refrigerant. The receiver-drier is typically found in systems with a thermal expansion valve, while the accumulator is used in systems with an orifice tube.
- Expansion Valve/Orifice Tube: Controls the flow of refrigerant into the evaporator, causing a pressure drop and subsequent cooling. The expansion valve is a more sophisticated and responsive component than the simpler orifice tube.
- Evaporator: Located inside the cabin, the evaporator absorbs heat from the cabin air, causing the refrigerant to evaporate and cool the air.
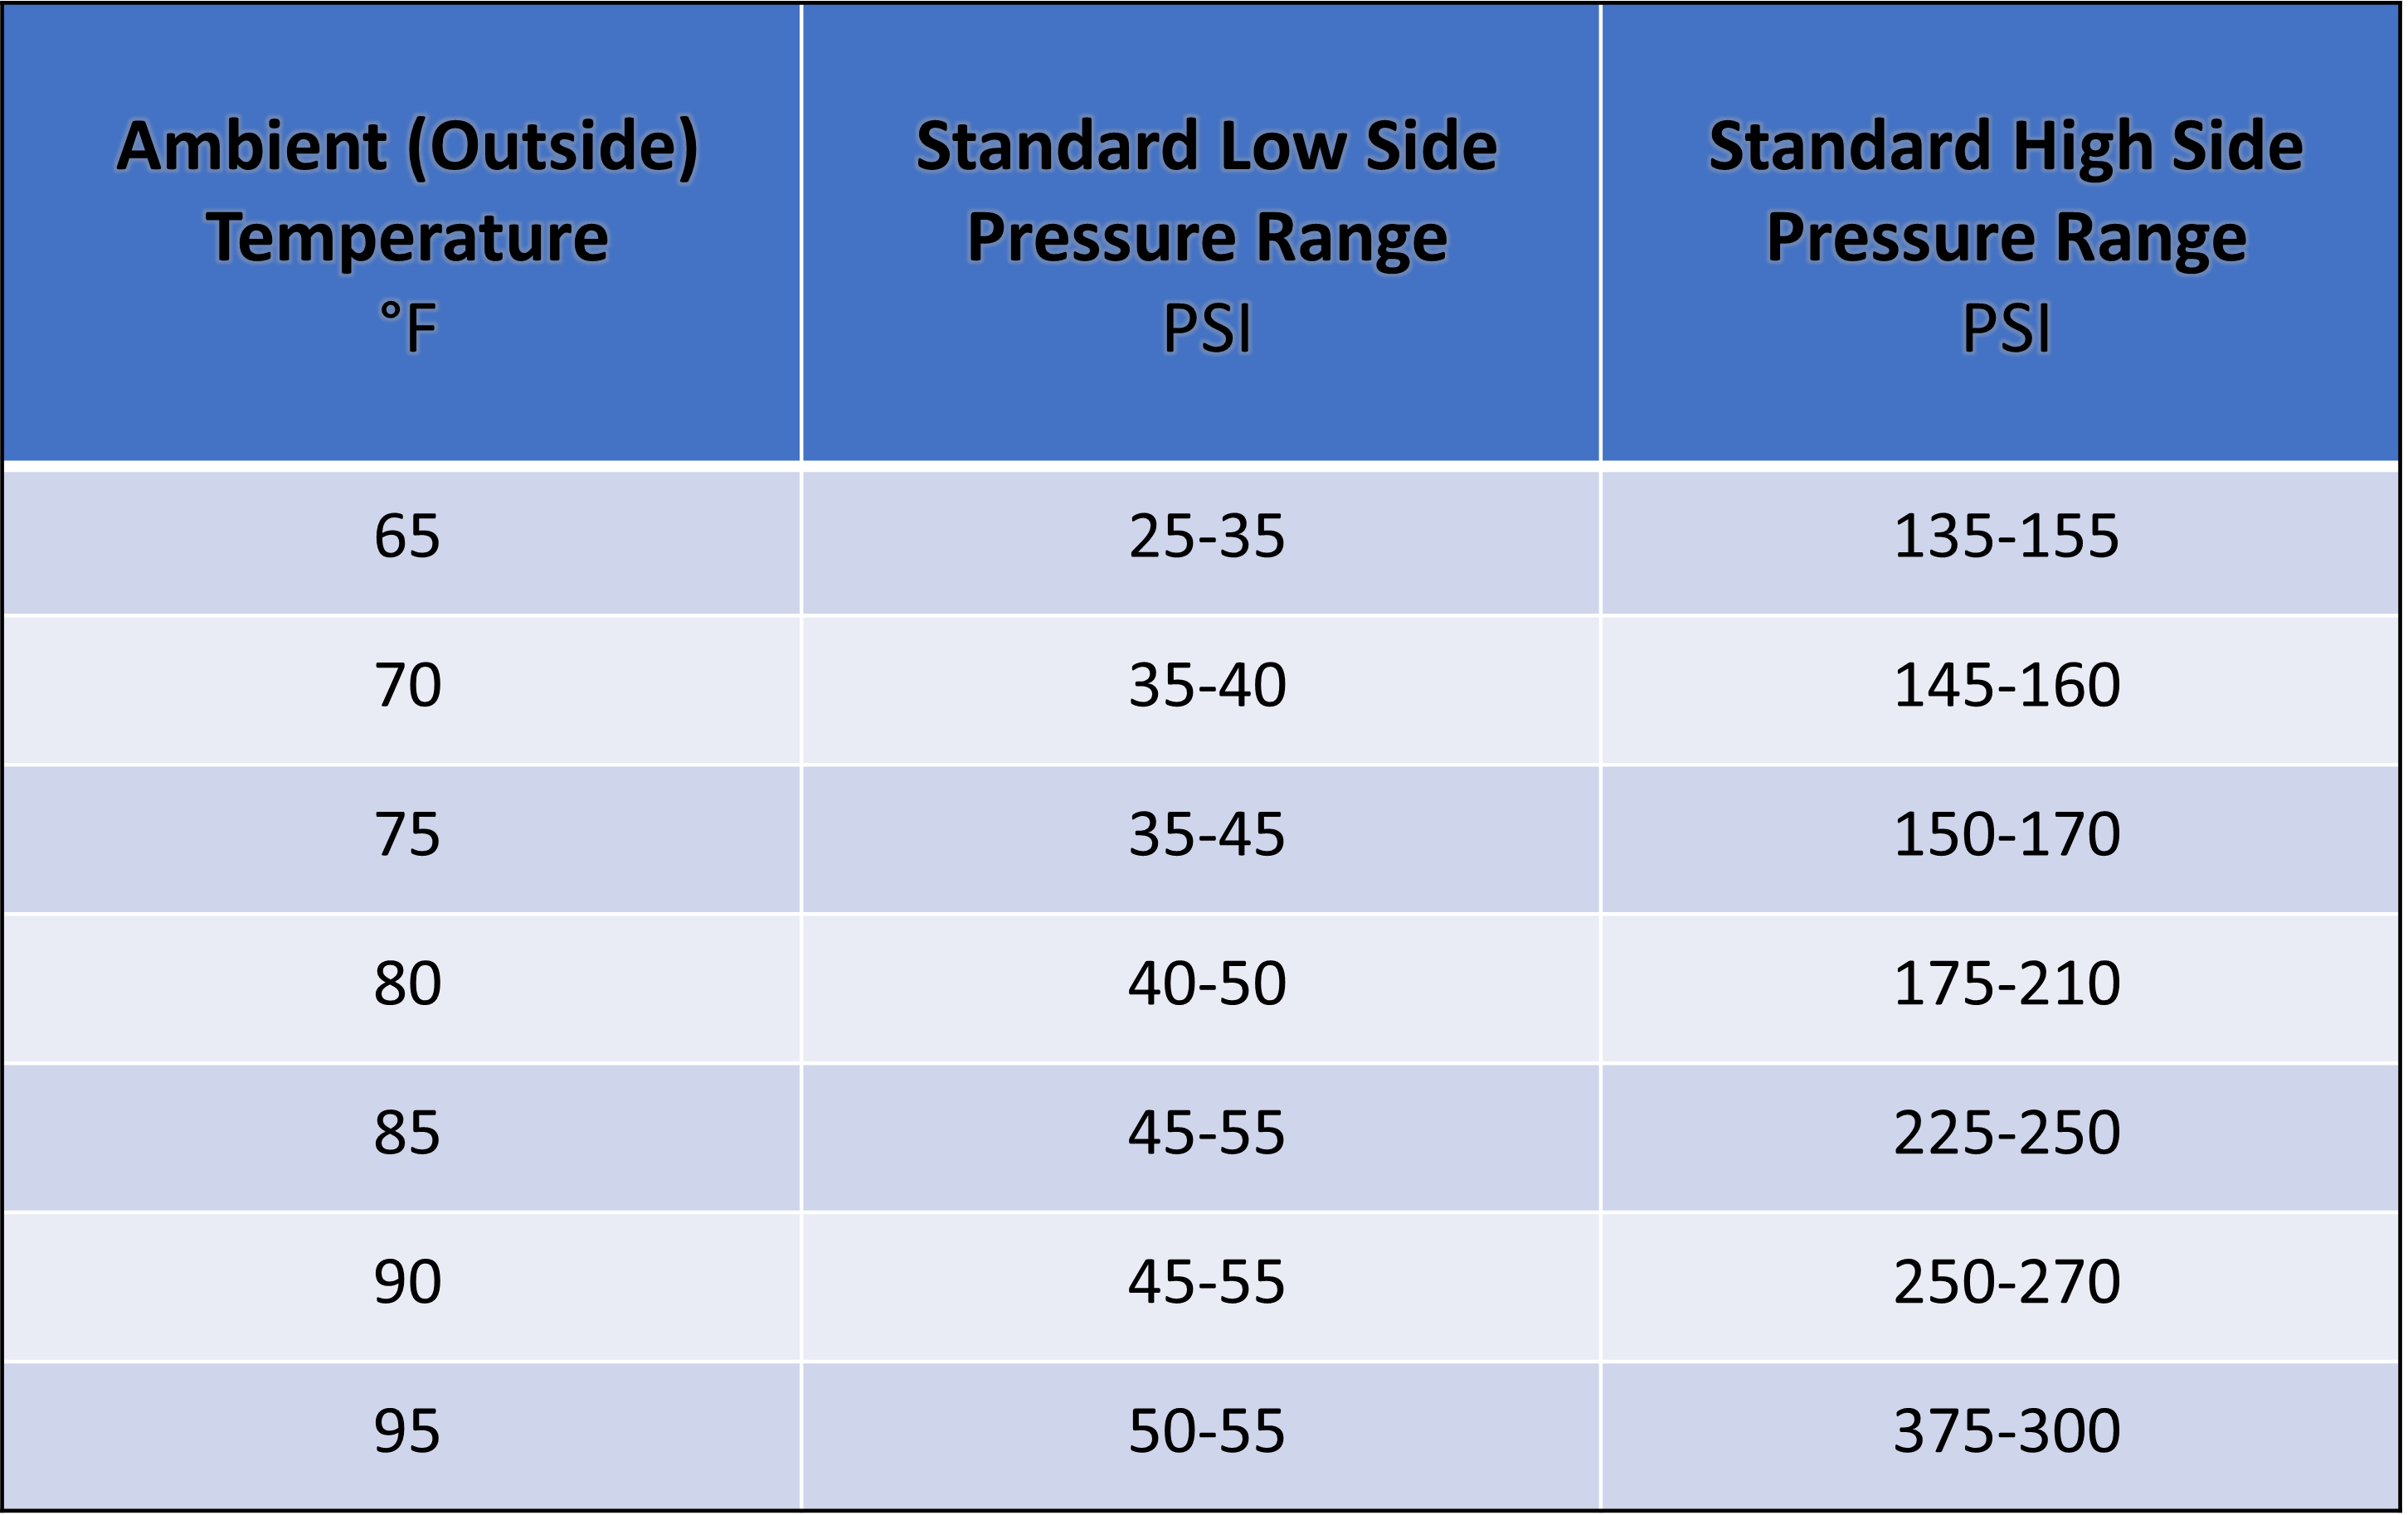
The R134a Pressure Chart: A Diagnostic Tool
An R134a pressure chart is an invaluable tool for diagnosing AC system problems. It correlates the high-side and low-side pressures with the ambient temperature, providing a baseline for optimal system performance. Deviations from these expected values often indicate underlying issues.
Here's a general guideline for interpreting R134a pressure readings, keeping in mind that specific values can vary slightly depending on the vehicle and system design:
General R134a Pressure Chart Guidelines (at Idle)
Ambient Temperature (°F) | Low Side (PSI) | High Side (PSI)
70 | 30-40 | 150-170
80 | 35-45 | 175-200
90 | 40-50 | 200-225
100 | 45-55 | 225-250
Important Note: These are just general guidelines. Always refer to the vehicle's specific service manual or a reputable source for precise pressure specifications. Slight variations are normal and depend on the vehicle make and model.
How to Use a Pressure Chart
- Connect Gauges: Connect an AC manifold gauge set to the high-side and low-side service ports. These ports are typically located in the engine compartment.
- Start the Engine and AC: Start the engine and turn the AC system to its maximum cooling setting with the fan on high.
- Record Readings: Allow the system to stabilize for a few minutes, then record both the high-side and low-side pressures. Also, note the ambient temperature.
- Compare to Chart: Compare the recorded pressures to the R134a pressure chart for the corresponding ambient temperature.
- Diagnose: Analyze any deviations from the expected pressure ranges to identify potential problems.
Interpreting Pressure Readings and Troubleshooting Common Issues
Understanding what different pressure readings indicate is crucial for effective AC system diagnosis. Here are some common scenarios:
- Low Low-Side and Low High-Side Pressure: This often indicates a low refrigerant charge. A leak in the system is the most likely culprit.
- High Low-Side and High High-Side Pressure: This could be caused by overcharging the system, a restricted condenser, or non-condensables (air) in the system.
- Low Low-Side and High High-Side Pressure: This may suggest a restricted expansion valve or orifice tube.
- High Low-Side and Low High-Side Pressure: A weak or failing compressor could be the cause. This indicates that the compressor is not able to effectively compress the refrigerant.
- Cycling On and Off Rapidly: This frequently means that the system is low on refrigerant, causing the low-pressure switch to repeatedly cycle the compressor on and off.
- No Cooling at All: This could be due to a variety of issues, including a completely empty system, a faulty compressor, a blown fuse, or a malfunctioning pressure switch.
Common AC System Problems and Their Solutions
Beyond pressure readings, other symptoms can help pinpoint AC system issues. Here are some frequently encountered problems and their potential solutions:
- Refrigerant Leaks: Leaks are a common cause of AC problems. They can occur at hoses, fittings, the compressor, condenser, evaporator, or even the service ports. Use a refrigerant leak detector to locate the source and repair or replace the leaking component.
- Compressor Failure: Compressors can fail due to wear and tear, lack of lubrication, or internal damage. A failing compressor may produce unusual noises, such as grinding or squealing. Replacement is usually the only option.
- Clogged Condenser: A dirty or clogged condenser restricts airflow, reducing its ability to dissipate heat. Clean the condenser fins with a soft brush and a fin comb to improve airflow.
- Faulty Expansion Valve/Orifice Tube: A malfunctioning expansion valve or orifice tube can restrict refrigerant flow, leading to poor cooling performance. Replacement is typically necessary.
- Electrical Problems: Electrical issues, such as blown fuses, faulty relays, or wiring problems, can prevent the AC system from operating. Check all fuses, relays, and wiring connections.
- Clogged Cabin Air Filter: A dirty cabin air filter restricts airflow into the cabin, reducing the effectiveness of the AC system. Replace the cabin air filter regularly.
Preventative Maintenance for Long-Term AC Performance
Regular maintenance is key to ensuring long-term AC system reliability and optimal performance. Here are some preventative measures:
- Regular System Checks: Periodically check the system's pressure readings and visually inspect components for leaks or damage.
- Refrigerant Recharge: Over time, refrigerant can leak out of the system. Have the system recharged to the proper level by a qualified technician.
- Leak Detection and Repair: Address any refrigerant leaks promptly to prevent further damage and maintain optimal cooling performance.
- Condenser Cleaning: Keep the condenser fins clean to ensure proper airflow.
- Cabin Air Filter Replacement: Replace the cabin air filter at the recommended intervals.
- System Flush: If the system has been contaminated or has experienced a compressor failure, a system flush may be necessary to remove debris and contaminants.
Safety Precautions When Working with R134a
Working with R134a refrigerant requires caution. Always wear appropriate personal protective equipment (PPE), including safety glasses and gloves. R134a can cause frostbite if it comes into contact with skin. Never release refrigerant into the atmosphere; it is harmful to the environment. Dispose of used refrigerant properly according to local regulations. If you're not comfortable working with refrigerant, it's best to take your vehicle to a qualified AC technician.
Conclusion
Understanding the R134a pressure chart and how to interpret pressure readings is an essential skill for anyone working on automotive AC systems. By using this knowledge in conjunction with proper diagnostic techniques and preventative maintenance practices, you can keep your car's AC system running efficiently and enjoy comfortable driving, no matter the weather. Remember that while some tasks, like checking pressures and replacing a cabin filter, can be done by informed enthusiasts, more complex repairs, such as compressor replacement or leak detection, are best left to qualified professionals. Investing in regular maintenance and professional repairs will ultimately save you money and ensure the longevity of your AC system.