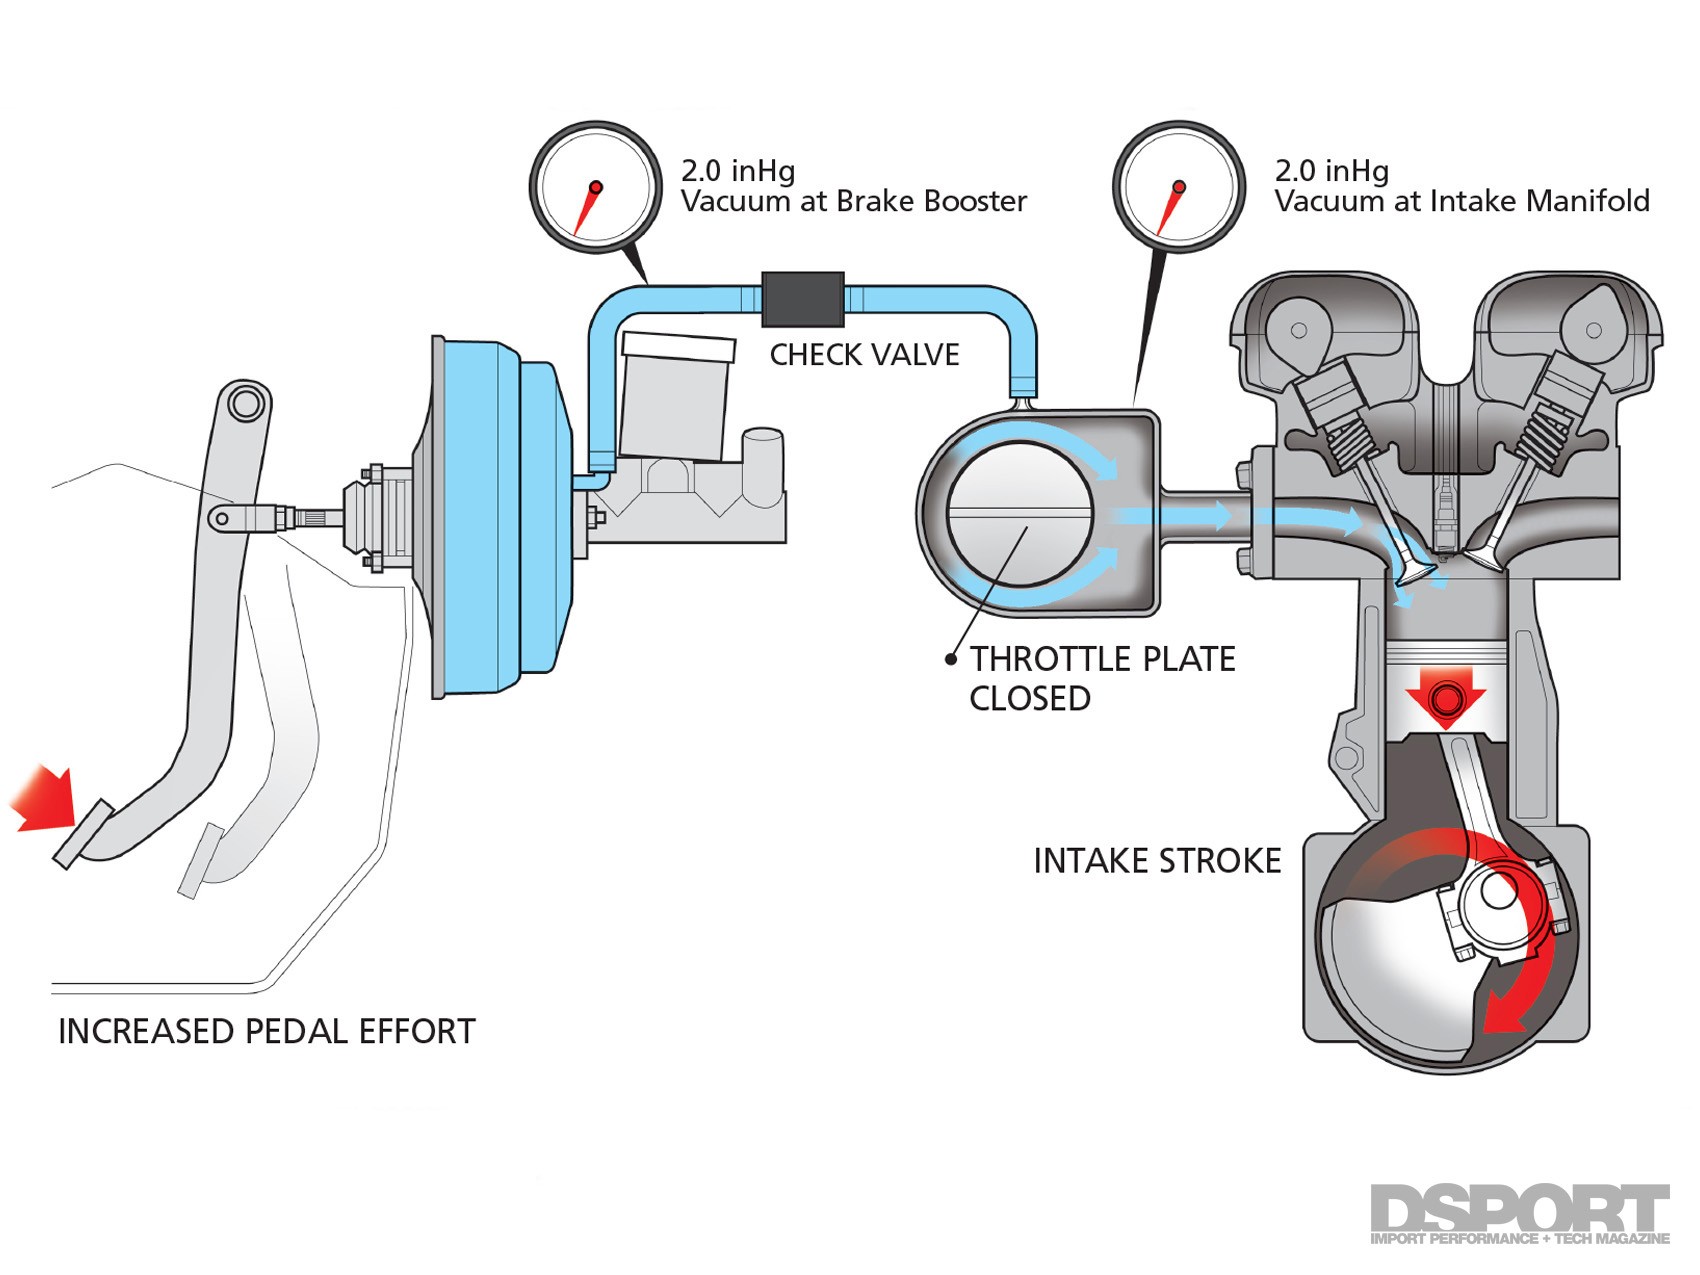
Brake Booster Vacuum Hose Diagram
The brake booster, a vital component in your car's braking system, significantly reduces the effort required to press the brake pedal. It achieves this through vacuum assistance, and the vacuum hose is the crucial link between the engine's intake manifold (the source of vacuum) and the brake booster itself. Understanding the brake booster vacuum hose diagram is essential for diagnosing brake issues, performing routine maintenance, and ensuring your vehicle's safety.
What is a Brake Booster and Why Does it Need Vacuum?
Imagine trying to stop a two-ton vehicle with just your leg power. It would be incredibly difficult, especially in an emergency. That's where the brake booster comes in. It's essentially a power assist system for your brakes. Inside the booster is a diaphragm. When you press the brake pedal, the booster uses vacuum from the engine to amplify your foot pressure. This allows you to stop the car more easily and quickly, even with a moderate amount of pedal force. Without the booster, the brakes would still work, but require much more effort – often referred to as "manual brakes." Think of older cars from the 1960s and earlier, where strong legs were a necessity!
The vacuum is the key to the booster's operation. The intake manifold of your engine naturally creates a vacuum as the pistons move up and down, drawing air into the cylinders. This vacuum is a readily available source of power that can be harnessed to assist the braking process.
Decoding the Brake Booster Vacuum Hose Diagram: A Typical Setup
While specific layouts can vary slightly depending on the vehicle make and model, the fundamental principles remain the same. Let's break down a typical brake booster vacuum hose diagram:
1. The Intake Manifold Connection
This is the starting point. The vacuum hose originates from a port on the intake manifold. This port is specifically designed to provide a consistent and reliable vacuum source. On many vehicles, like a Ford F-150 or a Honda Civic, this connection is usually located near the throttle body. Often, it will have a check valve fitted directly at the manifold or inline with the hose. This ensures that vacuum only flows *towards* the brake booster and not in the reverse direction.
2. The Vacuum Hose
This is the main artery of the system. It's a reinforced rubber hose designed to withstand the constant vacuum pressure. The hose is typically made from a material that resists collapsing under vacuum. Cheaper hoses may collapse, reducing braking power. The hose's diameter is also important; a too-narrow hose restricts vacuum flow, impacting brake performance. On a larger SUV like a Chevrolet Tahoe, the hose might be slightly larger in diameter than on a smaller car like a Toyota Corolla to provide adequate vacuum for the larger braking system.
3. The Check Valve
This is a critical safety component. The check valve is a one-way valve that allows vacuum to flow *only* from the intake manifold *to* the brake booster. Its primary function is to maintain vacuum in the booster even if the engine stalls or experiences a sudden loss of vacuum. This ensures you have at least one or two assisted braking applications after an engine failure – vital for bringing the car to a safe stop. You can usually find the check valve either right where the hose connects to the intake manifold, or closer to the booster, often integrated directly into the booster's inlet fitting. A common symptom of a faulty check valve is a hard brake pedal immediately after starting the car.
4. The Brake Booster Connection
This is where the vacuum hose connects to the brake booster itself. The connection is typically a secure, airtight fitting to prevent vacuum leaks. The fitting is designed to withstand the constant vacuum and prevent the hose from detaching. A worn or cracked fitting can lead to a vacuum leak, resulting in a hard brake pedal and reduced braking performance.
5. Potential Secondary Components
Sometimes, you might find additional components along the vacuum hose's path. These could include:
- Vacuum Reservoirs: Some vehicles, especially those with smaller engines or those that experience fluctuating vacuum levels, may have a vacuum reservoir. This is a small tank that stores vacuum to ensure a consistent supply to the brake booster.
- Vacuum Switches: Some advanced systems may incorporate vacuum switches that monitor the vacuum level and provide feedback to the engine control unit (ECU).
Common Problems and Troubleshooting
A malfunctioning brake booster vacuum system can manifest in several ways, ranging from a slightly stiffer pedal to a complete loss of power assist. Here are some common problems and how to diagnose them:
- Hard Brake Pedal: This is the most common symptom. It indicates a loss of vacuum assist. This can be caused by a leaking vacuum hose, a faulty check valve, or a problem within the brake booster itself.
- Hissing Sound: A hissing sound coming from the engine compartment, especially when the brakes are applied, often indicates a vacuum leak in the hose or its connections.
- Engine Idling Problems: A significant vacuum leak can affect the engine's air-fuel mixture, leading to rough idling, stalling, or poor engine performance.
- Poor Braking Performance: Even if the brake pedal isn't excessively hard, reduced braking effectiveness can be a sign of a vacuum leak impairing the booster's operation.
Troubleshooting Steps:
- Visual Inspection: Carefully inspect the entire length of the vacuum hose for cracks, cuts, or signs of wear. Pay close attention to the connections at the intake manifold, check valve, and brake booster.
- Listen for Leaks: With the engine running, listen for any hissing sounds around the vacuum hose and its connections.
- Check the Check Valve: Disconnect the hose from the check valve and try blowing air through it in both directions. It should only allow air to flow in one direction. If it allows air to flow freely in both directions, it's faulty and needs replacement.
- Vacuum Gauge Test: Use a vacuum gauge to measure the vacuum at the brake booster. A low vacuum reading indicates a problem with the vacuum supply. A healthy engine should pull around 17-22 inches of mercury (inHg) at idle.
- Brake Booster Test: With the engine off, pump the brake pedal several times to deplete any remaining vacuum in the booster. Then, hold the pedal down and start the engine. If the brake pedal drops slightly when the engine starts, it indicates that the booster is working correctly. If the pedal doesn't move, the booster itself may be faulty.
Practical Takeaways and Maintenance Tips
- Regular Inspection: Include the brake booster vacuum hose in your routine vehicle maintenance checks. Look for cracks, wear, and loose connections.
- Hose Replacement: If you notice any signs of wear or damage, replace the vacuum hose immediately. Use a high-quality hose specifically designed for vacuum applications. A collapsed hose can cause brake failure.
- Check Valve Replacement: The check valve is a relatively inexpensive component, and replacing it preventatively can avoid potential brake problems. Consider replacing it every 50,000 miles or during major brake service.
- Proper Installation: When replacing the vacuum hose, ensure it's properly routed to avoid kinking or rubbing against other components. Use hose clamps to secure the connections tightly.
- Seek Professional Help: If you're not comfortable diagnosing or repairing brake system components, consult a qualified mechanic. Brake systems are critical for safety, and any mistakes can have serious consequences.
By understanding the brake booster vacuum hose diagram and following these maintenance tips, you can help ensure your vehicle's braking system remains in optimal condition, providing you with safe and reliable stopping power.