
Charging Air Conditioning System In A Car
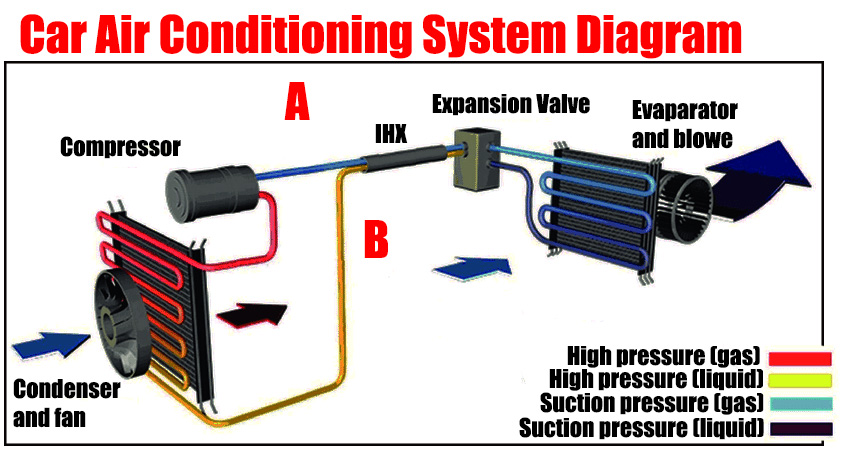
Is your car's air conditioning blowing warm air? Living in a hot climate makes a functioning AC system not just a luxury, but a necessity. One of the most common reasons for weak or non-existent cooling is a low refrigerant level. Recharging, or "topping off," the AC system can often restore its cooling power. However, before you reach for that DIY recharge kit, let's understand the process, the potential problems, and when it's best to call in a professional.
Understanding the Basics: Why is My AC Not Cold?
Several factors can contribute to a failing AC system. While low refrigerant is a frequent culprit, it's crucial to rule out other possibilities:
- Refrigerant Leaks: The most likely reason for low refrigerant. Leaks can occur in various components, including hoses, connections, the condenser, evaporator, or even the compressor.
- Compressor Issues: The compressor is the heart of the AC system, circulating refrigerant. A failing compressor simply won't provide the necessary pressure for cooling.
- Clogged Condenser or Evaporator: Debris buildup can restrict airflow and reduce cooling efficiency.
- Electrical Problems: Faulty wiring, relays, or sensors can prevent the compressor from engaging.
- Expansion Valve Problems: This valve controls the flow of refrigerant into the evaporator. A malfunctioning valve can disrupt the cooling cycle.
Before you even think about adding refrigerant, it's essential to identify the underlying cause of the problem. Simply recharging a system with a leak is a temporary fix and could potentially damage other components. Furthermore, constantly adding refrigerant is environmentally unfriendly and, in many jurisdictions, illegal.
Is DIY Recharging Right for You?
DIY AC recharge kits are readily available at auto parts stores. They often include a can of refrigerant, a charging hose with a pressure gauge, and instructions. While tempting due to their lower cost, DIY recharging has limitations and potential risks:
- Inaccurate Charging: Many DIY kits lack precise pressure gauges, making it difficult to add the correct amount of refrigerant. Overcharging or undercharging can damage the compressor.
- Refrigerant Contamination: Some kits contain sealants that can contaminate the entire AC system, causing long-term damage and making professional repairs more difficult and expensive.
- Inability to Detect Leaks: DIY kits don't help you find the source of a leak.
- Safety Concerns: Refrigerant can cause frostbite and is harmful if inhaled in large quantities. Proper safety precautions are crucial.
DIY recharging is generally only recommended if you are comfortable working on your car and are confident that the system is only slightly low on refrigerant and there are no visible or audible signs of leaks. If your AC system hasn't worked in months, or if you suspect a major leak, professional diagnosis and repair are necessary.
Tools Needed for DIY Recharging (If You Choose To)
If you decide to proceed with DIY recharging, you'll need the following:
- Refrigerant Can: Purchase the correct type of refrigerant specified for your vehicle (usually R-134a or HFO-1234yf). Double-check your owner's manual or the sticker under the hood.
- Charging Hose with Gauge: A hose with a pressure gauge is essential for monitoring the refrigerant level.
- Gloves and Eye Protection: Protect yourself from potential refrigerant exposure.
- AC Manifold Gauge Set (Optional but Recommended): A manifold gauge set provides more accurate pressure readings and is helpful for diagnosing system problems.
- Leak Detector (Optional): A UV dye and UV light can help you locate refrigerant leaks.
The DIY Recharging Process: A Step-by-Step Guide (With Cautions!)
Disclaimer: Proceed with caution and follow all instructions provided with your recharge kit. If you are unsure about any step, consult a professional.
- Locate the Low-Pressure Port: The low-pressure port is usually located on the larger of the two AC lines. It will have a cap marked with an "L".
- Connect the Charging Hose: Attach the charging hose to the low-pressure port. The fitting should only connect to the correct port.
- Check the Pressure: With the engine off, check the pressure reading on the gauge. This will give you a baseline.
- Start the Engine and Turn on the AC: Start the engine and turn the AC to the highest setting with the fan on maximum.
- Begin Charging: Follow the instructions on your recharge kit to slowly add refrigerant. Keep the can upright. Monitor the pressure gauge closely and avoid overcharging. The ideal pressure range varies depending on the vehicle and ambient temperature. The can should have a temperature vs pressure chart on it.
- Monitor the Cooling: Check the temperature of the air blowing from the vents. It should gradually become colder.
- Disconnect the Hose: Once the system is properly charged, disconnect the charging hose. Replace the cap on the low-pressure port.
Important Considerations:
- Avoid Overcharging: Overcharging the system can severely damage the compressor.
- Don't Add Liquid Refrigerant to the High-Pressure Side: This can cause immediate and catastrophic damage.
- Address Leaks: If the system loses refrigerant quickly after recharging, a leak is present and requires professional repair.
When to Call a Professional
While DIY recharging can sometimes be a quick fix, several situations warrant professional attention:
- Significant Refrigerant Loss: If the system has been empty for a long time or loses refrigerant quickly after recharging.
- Suspected Leaks: If you see or hear signs of a leak (e.g., oily residue, hissing sound).
- Compressor Issues: If the compressor is not engaging or making unusual noises.
- Electrical Problems: If you suspect electrical issues are affecting the AC system.
- Lack of Proper Tools or Knowledge: If you are not comfortable working on your car or lack the necessary tools.
Professional AC Service: What to Expect
A professional AC service typically involves the following steps:
- System Diagnosis: Using specialized equipment to identify the root cause of the problem.
- Leak Detection: Using electronic leak detectors or UV dye to pinpoint leaks.
- Refrigerant Recovery: Evacuating the remaining refrigerant from the system using specialized equipment.
- Component Repair or Replacement: Repairing or replacing faulty components (e.g., hoses, condenser, compressor).
- System Evacuation: Removing air and moisture from the system using a vacuum pump.
- Refrigerant Recharge: Adding the correct amount of refrigerant according to the vehicle manufacturer's specifications.
- Performance Testing: Verifying that the AC system is functioning properly and cooling effectively.
Cost of Professional AC Repair
The cost of professional AC repair varies depending on the nature of the problem and the parts required. A simple recharge might cost between $100 and $200, while more extensive repairs, such as compressor replacement, can cost several hundred dollars or even over $1,000. Always get a quote from a reputable mechanic before authorizing any repairs.
Preventive Maintenance
To keep your AC system in good working order, consider these preventive maintenance tips:
- Run the AC Regularly: Even during the winter months, running the AC for a few minutes each week can help keep the seals lubricated and prevent leaks.
- Inspect the Condenser: Keep the condenser free of debris.
- Check the Belts and Hoses: Inspect the belts and hoses for cracks or wear.
- Replace the Cabin Air Filter: A dirty cabin air filter can restrict airflow and reduce cooling efficiency.
A well-maintained AC system will provide reliable cooling for years to come. If you're experiencing AC problems, don't hesitate to seek professional help. Proper diagnosis and repair will ensure that your system is working efficiently and effectively, keeping you cool and comfortable on the road.