
Evap System Leak Detected Very Small Leak
The dreaded words illuminate on your dashboard: "Check Engine Light." After hooking up an OBD II scanner, you're greeted with a code related to the Evaporative Emission Control (EVAP) system, specifically, "Evap System Leak Detected Very Small Leak." While not as alarming as an engine misfire, this seemingly minor issue can impact fuel economy, emissions, and even your vehicle's performance over time. This article dives deep into understanding this common problem, equipping you with the knowledge to diagnose and potentially fix it yourself.
What is the EVAP System?
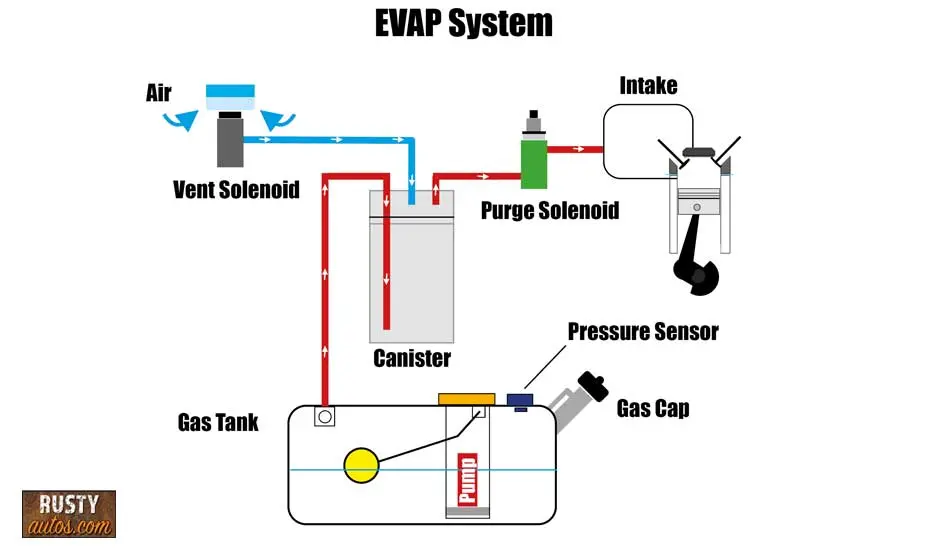
Imagine gasoline sitting in your fuel tank. As it sloshes around, it releases vapors. These vapors are, essentially, raw fuel and a major source of hydrocarbon emissions if released directly into the atmosphere. The EVAP system's job is to capture these vapors, store them temporarily, and then purge them into the engine to be burned during normal operation. Think of it as a closed-loop system that prevents harmful fumes from escaping.
The major components of a typical EVAP system include:
- Fuel Tank: Where the gasoline and vapors reside.
- Charcoal Canister: This is the system's storage tank. It's filled with activated charcoal, which absorbs and holds the fuel vapors. Consider it like a sponge for gasoline fumes.
- Canister Vent Valve: Controls airflow into the charcoal canister. It's typically open to allow air in when the engine is off (allowing vapors to be absorbed) and closed during certain testing phases.
- Purge Valve: Regulates the flow of fuel vapors from the charcoal canister into the engine's intake manifold. This valve is controlled by the engine control unit (ECU), or computer.
- Fuel Tank Pressure Sensor: Monitors the pressure or vacuum within the fuel tank and EVAP system. This sensor is crucial for detecting leaks.
- Hoses and Lines: Connect all the components, carrying fuel vapors and air throughout the system. These are common areas for leaks to develop, especially with age and exposure to the elements.
For example, a 2010 Honda Civic utilizes a similar EVAP system configuration. The charcoal canister is typically located near the fuel tank, and the purge valve is mounted on or near the engine. Similarly, a Ford F-150 uses the same core components but might have a larger canister due to the larger fuel tank and potentially higher vapor generation.
What Does "Very Small Leak" Mean?
The "Very Small Leak" designation is crucial. The ECU monitors the pressure within the EVAP system. During a self-test, the system seals itself and creates a vacuum (or sometimes pressure). If the ECU detects a very slight pressure change over a specific period, it triggers the "Very Small Leak" code. This indicates a tiny breach somewhere in the system. The threshold for what constitutes a "very small leak" is defined by the manufacturer, but it's generally in the range of 0.020 to 0.040 inches in diameter (the size of a pinhole or a very small crack).
The ECU doesn't know *where* the leak is; it just knows that one exists. It's like knowing you have a slow leak in a tire, but not being able to pinpoint the exact spot.
Common Causes of a "Very Small Leak"
Pinpointing the cause of a small EVAP leak can be frustrating, as the culprit can be elusive. Here are some of the most common offenders:
- Loose or Damaged Fuel Cap: This is the simplest and most common cause. A cracked, worn, or improperly tightened fuel cap prevents the system from sealing correctly. Always check your fuel cap first!
- Cracked or Deteriorated Hoses: Over time, the rubber hoses in the EVAP system can dry out, crack, and develop pinholes. These are particularly common in areas exposed to heat and sunlight.
- Faulty Purge Valve: The purge valve can leak if it's stuck open or has internal damage. Sometimes, even when closed, it might not seal perfectly.
- Damaged Canister Vent Valve: A faulty vent valve might not close properly, allowing air to leak into the system during testing.
- Cracked Charcoal Canister: While less common, the charcoal canister itself can develop cracks, especially from physical damage or age.
- Corroded or Leaky Fuel Tank Filler Neck: The filler neck, where you insert the gas nozzle, can rust or corrode, leading to leaks around the seal with the fuel cap.
- Faulty Fuel Tank Pressure Sensor: Although less frequent, a failing fuel tank pressure sensor might give inaccurate readings, leading the ECU to incorrectly diagnose a leak.
Imagine a 2005 Toyota Camry with this issue. The rubber hoses connecting the charcoal canister might be brittle and cracked due to years of exposure to engine heat. On a newer 2018 Chevrolet Malibu, a faulty purge valve could be the culprit, especially if the car frequently idles for extended periods.
Diagnosing the Leak
Diagnosing an EVAP leak requires patience and a methodical approach. Here are some steps you can take:
- Visual Inspection: Start with a thorough visual inspection of all EVAP system components. Look for cracked hoses, loose connections, and any signs of damage or corrosion. Pay close attention to the fuel cap and filler neck.
- Fuel Cap Test: Replace the fuel cap with a new, known-good cap. Clear the code with your OBD II scanner and drive the car for a few days to see if the code returns.
- Smoke Test: This is the most effective way to locate small leaks. A smoke machine injects a non-toxic smoke into the EVAP system. Any leaks will be readily apparent as smoke escapes. This often requires a visit to a mechanic with the proper equipment. Many shops will use specialized adapters to connect to the EVAP system service port.
- Using an OBD II Scanner: Some advanced OBD II scanners can perform EVAP system tests. They can command the purge and vent valves to open and close, allowing you to monitor pressure changes within the system.
- Bubble Test (DIY Option): This is a less precise method but can sometimes work. With the engine off and cold, lightly spray soapy water around hose connections, the fuel tank filler neck, and the charcoal canister. Look for bubbles forming, indicating a leak. Caution: Avoid spraying electrical connectors.
Repairing the Leak
Once you've identified the source of the leak, repair typically involves replacing the faulty component. Here are some common repair procedures:
- Replacing Hoses: Use high-quality fuel-grade hoses designed for EVAP systems. Ensure the hoses are properly sized and securely clamped.
- Replacing Valves (Purge/Vent): Disconnect the electrical connector and hoses, then unbolt the old valve and install the new one.
- Replacing the Fuel Cap: A straightforward process, but ensure you purchase a cap that's specifically designed for your vehicle.
- Repairing the Fuel Tank Filler Neck: Depending on the extent of the damage, you might be able to repair minor corrosion with a sealant. However, severe corrosion often requires replacing the entire filler neck. This is a more involved repair.
- Replacing the Charcoal Canister: Disconnect the hoses and electrical connector, then unbolt the old canister and install the new one.
Remember to always disconnect the negative battery terminal before working on any electrical components. After making repairs, clear the OBD II code and drive the vehicle to confirm the issue is resolved.
Practical Takeaways
Here's what you can do to tackle that "Evap System Leak Detected Very Small Leak" code:
- Start Simple: Always check and replace the fuel cap first. It's the easiest and cheapest fix.
- Visual Inspection is Key: Carefully inspect all EVAP system components for cracks, damage, and loose connections.
- Consider a Smoke Test: If you're unable to locate the leak yourself, a smoke test is the most reliable diagnostic method.
- Use Quality Parts: When replacing components, use parts that are specifically designed for your vehicle and the EVAP system.
- Document Your Work: Keep track of your diagnostic steps and repairs. This will help you troubleshoot future issues.
- Don't Ignore It: While a "very small leak" might seem insignificant, it can lead to reduced fuel economy, increased emissions, and potentially more serious problems down the road.
By understanding the EVAP system and following these steps, you can confidently diagnose and address that pesky "Very Small Leak" code, saving yourself time, money, and contributing to a cleaner environment. Remember to consult your vehicle's repair manual for specific instructions and diagrams related to your make and model. Happy wrenching!