
How Do You Clean The Mass Air Flow Sensor
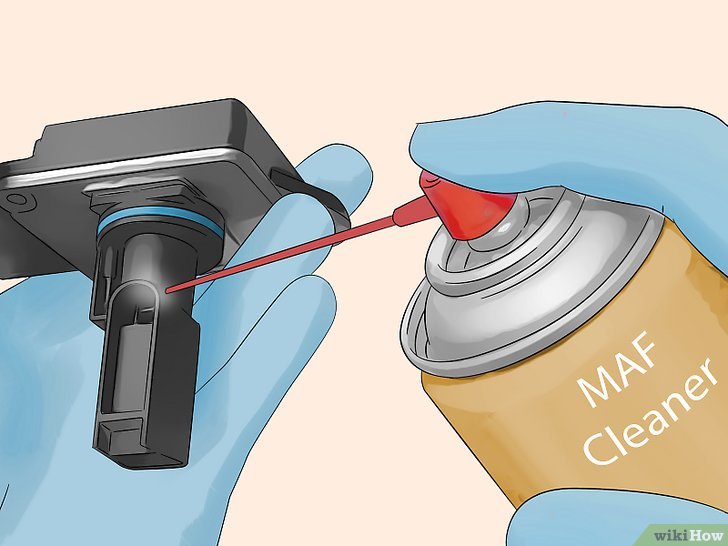
The Mass Air Flow (MAF) sensor is a critical component in modern electronically fuel-injected engines. It's responsible for measuring the amount of air entering the engine, allowing the engine control unit (ECU) to accurately calculate the correct amount of fuel to inject for optimal combustion. A dirty or malfunctioning MAF sensor can lead to a cascade of problems, including poor fuel economy, rough idling, reduced engine power, and even illuminated check engine lights. Understanding how to clean a MAF sensor is a valuable skill for any car enthusiast or aspiring mechanic.
Understanding the MAF Sensor's Operation
Before diving into the cleaning process, it's essential to understand how the MAF sensor works. There are primarily two types of MAF sensors: hot-wire and vane-meter. While vane-meter types were more common in older vehicles, modern cars overwhelmingly utilize hot-wire MAF sensors. Therefore, this guide will primarily focus on the hot-wire variety.
A hot-wire MAF sensor contains a heated wire (or sometimes a heated film) that is exposed to the incoming airflow. The sensor maintains this wire at a constant temperature, typically a few hundred degrees Fahrenheit above the ambient air temperature. As air flows across the wire, it cools it down. The more air that flows, the more electrical current is required to maintain the wire's constant temperature. The sensor measures this current and converts it into a voltage signal that is sent to the ECU. The ECU then interprets this voltage to determine the mass airflow rate.
The key takeaway is that the accuracy of the MAF sensor relies on the cleanliness of the hot-wire element. Even a thin layer of contamination, such as oil residue, dust, or pollen, can insulate the wire and affect its ability to dissipate heat. This leads to an inaccurate reading, causing the ECU to miscalculate the fuel mixture.
Why Cleaning is Necessary
Over time, the hot-wire in the MAF sensor inevitably accumulates contaminants. These contaminants can originate from various sources:
- Air filter degradation: A poorly maintained or low-quality air filter can allow fine particles to pass through and accumulate on the sensor.
- Oil residue from air filters: Some performance air filters are oiled, and over-oiling can lead to oil vapor being drawn into the intake system and deposited on the MAF sensor.
- Crankcase ventilation system: The positive crankcase ventilation (PCV) system vents blow-by gases (unburned fuel and combustion byproducts) from the engine crankcase back into the intake manifold. These gases can contain oil mist that contaminates the MAF sensor.
- Environmental pollutants: Airborne dust, pollen, and other environmental contaminants can also accumulate on the sensor.
When the MAF sensor is contaminated, it typically underestimates the amount of air entering the engine. This causes the ECU to inject less fuel than required, resulting in a lean fuel mixture. A lean mixture can lead to a variety of problems:
- Reduced fuel economy: The engine has to work harder to produce the same amount of power, leading to lower MPG.
- Rough idling: The engine may idle erratically or stall.
- Hesitation during acceleration: The engine may stumble or hesitate when accelerating.
- Increased emissions: A lean mixture can increase harmful emissions.
- Potential engine damage: In extreme cases, a severely lean mixture can lead to engine overheating and damage.
The Cleaning Process: A Step-by-Step Guide
Cleaning the MAF sensor is a relatively simple process that can be performed at home with the right tools and precautions. Here's a detailed guide:
1. Gather Your Supplies
You will need the following items:
- MAF sensor cleaner: This is a specialized cleaner designed to dissolve contaminants without damaging the delicate sensor. Do not use carburetor cleaner, brake cleaner, or any other general-purpose cleaner. These can damage the sensor. CRC MAF Sensor Cleaner is a popular and widely available option.
- Screwdrivers: You'll need the appropriate screwdrivers (usually Phillips or flathead) to remove the MAF sensor from the intake tract.
- Socket set (optional): In some cases, the MAF sensor may be secured with bolts rather than screws.
- Gloves: Wearing gloves will prevent oil and dirt from your hands from contaminating the sensor.
- Clean, lint-free cloth or paper towel: For wiping up any spills.
- Work area: Choose a well-ventilated area to work in.
2. Locate the MAF Sensor
The MAF sensor is typically located in the intake tract, between the air filter box and the throttle body. It's usually a cylindrical or rectangular component with an electrical connector attached. Consult your vehicle's repair manual or online resources if you're unsure of its location.
3. Disconnect the Electrical Connector
Before removing the MAF sensor, disconnect the electrical connector. This usually involves pressing a retaining clip or tab and pulling the connector off. Never attempt to remove the MAF sensor with the electrical connector still attached.
4. Remove the MAF Sensor
Use the appropriate screwdrivers or sockets to remove the MAF sensor from the intake tract. Be careful not to drop or damage the sensor during removal. Note the orientation of the sensor for reinstallation.
5. Inspect the Sensor
Carefully inspect the hot-wire element (or film) inside the sensor. You may need a flashlight to see it clearly. Look for any signs of contamination, such as dirt, oil residue, or debris. Do not touch the hot-wire element with your fingers or any other object. It is extremely fragile and easily damaged.
6. Clean the Sensor
Hold the MAF sensor so that the hot-wire element is facing downwards. Spray the MAF sensor cleaner directly onto the hot-wire element in short bursts. Allow the cleaner to dissolve the contaminants and drip off the sensor. Do not saturate the sensor with cleaner.
Repeat this process several times until the hot-wire element appears clean. Allow the sensor to air dry completely for at least 15-20 minutes before reinstallation.
7. Reinstall the Sensor
Once the sensor is completely dry, reinstall it into the intake tract, ensuring it's in the correct orientation. Tighten the screws or bolts to the proper torque specifications (if available). Do not overtighten the screws or bolts, as this can damage the sensor housing.
8. Reconnect the Electrical Connector
Reconnect the electrical connector to the MAF sensor. Make sure the connector clicks into place securely.
9. Start the Engine
Start the engine and let it idle for a few minutes. The engine may run slightly rough at first as the ECU readjusts to the cleaned sensor. Monitor the engine for any unusual noises or behavior.
10. Check for Error Codes
If your vehicle has a check engine light, check for any new error codes using an OBD-II scanner. If any codes related to the MAF sensor are present, clear them and see if they return.
Important Considerations and Troubleshooting
- Use the correct cleaner: Using the wrong type of cleaner can damage the MAF sensor beyond repair. Always use a cleaner specifically designed for MAF sensors.
- Handle with care: The hot-wire element is extremely fragile. Avoid touching it or dropping the sensor.
- Don't over-clean: Cleaning the MAF sensor too frequently can actually shorten its lifespan. Clean it only when necessary.
- Check the air filter: If your MAF sensor is frequently becoming contaminated, check your air filter and replace it if necessary.
- Consider professional assistance: If you're not comfortable performing this procedure yourself, or if you're experiencing persistent MAF sensor problems, consult a qualified mechanic.
Cleaning the MAF sensor is a simple yet effective way to improve your vehicle's performance and fuel economy. By understanding how the sensor works and following these steps carefully, you can keep your engine running smoothly for years to come.