How To Change Toyota Corolla Headlight Bulb
Maintaining your Toyota Corolla's headlights is crucial for safe driving, especially at night or in adverse weather. A burnt-out headlight not only reduces visibility but can also lead to traffic violations. Changing a headlight bulb on a Corolla is a relatively straightforward task that most car owners can handle themselves, saving time and money compared to a visit to the mechanic. This guide provides a practical, step-by-step approach, covering common issues, troubleshooting tips, and maintenance advice.
Identifying the Problem: Symptoms of a Failing Headlight
The most obvious symptom is, of course, a headlight that isn't illuminating. However, there are other, more subtle signs that indicate a bulb is nearing the end of its life:
- Dimming Light: A headlight that appears noticeably dimmer than the other is a strong indicator of impending failure. This happens as the filament inside the bulb weakens over time.
- Flickering: Intermittent flickering suggests a loose connection or a failing filament. While sometimes a temporary issue, it usually precedes complete failure.
- Color Change: Some bulbs, particularly halogen ones, may exhibit a yellowish or even pinkish hue as they degrade.
Tools and Materials You'll Need
Before you begin, gather the necessary tools and materials:
- New Headlight Bulb(s): Make sure you purchase the correct bulb type for your Corolla's year and model. Refer to your owner's manual or consult an auto parts store. It's generally recommended to replace both bulbs at the same time, even if only one has failed. This ensures consistent brightness and color.
- Gloves: Protect your hands and prevent oils from your skin from contaminating the new bulb. Oils can create hotspots on the bulb, shortening its lifespan.
- Screwdriver (Phillips or Flathead, depending on your model): For removing any access panels or securing clips.
- Socket Wrench (with appropriate sized sockets): May be needed for removing retaining bolts on some Corolla models.
- Shop Towels or Rags: To clean up any dirt or debris.
- Owner's Manual: A helpful resource for specific instructions related to your Corolla model.
Step-by-Step Guide to Changing a Toyota Corolla Headlight Bulb
- Preparation and Safety:
- Turn off the engine and remove the key from the ignition.
- Engage the parking brake.
- Locate the headlight assembly. In most Corollas, it's accessible from behind the headlight housing in the engine compartment.
- Accessing the Headlight Bulb:
- Open the hood and locate the rear of the headlight assembly.
- You may need to remove a plastic cover or access panel. This may require unscrewing a few screws or unclipping retaining clips. Refer to your owner's manual for specific instructions for your model year. For example, some older Corollas have simple clips, while newer models might have a more involved access panel.
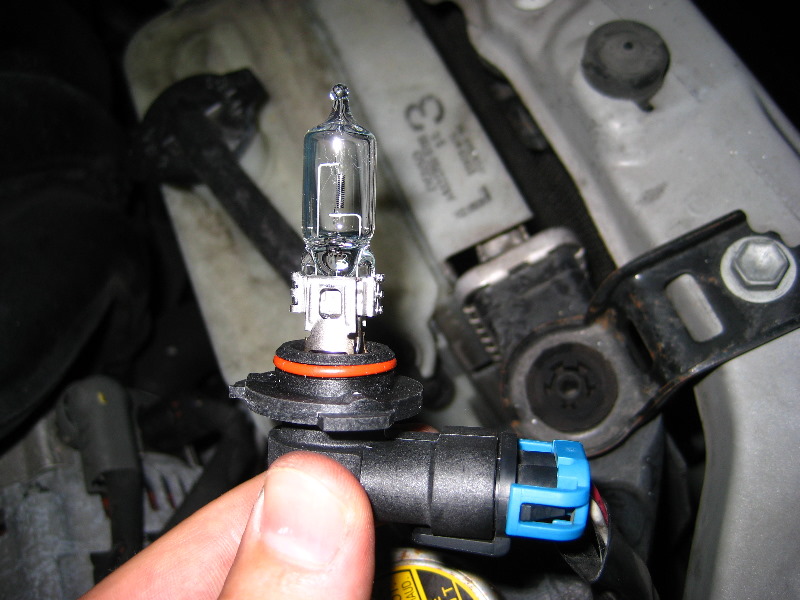
- Disconnecting the Electrical Connector:
- Carefully disconnect the electrical connector from the back of the headlight bulb. There's usually a small tab or clip that needs to be pressed or squeezed to release the connector.
- Do not pull on the wires! Grasp the connector firmly and wiggle it gently to detach it.
- Removing the Old Bulb:
- The bulb is usually held in place by a retaining clip or a twist-lock mechanism.
- For a retaining clip: Press down on the clip and move it to the side to release the bulb.
- For a twist-lock mechanism: Rotate the bulb housing counterclockwise until it's free.
- Gently remove the old bulb from the headlight assembly.
- Installing the New Bulb:
- Handle the new bulb with gloves. Avoid touching the glass portion of the bulb.
- Align the new bulb with the socket and insert it into the headlight assembly.
- Secure the bulb with the retaining clip or twist-lock mechanism, ensuring it's firmly in place.
- Reconnecting the Electrical Connector:
- Reattach the electrical connector to the back of the new bulb. Ensure it clicks into place securely.
- Reassembling and Testing:
- Reinstall the access panel or cover, securing it with screws or clips.
- Turn on the headlights to test the new bulb. If it doesn't light up, double-check the electrical connector and the bulb's seating.
- Repeat the process for the other headlight if necessary.
Troubleshooting Common Issues
Sometimes, things don't go as planned. Here are some common problems and their solutions:
- Bulb Doesn't Light Up:
- Problem: Incorrect bulb type, loose electrical connection, blown fuse, or defective new bulb.
- Solution: Verify the bulb type, ensure the connector is securely attached, check the headlight fuse in the fuse box (refer to your owner's manual for location), and try a different new bulb.
- Difficulty Removing the Old Bulb:
- Problem: Corroded or stuck retaining clip, or incorrect removal technique.
- Solution: Use penetrating oil to loosen a corroded clip. Consult your owner's manual or online resources for the correct removal procedure. Applying too much force can damage the headlight assembly.
- Difficulty Accessing the Bulb:
- Problem: Obstruction by other engine components, or unfamiliar access panel design.
- Solution: Consult your owner's manual for specific instructions. You may need to temporarily remove other components (e.g., air intake duct) to gain access.
- New Bulb Burns Out Quickly:
- Problem: Touching the glass portion of the bulb, voltage spikes in the electrical system, or incompatible bulb type.
- Solution: Always wear gloves when handling bulbs. Have your car's charging system inspected for voltage irregularities. Ensure you're using the correct bulb type specified in your owner's manual.
Examples from Popular Corolla Models
The headlight bulb replacement procedure is generally similar across different Corolla generations, but there can be subtle variations:
- Corolla (2003-2008): These models often have a relatively simple access panel secured by a few screws or clips. The bulb is typically held in place by a wire retaining clip.
- Corolla (2009-2013): Some models have a more integrated headlight assembly, requiring the removal of several bolts to access the bulb.
- Corolla (2014-2019): These models often use a twist-lock mechanism to secure the bulb. The electrical connector can be a bit tight to remove, so be patient and use a gentle wiggling motion.
- Corolla (2020-Present): These models may require specialized tools or access through the wheel well for certain headlight bulbs. Consulting the owner's manual is highly recommended.
Maintaining Your Car's Electrical System
Proper maintenance extends beyond just replacing bulbs. Here's how to keep your Corolla's electrical system in top condition:
- Regularly Check Your Lights: Inspect all exterior lights (headlights, taillights, brake lights, turn signals) frequently to ensure they're functioning properly.
- Clean Headlight Lenses: Over time, headlight lenses can become cloudy or yellowed, reducing brightness. Use a headlight restoration kit to clean and restore the lenses.
- Battery Maintenance: Keep the battery terminals clean and free of corrosion. Have your battery tested periodically to ensure it's holding a charge.
- Professional Inspections: Schedule regular maintenance checks with a qualified mechanic to inspect the overall electrical system and identify potential problems early on.
By following these steps and maintaining your vehicle properly, you can ensure your Toyota Corolla remains a safe and reliable vehicle for years to come. Replacing a headlight bulb is a small but important task that contributes to overall safety and peace of mind.