
How To Check For A Battery Drain In A Car
A parasitic battery drain, also known as an excessive key-off draw, is a common automotive problem that can leave you stranded with a dead battery. Even when your car is turned off, certain systems continue to draw a small amount of power to maintain settings for the clock, radio presets, and alarm system. However, when this draw exceeds the normal threshold, it can significantly deplete the battery over time. This article provides a comprehensive guide on how to diagnose and identify the source of a battery drain in your vehicle.
Understanding Normal Battery Drain
Before diving into troubleshooting, it's crucial to understand what constitutes a *normal* battery drain. Typically, a healthy vehicle will have a parasitic draw of around 25-50 milliamps (mA). This range allows for essential systems to remain operational without significantly impacting battery life. Newer vehicles with more complex electronics might have a slightly higher acceptable range, but anything consistently above 50mA warrants investigation. Exceeding this value significantly increases the risk of a dead battery, especially if the vehicle sits unused for extended periods.
Tools and Preparation
You'll need a few essential tools to perform this test:
- A Digital Multimeter (DMM): Essential for measuring current (amps) and voltage. Ensure your DMM is capable of measuring DC current, typically up to 10 amps.
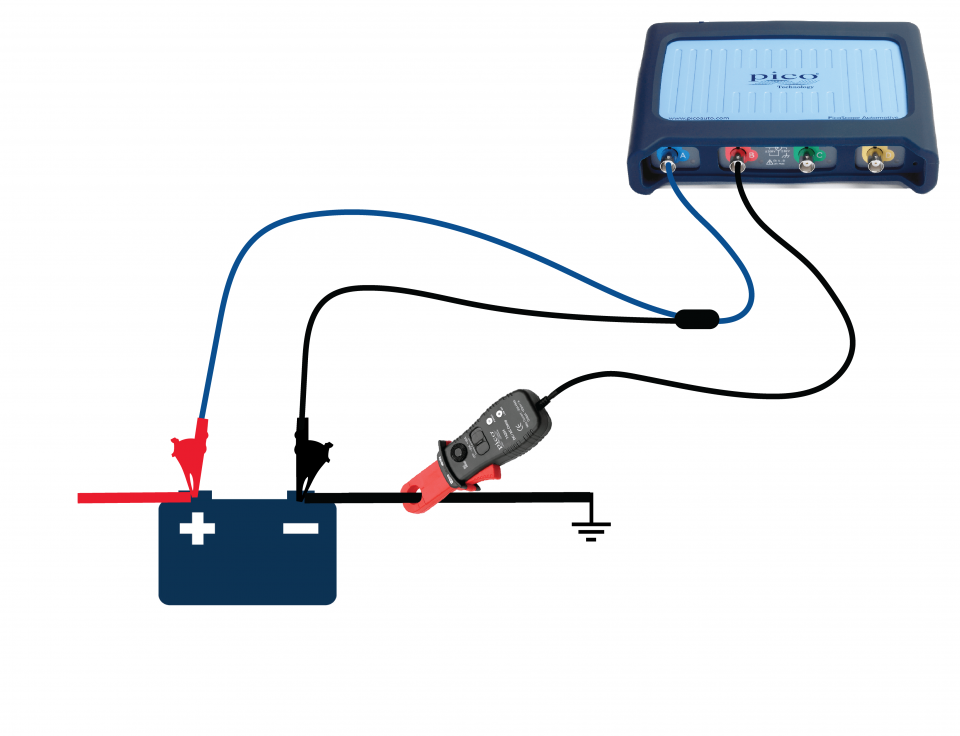
- An Ammeter with a clamp (optional): simplifies the process by allowing current measurement without disconnecting the battery terminal.
- Jumper Cables or a Battery Charger: In case the battery is drained during the testing process.
- Wiring Diagrams for your specific vehicle model: Helpful for understanding circuit layouts and identifying potential problem areas.
- Basic Hand Tools: Screwdrivers, sockets, and pliers for accessing and disconnecting components.
Preparation is key. Ensure the battery is fully charged before starting the test. Switch off all accessories, including interior lights, radio, and any aftermarket devices. Leave the doors closed and the hood open (you may need to manually engage the hood latch sensor if equipped). Allow the vehicle to "sleep" for 20-30 minutes after turning it off. This allows the vehicle's electronic control units (ECUs) to power down completely, providing a more accurate reading.
The Testing Process
Here's a step-by-step guide to checking for a battery drain using a DMM:
- Disconnect the Negative Battery Terminal: Use a wrench to loosen and detach the negative (-) battery cable.
- Connect the Multimeter in Series: Set your DMM to measure DC Amps (A). Connect one lead of the DMM to the disconnected negative battery cable and the other lead to the negative battery terminal post. This forces all current flowing from the battery to pass through the multimeter.
- Observe the Current Reading: Note the initial reading. It might spike briefly as the ECU wakes up, but it should settle down within the normal range (25-50 mA) within a few minutes. If the reading is significantly higher, you have a parasitic drain.
- Isolate the Circuit: The next step is to identify the culprit circuit. Start by removing fuses one at a time from the fuse box(es). *Important: Do not remove multiple fuses at once, as this can complicate the process and potentially damage sensitive electronics.* After removing each fuse, observe the multimeter reading. If the reading drops significantly when a particular fuse is removed, the circuit protected by that fuse is likely the source of the drain.
- Investigate the Culprit Circuit: Once you've identified the circuit, consult your vehicle's wiring diagram to understand which components are powered by that circuit. Check those components for faults, shorts to ground, or signs of corrosion. Common culprits include faulty door switches, trunk lights, glove box lights, aftermarket accessories (alarms, stereos), and malfunctioning relays.
Real-World Examples and Troubleshooting Tips
- Example 1: A trunk light that doesn't turn off. This is a classic example. The bulb continues to drain the battery even when the trunk is closed due to a faulty switch.
- Example 2: An aftermarket alarm system improperly installed. Poor wiring or a malfunctioning module can cause a significant parasitic draw.
- Example 3: A corroded trailer light connector. Corrosion can create a path to ground, allowing current to flow even when the lights are off.
If you suspect a specific component, you can use the DMM to check for continuity to ground with the component disconnected. High continuity indicates a short circuit. Remember to always reconnect the battery and verify that all systems are functioning correctly after making any repairs.
Conclusion
Diagnosing a battery drain can be a methodical process, but by understanding the principles involved and following these steps, you can effectively pinpoint the source of the problem and prevent future battery issues. If you're uncomfortable performing these tests, it's always best to consult a qualified mechanic. A thorough understanding of automotive electrical systems and the proper use of diagnostic tools is critical for accurate and safe troubleshooting.