How To Clean Corrosion Off Battery Terminal
Corrosion on your car battery terminals is a common problem, but thankfully, one that's relatively straightforward to fix. Left unchecked, this build-up, primarily composed of sulfates resulting from escaping sulfuric acid, can inhibit current flow, leading to starting problems, dim headlights, and other electrical gremlins. This guide will walk you through the process of safely and effectively cleaning corrosion from your battery terminals, ensuring optimal performance and extending the life of your battery.
Understanding Battery Corrosion
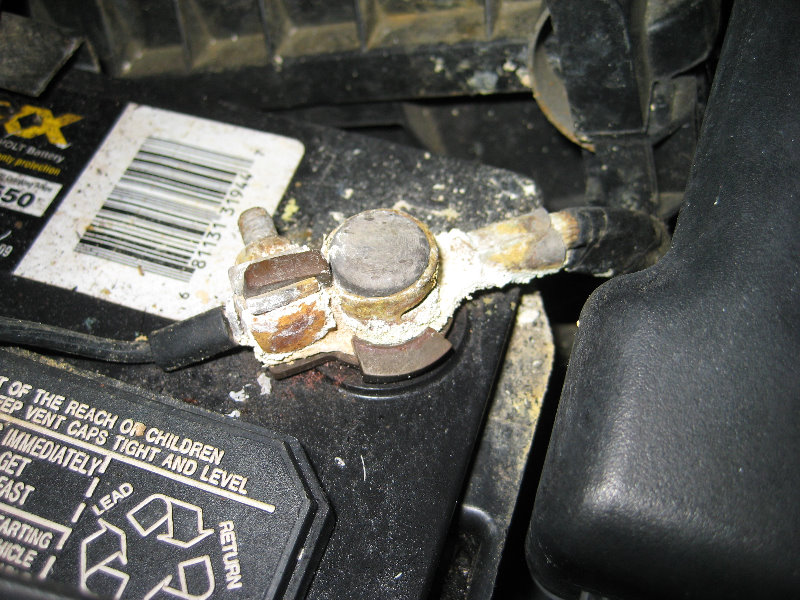
Before we dive into the cleaning process, it's helpful to understand what causes this corrosion in the first place. The battery itself contains sulfuric acid (H2SO4), the electrolyte, which reacts with the lead plates to generate electricity. During charging and discharging, small amounts of this acid can escape, typically as a gas or fine mist, around the terminals. When this acid reacts with the metal of the terminals and the surrounding air, it forms various lead sulfate compounds, visible as the white, blue, or greenish corrosion we often see. Overcharging, a faulty voltage regulator, or even just the age of the battery can exacerbate this issue.
Recognizing the Signs
While the visual presence of corrosion is the most obvious sign, there are other indicators that your battery terminals may need attention. These include:
- Difficulty Starting: The starter motor may crank slowly or not at all. A high resistance connection due to corrosion reduces the amperage available to the starter.
- Dim Headlights: Reduced voltage can cause headlights to appear dimmer than usual.
- Electrical System Issues: Intermittent problems with other electrical components, such as the radio or power windows, can sometimes be traced back to poor battery connections.
- Battery Light: The battery warning light on your dashboard may illuminate, although this can also indicate other charging system problems. It's a good idea to use a multimeter to test the voltage at the terminals. A healthy battery should read around 12.6 volts when the engine is off.
Safety First: Disconnecting the Battery
Always prioritize safety when working with automotive electrical systems. Disconnecting the battery minimizes the risk of electrical shock and prevents accidental damage to sensitive electronics. Follow these steps:
- Gather Your Tools: You'll need a wrench (usually 8mm, 10mm, or 13mm, but check your vehicle's specifications), safety glasses, gloves (nitrile or rubber are best), a battery terminal cleaner or wire brush, baking soda, water, petroleum jelly (optional), and rags.
- Park on a Level Surface: Ensure the vehicle is parked on a level surface and the parking brake is engaged.
- Turn Off the Ignition: Completely turn off the ignition and remove the key.
- Locate the Battery: Most vehicles have the battery under the hood, but some may have it in the trunk or under the rear seat. Consult your owner's manual if you're unsure.
- Identify the Terminals: The positive terminal is usually marked with a "+" symbol or a red cover, while the negative terminal is marked with a "-" symbol or a black cover.
- Disconnect the Negative Terminal First: This is crucial! Using the appropriate wrench, loosen the nut on the negative terminal. Carefully remove the cable from the terminal. This prevents a short circuit if your wrench accidentally touches a grounded metal part while still connected to the positive terminal. Tuck the cable away from the terminal so it doesn't accidentally reconnect.
- Disconnect the Positive Terminal: Repeat the process for the positive terminal, loosening the nut and removing the cable. Again, tuck the cable away from the terminal.
Cleaning the Battery Terminals
Now that the battery is safely disconnected, you can proceed with cleaning the terminals.
- Prepare the Cleaning Solution: Mix one tablespoon of baking soda with one cup of warm water. This creates a mild alkaline solution that neutralizes the acidic corrosion. Baking soda (sodium bicarbonate, NaHCO3) is a weak base that will react with the sulfuric acid (H2SO4) to form less harmful compounds like sodium sulfate, water, and carbon dioxide.
- Apply the Cleaning Solution: Using an old toothbrush or a rag, apply the baking soda solution liberally to the corroded terminals and cable clamps. Let it fizz and bubble for a few minutes. This allows the solution to break down the corrosion.
- Scrub the Terminals: Use a battery terminal cleaner (a specialized tool with internal and external brushes) or a wire brush to thoroughly scrub the terminals and cable clamps. Pay close attention to any areas with heavy corrosion. For heavily corroded terminals, you might need to repeat steps 2 and 3.
- Rinse Thoroughly: Use clean water to rinse away any remaining baking soda solution and loosened corrosion. Make sure to dry everything completely with a clean rag. Moisture can lead to further corrosion.
- Clean the Battery Tray: Inspect the battery tray for any signs of acid spillage or corrosion. Clean the tray with the baking soda solution and rinse thoroughly.
Reconnecting the Battery
Once everything is clean and dry, you can reconnect the battery. Follow these steps in reverse order of disconnection:
- Reconnect the Positive Terminal: Attach the positive cable to the positive terminal and tighten the nut securely. Ensure the connection is tight but avoid overtightening, which can damage the terminal.
- Reconnect the Negative Terminal: Attach the negative cable to the negative terminal and tighten the nut securely.
- Apply a Corrosion Preventative (Optional): Apply a thin layer of petroleum jelly or a battery terminal protectant spray to the terminals and cable clamps. This helps to prevent future corrosion by creating a barrier against moisture and air. Dielectric grease is another option.
- Start the Engine: Start the engine and check that the electrical system is functioning correctly. Check the headlights, radio, and other accessories.
Preventing Future Corrosion
While cleaning the terminals addresses the immediate problem, taking steps to prevent future corrosion is essential. Here are a few tips:
- Regular Inspection: Inspect your battery terminals regularly (at least every six months) for signs of corrosion. Early detection allows you to address the problem before it becomes severe.
- Proper Ventilation: Ensure that the battery is properly ventilated, especially if it's located in an enclosed space. This helps to prevent the build-up of corrosive gases.
- Avoid Overcharging: Overcharging can accelerate corrosion. If you suspect your charging system is faulty, have it inspected by a qualified mechanic. A faulty voltage regulator is the most common culprit here.
- Battery Terminal Protectors: Install battery terminal protectors (felt washers or specialized covers) to help absorb any escaping acid.
- Check for Leaks: Periodically check the battery casing for any signs of cracks or leaks. If you find any, replace the battery immediately.
By following these steps, you can effectively clean corrosion from your battery terminals, improve your vehicle's electrical performance, and extend the life of your battery. Remember, safety is paramount, so always disconnect the negative terminal first and wear appropriate protective gear.