How To Compress Coil Springs Without Tool
Compressing coil springs is a fundamental task in automotive repair, crucial for jobs like replacing struts, shocks, or control arms. Normally, this requires a specialized coil spring compressor tool. But what if you're in a pinch, or simply don't have access to one? While we strongly advise against it due to the immense potential for injury, understanding the principles and potential risks of alternative methods is essential for any serious automotive enthusiast. Safety is paramount; never attempt these methods without proper training and understanding of the potential consequences. This article is for informational purposes only and should not be taken as encouragement to bypass proper safety procedures or equipment.
Understanding the Risks: Why Coil Spring Compressors Exist
Coil springs store a tremendous amount of energy. When compressed, they exert significant force, and if released uncontrollably, can cause serious injury or even death. Coil spring compressors are designed to distribute this force safely and gradually. Attempting to compress a spring without one introduces significant and unacceptable risk. The inherent danger in these methods cannot be overstated. We will only be covering methods that professionals may utilize in very specific circumstances where other tools are not available, always prioritizing safety and control as much as possible.
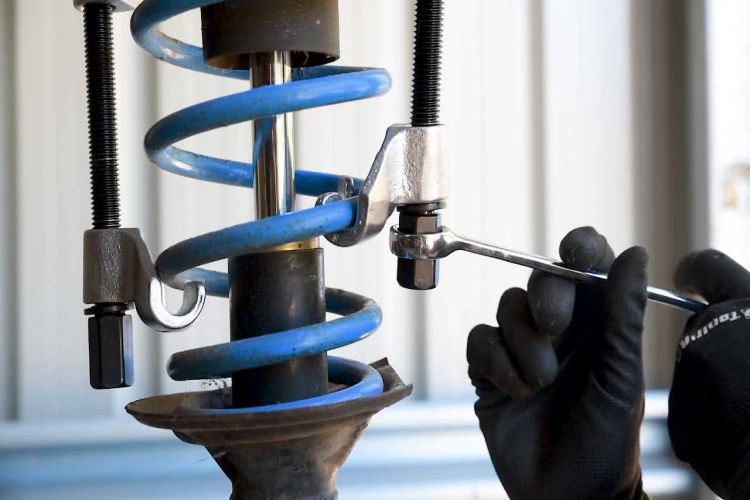
Method 1: The Floor Jack and Straps (Advanced Skill Required)
This method is potentially dangerous and should only be attempted by experienced mechanics who fully understand the risks. It involves using a floor jack and heavy-duty ratchet straps to gradually compress the spring. The principle relies on controlling the spring's expansion with the straps while the jack raises the control arm (or similar component) to compress the spring.
- Preparation: Position the strut assembly on a solid, level surface. Ensure the area is clear of obstructions. Wear appropriate personal protective equipment (PPE), including safety glasses, gloves, and sturdy shoes.
- Securing the Spring: Wrap multiple heavy-duty ratchet straps tightly around the coil spring, spaced evenly apart. Ensure the straps are rated for the load they will be bearing and are in good condition. This provides some measure of containment should the spring unexpectedly release.
- Jacking the Control Arm: Carefully position the floor jack under the control arm (or the relevant component attached to the spring). Slowly and incrementally raise the jack, compressing the spring. Monitor the spring and straps constantly for any signs of stress or slippage.
- Disassembly: Once the spring is compressed sufficiently to remove the strut assembly or other components, carefully secure the assembly with additional supports. Gradually release the pressure on the jack, allowing the straps to control the spring's expansion.
- Reassembly: Reverse the process to reassemble the suspension. Pay close attention to proper alignment and torque specifications.
Critical Considerations: The integrity of the ratchet straps is paramount. The jack must be stable and securely positioned. Any sign of slippage or deformation requires immediate cessation of the process. This method is inherently risky and should only be employed as a last resort by experienced professionals who fully understand the potential consequences. Do not attempt this without proper training and experience.
Method 2: The Power of Leverage (Limited Applications)
In specific situations, where only minor spring compression is needed (such as when working with very soft springs or performing minor adjustments), leverage can be used. This typically involves using pry bars or similar tools to slightly compress the spring enough to allow removal or installation of a component. This is only applicable in situations where the spring force is relatively low and the risk of sudden release is minimal. An example might be re-seating a spring that has slightly popped out of its perch.
- Assessment: Carefully assess the amount of compression needed and the force exerted by the spring. If the spring feels too stiff or requires significant force to compress, this method is not appropriate.
- Leverage Points: Identify suitable leverage points near the spring. Use a sturdy pry bar to apply controlled pressure, compressing the spring just enough to achieve the desired outcome.
- Secure the Area: Use clamps or other securing devices to hold the spring in its compressed position while you work.
- Gradual Release: Once the task is complete, gradually release the pressure on the pry bar, allowing the spring to decompress slowly.
Important Considerations: This method is only suitable for minor compression adjustments. Never attempt to compress a fully loaded coil spring using leverage alone. The risk of slippage and sudden release is high. This method should only be considered when the spring is already near its compressed state, requiring only slight manipulation.
The Unwavering Emphasis on Safety
Regardless of the method you might consider, remember that coil springs are potentially dangerous components. Whenever possible, use a proper coil spring compressor tool. If you are unsure about any aspect of the process, consult a qualified mechanic. Improper handling of coil springs can lead to serious injury or even death. There is no substitute for experience, caution, and the right tools. Working on automotive suspension systems requires a thorough understanding of mechanical principles and the potential hazards involved.
These methods described are for informative purposes only, demonstrating alternatives that professionals MAY utilize when completely necessary. Never compromise your safety or the safety of others. Always prioritize using the correct tools and following proper procedures.