
How To Connect A Trailer Brake Controller
Towing. It's the unsung hero of the automotive world. Need to haul your prized '67 Mustang to the track? Launch your boat for a weekend of fishing? Or maybe you're embarking on a cross-country RV adventure? Whatever your reason, safe and controlled towing hinges on one crucial piece of equipment: the trailer brake controller. But understanding *how* to connect one isn't always straightforward. Let's dive in!
Understanding the Basics: Why Trailer Brakes Matter
Before we get our hands dirty, let's quickly recap why trailer brakes are essential. Imagine a scenario: you're cruising down the highway, towing a hefty travel trailer, and a car suddenly cuts you off. Without trailer brakes, your tow vehicle's brakes are solely responsible for stopping both your rig and the trailer. This dramatically increases stopping distance, puts immense strain on your vehicle's braking system, and creates a potentially dangerous situation. Trailer brakes, activated by the brake controller, provide independent braking force to the trailer's wheels, ensuring smoother, safer, and more controlled stops.
The Different Types of Trailer Brake Controllers
Trailer brake controllers broadly fall into two categories: time-delayed and proportional.
- Time-Delayed Controllers: These are the simpler, often more affordable option. When you press the brake pedal, the controller sends a preset amount of braking power to the trailer brakes after a short delay. You typically adjust the power output via a knob.
- Proportional Controllers: These controllers are more sophisticated and provide a more natural braking feel. They use an internal accelerometer to sense how quickly your tow vehicle is decelerating and apply braking force to the trailer proportionally. The harder you brake, the harder the trailer brakes engage.
Choosing the right type depends on your towing needs and preferences. For occasional, lighter towing, a time-delayed controller might suffice. However, for heavier loads, frequent towing, or a smoother, more confident driving experience, a proportional controller is the way to go.
Wiring: The Heart of the Connection
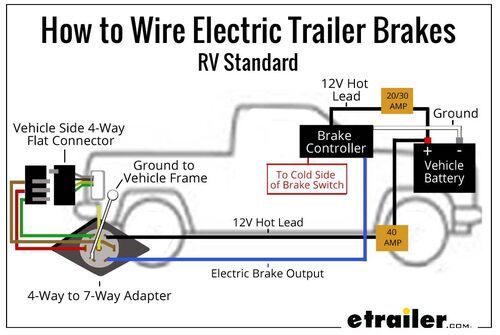
The actual connection process involves wiring the brake controller into your tow vehicle's electrical system. This is where things can get a little tricky, as wiring configurations can vary depending on the make, model, and year of your vehicle. Thankfully, most modern trucks and SUVs come equipped with a pre-wired tow package, which simplifies the process significantly. However, even with a tow package, knowing what you're doing is critical.
Common Wire Functions:
- Power Wire (Typically Blue): This wire carries the brake signal from the controller to the trailer's electric brakes.
- Ground Wire (Typically White): Provides a ground connection for the controller.
- Brake Light Wire (Typically Red): This wire connects to the vehicle's brake light circuit, signaling the controller to activate the trailer brakes when you press the pedal.
- 12V Power Wire (Typically Black): Provides power to the controller.
Spec Table: Wire Colors (Typical)
| Wire Function | Typical Color | Notes |
|---|---|---|
| Brake Signal | Blue | Connects to trailer brake wire. |
| Ground | White | Essential for proper operation. |
| Brake Light Input | Red | Signals brake application. |
| 12V Power | Black | Supplies power to the controller. |
Important Note: *Always* consult your vehicle's owner's manual and the brake controller's instructions for specific wiring diagrams. Incorrect wiring can damage your electrical system or render the brake controller ineffective.
Step-by-Step Connection (With Pre-Wired Tow Package)
If your vehicle has a pre-wired tow package, the process is generally as follows:
- Locate the Connector: Look for a dedicated connector, typically located under the dashboard near the steering column or in the glove box. It might be labeled "Trailer Brake Controller."
- Connect the Controller: Many brake controllers come with a wiring harness that plugs directly into this connector. If not, you'll need to match the wires on the controller's harness to the corresponding wires on the vehicle's connector.
- Secure the Controller: Mount the controller in a convenient location where you can easily reach the manual override lever. Make sure it doesn't obstruct your view or interfere with the vehicle's controls.
- Test the Connection: With the trailer connected, have someone monitor the trailer brakes while you slowly apply the brakes. You should see the trailer brakes engaging. Adjust the controller's settings (gain or power) as needed.
Vehicular Variations: Diesel vs. Gas & Model Year Matters
The connection process can also vary based on your engine type and model year. For example, some older diesel trucks may require a different wiring configuration than newer gas-powered trucks. The location of the connector, the wire colors, and even the availability of a pre-wired tow package can differ significantly.
Considerations:
- Older Vehicles: May require more extensive wiring, potentially needing to tap into the brake light circuit directly. This can be more complex and might require professional assistance.
- Diesel Trucks: Some diesel engines have different electrical characteristics that can affect the brake controller's performance. Consult the controller's instructions for diesel-specific compatibility information.
- Newer Trucks with Integrated Systems: Some modern trucks have integrated trailer brake controllers that are controlled through the vehicle's infotainment system. In these cases, you may only need to connect the trailer wiring harness.
Driving Impressions and Adjustments
Once the controller is connected, proper adjustment is key. Start with a low gain setting and gradually increase it until you feel the trailer brakes engaging slightly before your vehicle's brakes. Avoid setting the gain too high, as this can cause the trailer brakes to lock up, leading to instability. Pay attention to how the trailer feels during braking – a slight pull to one side could indicate an issue with the trailer brakes themselves.
Pros and Cons
Time-Delayed Controllers
- Pros: Simple to install, more affordable.
- Cons: Less smooth braking, requires more adjustment for varying loads.
Proportional Controllers
- Pros: Smoother, more natural braking feel, automatically adjusts to braking force.
- Cons: More expensive, slightly more complex to install.
Real-World Driving Impression: After switching from a time-delayed to a proportional controller in my F-150, towing my camper became a much more relaxed experience. The proportional controller reacted seamlessly to my braking inputs, eliminating the jerky feel of the time-delayed unit. It's definitely worth the extra investment if you tow frequently.
Final Thoughts: Connecting a trailer brake controller is a task that requires careful attention to detail and a solid understanding of your vehicle's electrical system. If you're not comfortable working with electrical wiring, it's always best to consult a qualified mechanic or trailer specialist. Safe towing is non-negotiable, and a properly installed and adjusted brake controller is your first line of defense.
Now, here's the fun part: Which is better - a wireless trailer brake controller or a wired one? Let the debate begin in the comments below!