
How To Fix A Hole In A Plastic Car Bumper
A hole in your plastic car bumper is more than just an eyesore; it can lead to further damage and potentially compromise safety. Whether it's a small puncture from road debris or a larger dent caused by a minor collision, addressing the issue promptly is crucial. This article provides a practical guide for car owners and mechanics on how to repair a hole in a plastic car bumper, covering common problems, solutions, and preventative maintenance.
Identifying the Problem and Its Causes
The first step is to accurately assess the damage. Common symptoms of a hole in a plastic bumper include:
- Visible puncture or tear in the plastic.
- Cracks radiating outwards from the hole.
- Loose or detached pieces of the bumper.
- Unusual noises (rattling, flapping) while driving.
The causes can range from minor incidents to more significant events:
- Road debris: Rocks, gravel, and other objects kicked up by tires.
- Low-speed impacts: Parking lot collisions, bumping into objects.
- Weather damage: Extreme temperatures can weaken the plastic, making it more susceptible to damage.
- Age and material degradation: Over time, plastic can become brittle and prone to cracking.
For instance, a common issue with older Honda Civics is that the lower bumper plastic becomes brittle over time, making it easily susceptible to cracking from even minor impacts. Similarly, the often-low-slung bumpers of Mazda Miatas are prone to scraping and small puncture holes from road debris.
Troubleshooting and Repair Options
Several repair options exist, ranging from DIY solutions to professional repairs. The best choice depends on the size and severity of the hole, your budget, and your skill level.
Small Hole Repair (DIY Option)
For small holes (less than an inch in diameter) without significant cracking, a DIY repair using a plastic repair kit may be sufficient. These kits typically include:
- Plastic filler: A two-part epoxy or polyester resin.
- Hardener: To activate the filler.
- Sanding paper: For smoothing the repair.
- Mixing sticks and applicators.
Steps:
- Clean the area: Thoroughly clean the bumper around the hole with soap and water, then degrease with isopropyl alcohol.
- Prepare the surface: Sand the area around the hole to create a rough surface for the filler to adhere to.
- Mix the filler: Follow the manufacturer's instructions to mix the plastic filler and hardener.
- Apply the filler: Use the applicator to carefully fill the hole, slightly overfilling it.
- Allow to cure: Let the filler cure completely according to the instructions (usually several hours).
- Sand and smooth: Sand the filled area to match the surrounding surface, starting with coarse grit sandpaper and finishing with fine grit.
- Prime and paint: Apply primer to the repaired area, followed by matching automotive paint. Several thin coats are better than one thick one.
Real-world Issue: The color match can be tricky. Take your car's paint code to an automotive paint store for a custom mix. Also, ensure you thoroughly clean and degrease the area, otherwise the filler may not adhere properly, leading to the repair failing prematurely.
Larger Hole Repair (Professional or Advanced DIY)
For larger holes, significant cracking, or if the bumper is severely damaged, a more extensive repair is needed. This often involves:
- Plastic welding: Using a specialized tool to melt and fuse the plastic together.
- Bumper replacement: Replacing the entire bumper with a new or used one.
Plastic Welding:
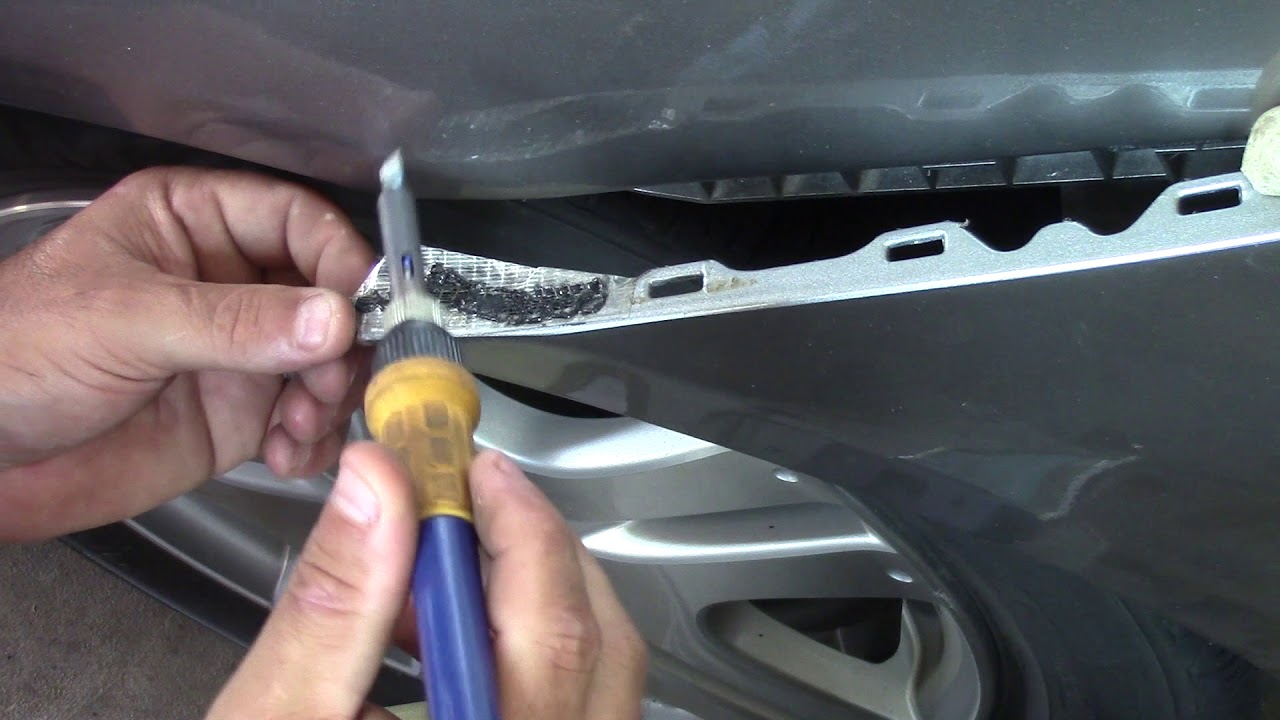
This method requires specialized equipment and skill. It's generally best left to professionals, but experienced DIYers with the right tools can attempt it. The process involves using a plastic welder to melt plastic rods and fuse them to the bumper material, effectively "welding" the hole closed. Reinforcement mesh is often used on the backside of the bumper to provide extra strength.
Bumper Replacement:
While more expensive, replacing the entire bumper is sometimes the only viable option for severely damaged bumpers. This involves removing the old bumper (typically held on by bolts and clips) and installing a new one. You can purchase aftermarket bumpers or used bumpers from salvage yards.
Example: Replacing the bumper on a Toyota Camry typically involves removing several bolts under the car and inside the wheel wells, as well as disconnecting any sensors or lights attached to the bumper. Aftermarket bumpers can sometimes have fitment issues, so it's crucial to check reviews and ensure compatibility with your specific model year.
Preventative Maintenance and Long-Term Care
Preventing bumper damage is always better than repairing it. Here are some tips for keeping your car's bumper in top condition:
- Drive defensively: Avoid tailgating and be aware of your surroundings to anticipate potential hazards.
- Park carefully: Avoid tight spaces and be mindful of parking curbs and other obstacles.
- Regularly inspect your bumper: Look for signs of damage (cracks, scratches) and address them promptly.
- Apply a protective coating: Wax or sealant can help protect the plastic from UV damage and minor scratches.
- Consider parking sensors: Especially useful for larger vehicles, parking sensors can help prevent low-speed impacts.
Regular car washing and waxing not only keep your car looking its best but also help protect the plastic bumper from environmental damage. Promptly addressing minor damage can prevent it from escalating into a more significant and costly repair. By understanding the causes of bumper damage and implementing preventative measures, you can keep your car looking great and maintain its value for years to come. Remember to always consult with a qualified mechanic if you are unsure about any repair procedures.