How To Install An Egr On A KA24DE Engine?
Imagine your engine as a diligent runner, constantly expelling exhaled air. Now, imagine that some of that air, still carrying valuable energy, is rerouted back into the intake to be used again. That, in essence, is what an Exhaust Gas Recirculation (EGR) system does. On the trusty KA24DE, the workhorse engine found in many Nissan vehicles, the EGR system plays a significant role in emissions control and fuel efficiency. While many performance enthusiasts might initially see EGR systems as power robbers, understanding their function and installation is crucial for maintaining a healthy and environmentally responsible engine.
Understanding the KA24DE EGR System
The KA24DE EGR system isn't overly complex, but understanding its components and operation is essential before tackling an installation. At its core, the system aims to reduce the formation of nitrogen oxides (NOx), a harmful greenhouse gas, by lowering combustion temperatures. It achieves this by introducing a small amount of exhaust gas back into the intake manifold.
Mechanical Operation
The EGR system consists of several key components:
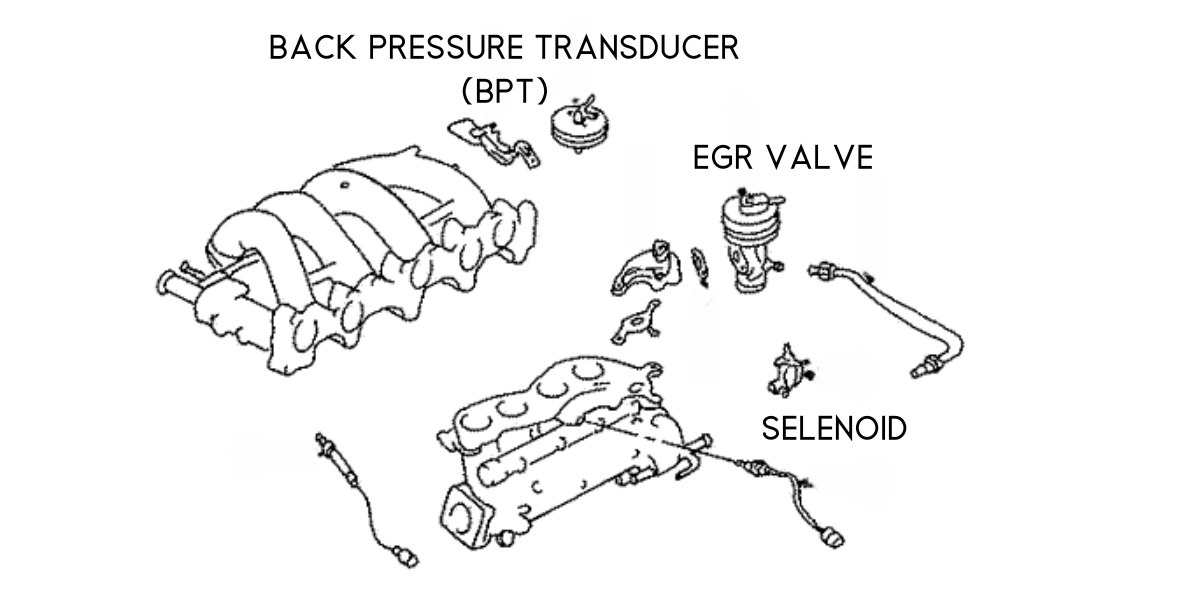
- EGR Valve: This is the heart of the system. The EGR valve is a vacuum-actuated device that controls the flow of exhaust gas into the intake manifold. It's usually mounted on the intake manifold or on a dedicated EGR pipe near the manifold. When vacuum is applied (typically at cruising speeds and part-throttle conditions), the valve opens, allowing exhaust gas to flow.
- EGR Control Solenoid Valve (EGRC): This solenoid controls the vacuum signal to the EGR valve. The Engine Control Unit (ECU) commands the EGRC to open or close, regulating when the EGR valve is active.
- Vacuum Hoses: A network of vacuum hoses connects the intake manifold (vacuum source), the EGRC solenoid, and the EGR valve. These hoses must be in good condition and properly connected to ensure correct operation.
- EGR Tube/Pipe: This metal tube connects the exhaust manifold to the EGR valve, providing a pathway for the exhaust gas.
- Temperature Sensor (Some Models): Some KA24DE engines feature an EGR temperature sensor. This sensor provides feedback to the ECU regarding the temperature of the recirculated exhaust gas, allowing for finer control.
When the engine is cold or at idle, the ECU keeps the EGRC solenoid closed, preventing vacuum from reaching the EGR valve. This ensures proper combustion and prevents stalling. As the engine warms up and reaches cruising speed, the ECU energizes the EGRC solenoid, opening it and allowing vacuum to reach the EGR valve. The valve opens, and exhaust gas is drawn into the intake manifold, diluting the incoming air-fuel mixture and reducing combustion temperatures.
Pros and Cons of EGR Systems
Like any system, the EGR has its advantages and disadvantages:
Pros:
- Reduced NOx Emissions: The primary benefit is a significant reduction in NOx emissions, contributing to cleaner air.
- Improved Fuel Economy: Under certain driving conditions (cruising), EGR can slightly improve fuel economy by reducing pumping losses and allowing for a leaner air-fuel mixture.
- Reduced Engine Knock: Diluting the air-fuel mixture reduces the likelihood of engine knock, especially under high-load conditions.
Cons:
- Reduced Performance: Introducing exhaust gas into the intake reduces the amount of fresh air available for combustion, potentially slightly reducing power output. This effect is most noticeable at wide-open throttle.
- Carbon Buildup: The exhaust gas contains carbon particles that can accumulate in the intake manifold and on the EGR valve, potentially causing clogging and malfunctioning.
- Potential for Rough Idle: If the EGR valve is leaking or stuck open, it can cause a rough idle or even stalling, especially when the engine is cold.
Use Cases and Manufacturer Examples
EGR systems have been a standard feature on most modern vehicles for decades. Nissan implemented EGR on the KA24DE across various models, including the 240SX, Altima, and Pickup truck. The specific implementation might vary slightly depending on the year and model, but the fundamental principles remain the same. Other manufacturers like Toyota, Honda, and Mazda have also utilized EGR systems extensively to comply with emissions regulations.
The most common use case for EGR is during steady-state cruising. During these conditions, the engine is operating efficiently, and the introduction of exhaust gas has minimal impact on performance while significantly reducing NOx emissions. EGR systems are typically deactivated during idle, cold starts, and wide-open throttle conditions to ensure optimal engine performance and drivability.
Installation Guide: Installing an EGR System on a KA24DE
Disclaimer: Installing an EGR system requires a basic understanding of automotive mechanics and the ability to safely work on your vehicle. If you are not comfortable with these tasks, it's best to consult a qualified mechanic.
Tools and Materials Required:
- New EGR valve
- New EGRC solenoid (recommended)
- New vacuum hoses
- New EGR tube/pipe (if necessary)
- Gaskets (for EGR valve and EGR tube)
- Basic hand tools (sockets, wrenches, screwdrivers)
- Vacuum gauge
- Penetrating oil
- Torque wrench
- Safety glasses
- Gloves
Step-by-Step Installation:
- Preparation: Disconnect the negative battery cable to prevent electrical shorts. Allow the engine to cool completely before starting the work.
- Locate Components: Identify the location of the EGR valve, EGRC solenoid, and EGR tube on your engine. Refer to a repair manual or online diagrams if needed.
- Remove Old Components: Spray penetrating oil on the bolts and fittings of the EGR valve and EGR tube to loosen them. Carefully disconnect the vacuum hoses from the EGR valve and EGRC solenoid. Disconnect the electrical connector from the EGRC solenoid. Remove the bolts holding the EGR valve and EGR tube in place. Be careful not to damage the threads in the intake manifold or exhaust manifold.
- Inspect Components: Examine the old EGR valve and EGR tube for signs of carbon buildup or damage. If the EGR valve is heavily clogged, it may need to be replaced. Inspect the vacuum hoses for cracks or leaks. Replace any damaged or worn components.
- Clean Surfaces: Clean the mating surfaces on the intake manifold and exhaust manifold where the EGR valve and EGR tube will be installed. Use a gasket scraper or wire brush to remove any old gasket material.
- Install New Components: Install the new EGR valve and EGR tube with new gaskets. Tighten the bolts to the manufacturer's specified torque. Connect the vacuum hoses to the EGR valve and EGRC solenoid, ensuring they are properly routed and securely attached. Connect the electrical connector to the EGRC solenoid.
- Install New Vacuum Hoses: Replace all vacuum hoses associated with the EGR system, ensuring they are properly routed and securely attached. Use a vacuum gauge to check for leaks in the vacuum lines.
- Test the System: Reconnect the negative battery cable. Start the engine and let it warm up to operating temperature. Use a vacuum gauge to verify that the EGR valve is receiving vacuum when the engine is at cruising speed. Check for any leaks around the EGR valve and EGR tube.
- Monitor Engine Performance: After the installation, monitor the engine performance for any signs of problems, such as rough idle, stalling, or poor fuel economy. If you experience any issues, consult a qualified mechanic.
Real-World Insights and Recommendations
Installing an EGR system can be a beneficial project, especially if you're restoring a KA24DE engine and want to ensure it meets emissions standards. However, remember that a properly functioning EGR system is crucial for its benefits to outweigh the potential drawbacks.
Recommendation 1: Preventative Maintenance: Regularly inspect and clean the EGR valve and EGR tube to prevent carbon buildup. Using high-quality fuel and performing regular oil changes can also help reduce carbon deposits in the exhaust system. Some owners also use fuel additives designed to clean fuel systems. This may indirectly help prevent carbon build up around the EGR valve.
Recommendation 2: Troubleshooting: If you experience any problems with your EGR system, such as a rough idle or poor fuel economy, diagnose the issue promptly. Common problems include clogged EGR valves, leaking vacuum hoses, and faulty EGRC solenoids. A scan tool can often provide diagnostic trouble codes (DTCs) that can help pinpoint the source of the problem.
Recommendation 3: Consider your needs: If you're primarily focused on maximizing engine performance and are not concerned about emissions, you might consider disabling the EGR system. However, be aware that this may not be legal in your area, and it can also affect the engine's long-term reliability. If you choose to disable the EGR system, it's important to do so properly to avoid any negative consequences. This typically involves blocking off the EGR port on the exhaust manifold and disabling the EGR function in the ECU (if possible).
In conclusion, understanding and properly maintaining your KA24DE's EGR system is important for both emissions compliance and engine health. By following these guidelines and being mindful of the potential issues, you can keep your engine running smoothly and contribute to a cleaner environment.