
How To Install Running Boards On Ram 1500
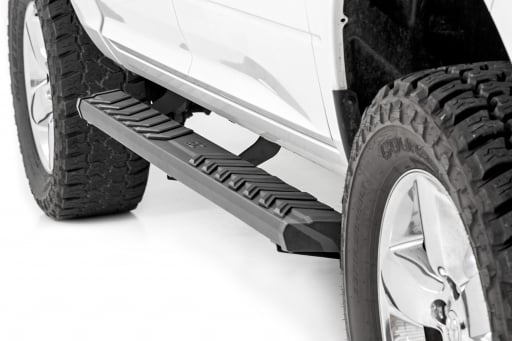
Installing running boards on a Ram 1500 is a common upgrade, providing enhanced accessibility and a more rugged aesthetic. While seemingly straightforward, a successful installation requires understanding the technical aspects, engineering considerations, and long-term maintenance implications.
Preparation and Inspection
Before commencing the installation, meticulously inspect all components. This includes the running boards themselves, mounting brackets, hardware (bolts, washers, nuts), and any included instructions. Verify that the parts are compatible with your specific Ram 1500 model year and cab configuration (e.g., crew cab, quad cab). Mismatched parts can lead to structural instability or installation difficulties. Pay close attention to the torque specifications provided in the instructions; using incorrect torque can compromise the integrity of the connection.
Inspect the underside of the truck for existing mounting points. Many Ram 1500s come pre-drilled with threaded holes or pre-existing mounting brackets. Ensure these points are clean and free from rust or debris. If rust is present, use a wire brush and rust inhibitor to prepare the surface for optimal adhesion. The presence of corrosion can significantly reduce the lifespan and reliability of the installation.
Installation Process: A Step-by-Step Guide
The installation typically involves the following steps:
- Preparation: Gather all necessary tools, including a socket set (metric or SAE depending on the hardware), torque wrench, level, measuring tape, and possibly a drill if additional mounting points are required (rare but possible).
- Bracket Installation: Attach the mounting brackets to the pre-existing mounting points on the truck's frame or rocker panels. Ensure the brackets are properly aligned and oriented according to the instructions. Incorrect bracket placement can result in misaligned running boards or interference with other vehicle components.
- Running Board Attachment: Lift the running boards into position and attach them to the installed brackets using the provided hardware. Start by loosely tightening the bolts to allow for adjustments before final tightening.
- Alignment and Leveling: Use a level to ensure the running boards are horizontally aligned. Adjust the bracket positions as necessary to achieve a level and uniform appearance. Measure the distance from the running board to the ground at several points to verify consistent clearance.
- Final Tightening: Once the running boards are properly aligned, tighten all bolts to the specified torque values using a torque wrench. Overtightening can strip the threads, while undertightening can lead to loosening and instability over time.
- Inspection: After installation, thoroughly inspect the running boards and brackets to ensure they are securely attached. Test the stability of the running boards by applying weight to them.
Alternatives and Comparisons
Alternatives to traditional running boards include:
- Nerf Bars (Side Steps): Offer a more minimalist appearance and often provide slightly better ground clearance. However, they typically have a smaller stepping surface compared to running boards.
- Power Running Boards: Automatically extend and retract when the doors are opened and closed. They provide the best of both worlds – easy access and improved ground clearance when retracted. However, they are significantly more expensive and complex to install and maintain.
Pros and Cons:
| Feature | Running Boards | Nerf Bars | Power Running Boards |
|---|---|---|---|
| Accessibility | Excellent | Good | Excellent |
| Ground Clearance | Lower | Higher | Highest (when retracted) |
| Appearance | More substantial | More minimalist | Sleek, integrated |
| Cost | Moderate | Lower | Highest |
| Complexity | Simple | Simple | Complex |
| Reliability | High | High | Lower (due to moving parts) |
Reliability and Maintenance
The reliability of running boards depends heavily on the quality of the materials and the installation. Stainless steel or powder-coated aluminum running boards are generally more resistant to corrosion than chrome-plated steel. Regularly inspect the mounting hardware for looseness and corrosion. Retorque the bolts as needed, especially after the first few weeks of use. Cleaning the running boards regularly with soap and water can help prevent the buildup of dirt and debris that can accelerate corrosion.
For power running boards, periodic lubrication of the moving parts is essential to prevent sticking and ensure smooth operation. Consult the manufacturer's instructions for recommended lubricants and maintenance procedures.
Future Trends
Future trends in running board design include:
- Integrated Lighting: Running boards with built-in LED lighting for enhanced visibility and safety.
- Advanced Materials: The use of lightweight and high-strength materials such as carbon fiber composites to improve fuel efficiency and durability.
- Smart Technology: Integration with vehicle systems to automatically adjust the running board height based on vehicle speed and terrain.
Forward-Looking Note
The automotive industry is rapidly evolving, with a focus on electric vehicles, autonomous driving, and connected car technologies. While these advancements may seem unrelated to running boards, they will ultimately influence their design and functionality. For example, electric trucks may require different mounting solutions due to battery placement, and autonomous vehicles may incorporate advanced sensor systems into the running boards for enhanced safety and navigation. As automotive professionals, it is crucial to stay informed about these trends and adapt our skills and knowledge to meet the changing demands of the industry.