
How To Replace Vapor Canister Purge Valve
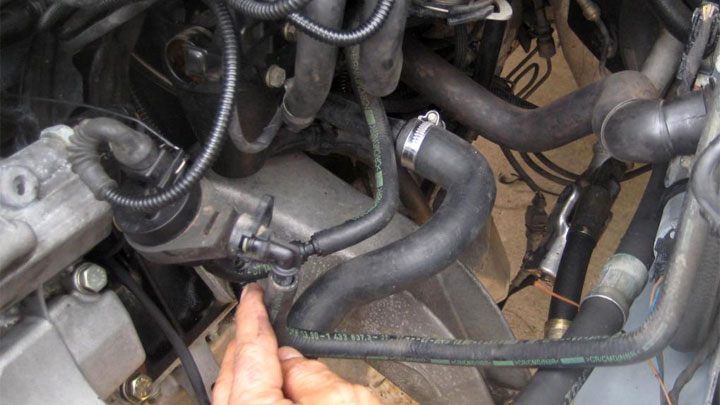
The vapor canister purge valve, often referred to simply as the purge valve, is a crucial component of your vehicle's evaporative emissions control (EVAP) system. This system prevents harmful gasoline vapors from escaping into the atmosphere. The purge valve specifically controls the flow of these stored vapors from the charcoal canister to the engine intake manifold, where they can be burned during normal combustion. A failing purge valve can lead to a variety of performance issues, including poor fuel economy, rough idling, and even a check engine light. Replacing it is a relatively straightforward repair that many car owners can tackle themselves, saving on potentially hefty mechanic fees. This guide will provide a comprehensive, step-by-step process for replacing your vapor canister purge valve.
Identifying a Faulty Vapor Canister Purge Valve
Before diving into the replacement process, it's essential to confirm that the purge valve is indeed the problem. Here are some common symptoms of a failing purge valve:
- Check Engine Light: This is often the first indicator of a problem. The code associated with a faulty purge valve typically falls within the P0440-P0449 range. You'll need an OBD-II scanner to read the code.
- Rough Idling: A malfunctioning valve can disrupt the air-fuel mixture, causing the engine to idle roughly, stall, or hesitate. This is often more noticeable when the engine is cold.
- Poor Fuel Economy: If the valve is stuck open, it can continuously introduce fuel vapors into the intake, leading to a rich fuel mixture and decreased fuel efficiency.
- Difficulty Starting: In some cases, a stuck-open purge valve can flood the engine with fuel vapors, making it difficult to start, particularly after refueling.
- Fuel Smell: A noticeable gasoline smell, especially near the fuel tank or charcoal canister, can indicate a leak in the EVAP system, possibly due to a faulty purge valve.
Keep in mind that these symptoms can also be caused by other issues. Using an OBD-II scanner to read the trouble codes is the best way to confirm a purge valve problem. You can often find inexpensive scanners online or at auto parts stores. You can also use a multimeter to test the valve's resistance, but this requires knowing the specific resistance range for your vehicle's purge valve (consult your vehicle's repair manual).
Tools and Materials Needed
Before you begin, gather the necessary tools and materials. Having everything on hand will make the process smoother and more efficient.
- New Vapor Canister Purge Valve: Purchase a replacement valve that is specifically designed for your vehicle's make, model, and year. Using the VIN (Vehicle Identification Number) is the most accurate way to ensure you get the correct part.
- Basic Hand Tools: This includes a socket set, wrench set, screwdrivers (both flathead and Phillips head), and possibly pliers. The specific sizes will depend on your vehicle.
- OBD-II Scanner (optional): To clear the check engine light after the repair.
- Safety Glasses: Always protect your eyes when working on your vehicle.
- Gloves: To keep your hands clean and protected.
- Penetrating Oil (optional): If any bolts or connections are rusted or difficult to remove.
- Shop Rags or Paper Towels: For cleaning up any spills.
- Wheel Chocks: For safety, especially if working on a sloped surface.
Step-by-Step Guide to Replacing the Vapor Canister Purge Valve
Now, let's get into the replacement process. Always prioritize safety and work in a well-ventilated area. Refer to your vehicle's service manual for specific instructions or diagrams, as the location and configuration of the purge valve can vary.
- Locate the Vapor Canister Purge Valve: The purge valve is typically located in the engine compartment, often near the intake manifold or fuel rail. Refer to your vehicle's repair manual or search online for diagrams specific to your vehicle model. Sometimes, it is hidden and requires removing other components for access.
- Disconnect the Negative Battery Terminal: This is a crucial safety step to prevent electrical shorts. Use a wrench to loosen the nut on the negative battery terminal and carefully disconnect it.
- Disconnect the Electrical Connector: The purge valve will have an electrical connector attached to it. Gently press the release tab on the connector and pull it straight off. Avoid pulling on the wires themselves.
- Disconnect the Vacuum Hoses: The purge valve will also have vacuum hoses connected to it. Carefully disconnect these hoses. Pay attention to the routing of the hoses, and take pictures or make a diagram to ensure you reconnect them correctly later. Use pliers if necessary to loosen any tight connections.
- Remove the Old Purge Valve: The valve is usually held in place by a bolt or two, or sometimes by a bracket. Use the appropriate socket or wrench to remove the bolt(s) or bracket. Once the fasteners are removed, gently pull the old purge valve out.
- Install the New Purge Valve: Install the new purge valve in the reverse order of removal. Secure it with the bolt(s) or bracket. Make sure it is properly seated and tightened.
- Reconnect the Vacuum Hoses: Carefully reconnect the vacuum hoses, ensuring they are properly seated and secured. Refer to your diagram or pictures to ensure correct routing.
- Reconnect the Electrical Connector: Reconnect the electrical connector to the new purge valve. Make sure it clicks into place securely.
- Reconnect the Negative Battery Terminal: Reconnect the negative battery terminal to the battery. Tighten the nut securely.
- Clear the Check Engine Light (Optional): Use an OBD-II scanner to clear the trouble code and reset the check engine light. If you don't have a scanner, the light may clear itself after a few driving cycles, but it's best to clear it manually.
- Start the Engine and Test: Start the engine and let it idle for a few minutes. Listen for any unusual noises or rough idling. If everything sounds and feels normal, take the vehicle for a short test drive.
Important Considerations
While this guide provides a general overview, here are some additional points to keep in mind:
- Vehicle-Specific Instructions: Always consult your vehicle's repair manual for specific instructions and diagrams. The location and configuration of the purge valve can vary significantly between different makes and models.
- Torque Specifications: When tightening bolts, it's essential to follow the manufacturer's torque specifications. Over-tightening can damage the valve or the surrounding components. Consult your repair manual for the correct torque values.
- Vacuum Hose Condition: Inspect the condition of the vacuum hoses. If they are cracked, brittle, or damaged, replace them as well.
- Safety First: Always prioritize safety when working on your vehicle. Wear safety glasses and gloves, and disconnect the negative battery terminal to prevent electrical shorts.
Replacing your vapor canister purge valve is a manageable task for many DIY car owners. By following these steps carefully and referring to your vehicle's specific repair manual, you can save money and restore your vehicle's performance and emissions control.
Troubleshooting Tips
Even after replacing the purge valve, you might encounter some issues. Here are a few troubleshooting tips:
- Check Engine Light Remains On: If the check engine light remains on after replacing the valve and clearing the code, double-check all connections, including the electrical connector and vacuum hoses. Ensure the replacement valve is the correct part for your vehicle. If the light persists, there may be another issue with the EVAP system.
- Rough Idling Persists: If the rough idling continues, inspect the intake manifold for vacuum leaks. Also, consider checking other components of the EVAP system, such as the charcoal canister and the fuel tank pressure sensor.
- New Valve Fails Quickly: If the new purge valve fails shortly after installation, it could indicate an underlying problem in the EVAP system, such as a saturated charcoal canister or a faulty fuel tank pressure sensor.
If you're unsure about any part of the process or encounter difficulties, it's always best to consult with a qualified mechanic. Proper diagnosis and repair are crucial to ensure your vehicle runs smoothly and complies with emissions regulations.