How To Turn On The Pilot On A Water Heater
While seemingly unrelated to the automotive world, understanding basic appliance operation, like turning on a water heater pilot light, is a valuable skill, especially for those who work on RVs, operate auto repair shops (for employee comfort), or simply maintain their own homes. A malfunctioning water heater can lead to discomfort and, in severe cases, property damage. This guide provides a comprehensive, step-by-step approach to safely and effectively reigniting a water heater pilot light.
Understanding the Water Heater Pilot System
The pilot light is a small, continuous flame that ignites the main burner in a gas-powered water heater. It ensures that when hot water is needed, the main burner can light instantly. Several factors can cause the pilot light to go out, including: a draft, a gas supply interruption, a faulty thermocouple, or a clogged pilot orifice. Before attempting to relight the pilot, it's crucial to understand the components involved.
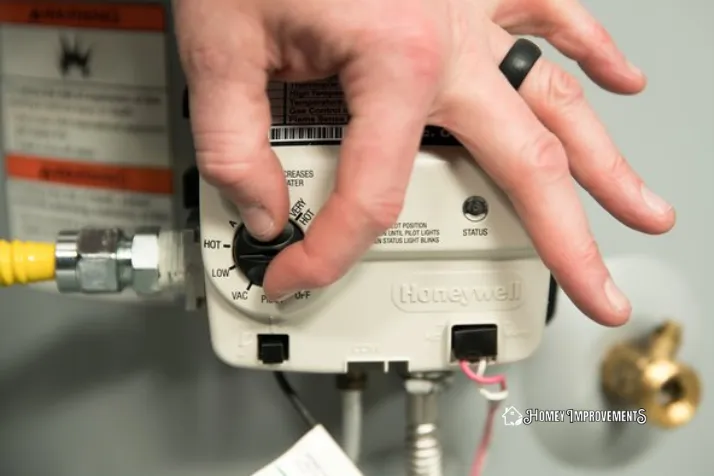
- Gas Control Valve: This is the main control center, usually located at the bottom of the water heater. It regulates gas flow to the pilot and the main burner. Look for the "Pilot," "On," and "Off" settings on the dial.
- Thermocouple (or Flame Sensor): This safety device senses the heat from the pilot light. If the pilot flame is present, the thermocouple sends a small electrical current to the gas control valve, keeping the gas supply to the pilot open. If the pilot goes out, the thermocouple cools down, the current stops, and the gas valve closes, preventing gas from leaking.
- Pilot Orifice: A small opening that supplies gas to the pilot light. It can become clogged with debris over time, preventing the pilot from staying lit.
- Igniter (Piezo or Electronic): Some modern water heaters use a piezo igniter (push-button spark generator) or an electronic igniter to light the pilot. Older models may require a match or lighter.
Step-by-Step Guide to Lighting the Pilot Light
- Safety First: Before proceeding, smell for gas. If you smell a strong gas odor, DO NOT attempt to light the pilot. Evacuate the area immediately and call your local gas company or a qualified professional. Ensure the area around the water heater is well-ventilated.
- Turn Off the Gas Supply: Locate the gas control valve and turn the dial to the "Off" position. Wait at least five minutes to allow any accumulated gas to dissipate. This is a critical safety precaution.
- Locate the Pilot Light Assembly: This is usually found near the bottom of the water heater, behind a small access panel. You might need a screwdriver to remove the panel.
- Set the Gas Control Valve to "Pilot": Turn the gas control valve dial to the "Pilot" position. You will usually need to depress the dial slightly to turn it to this position.
- Depress and Hold the Reset Button: While holding the gas control valve dial depressed, light the pilot.
- For Piezo Igniters: Repeatedly press the igniter button until you see and hear a spark, and the pilot light ignites.
- For Electronic Igniters: The igniter will automatically spark.
- For Manual Lighting (Match/Lighter): Carefully use a long lighter or match to light the pilot.
- Maintain the Pressure: Continue holding the gas control valve dial depressed for at least 30-60 seconds after the pilot light is lit. This allows the thermocouple to heat up sufficiently and generate enough current to keep the gas valve open. If you release the dial too soon, the pilot light will go out.
- Release the Dial and Verify the Pilot: After 30-60 seconds, slowly release the gas control valve dial. The pilot light should remain lit. Observe the pilot flame. It should be a steady blue flame. If the flame is yellow, flickering, or weak, there may be a problem with the gas supply or the pilot orifice.
- Turn the Gas Control Valve to "On": Once you are sure the pilot light is staying lit, carefully turn the gas control valve dial to the "On" position.
- Monitor the Water Heater: Listen for the main burner to ignite when hot water is drawn. If the main burner does not ignite, there may be a problem with the gas valve or burner assembly.
Troubleshooting Pilot Light Issues
If the pilot light repeatedly goes out, or you are unable to light it at all, consider the following troubleshooting steps:
- Check the Thermocouple: A faulty thermocouple is a common cause of pilot light problems. A visual inspection may reveal damage. A multimeter can be used to test its output (consult a qualified technician).
- Clean the Pilot Orifice: A clogged pilot orifice can restrict gas flow. Use a thin wire or needle to carefully clean the orifice. Be extremely careful not to enlarge the opening.
- Check the Gas Supply: Ensure that the gas supply is turned on and that there are no kinks or obstructions in the gas line.
- Inspect the Venting: Make sure the water heater's venting is clear and unobstructed. Proper venting is crucial for safe and efficient operation.
Important Note: If you are uncomfortable working with gas appliances or suspect a more serious problem, it is always best to consult a qualified HVAC technician or plumber. Improperly working with gas lines can be extremely dangerous.