John Deere Riding Lawn Mower Parts Diagram
For many, the words “John Deere” conjure images of verdant fields and powerful tractors. But the company's impact extends far beyond agriculture, reaching into suburban landscapes with its ubiquitous riding lawn mowers. Understanding the anatomy of these machines, specifically through a John Deere Riding Lawn Mower Parts Diagram, is crucial for both maintaining peak performance and tackling DIY repairs. Whether you're a seasoned mechanic or a homeowner looking to save on maintenance costs, this guide will navigate the intricacies of these indispensable diagrams.
Why Understanding the Parts Diagram Matters
A parts diagram isn't just a glorified exploded view; it's a roadmap to your lawn mower's inner workings. It provides a visual representation of every component, from the smallest bolt to the largest deck casting, typically with corresponding part numbers. This allows you to:
- Accurately Identify Parts: Forget guessing – a diagram eliminates ambiguity when ordering replacements.
- Plan Repairs: Visualizing the assembly helps you anticipate challenges and organize your repair process.
- Troubleshoot Problems: Tracing components through the diagram can pinpoint the source of a malfunction.
- Ensure Compatibility: Crucial for older models or modifications, verifying part numbers ensures a proper fit.
Think of it like the wiring diagram for your car – essential for understanding the flow of electricity and troubleshooting electrical issues. The same principle applies to your John Deere mower.
Key Components and Their Diagrams
A typical John Deere riding lawn mower parts diagram is usually broken down into several key sections, each covering a specific area of the machine:
- Engine: Arguably the most critical section, detailing the carburetor, ignition system, fuel system, and all internal engine components. Many John Deere mowers utilize Briggs & Stratton or Kohler engines, so understanding these engines independently can be helpful.
- Transmission/Drivetrain: This section covers the transmission (hydrostatic, gear-driven, etc.), axles, wheels, and any associated linkages. Identifying the specific transmission type is essential, as parts diagrams differ significantly.
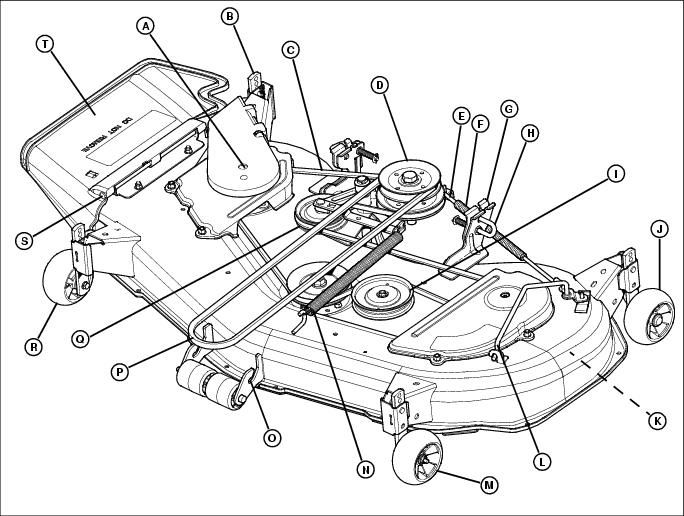
- Mower Deck: This section is crucial for maintaining a clean cut. It showcases blades, spindles, belts, pulleys, and the deck housing itself. Worn blades and damaged spindles are common issues addressed using this diagram.
- Steering and Controls: This section details the steering wheel, linkages, control levers, and associated hardware. Issues here can affect maneuverability and operator comfort.
- Electrical System: From the battery and starter to the wiring harness and safety switches, this section is essential for diagnosing electrical problems.
- Frame and Body: Covers the chassis, fenders, seat, and other cosmetic components. While less critical for performance, these parts contribute to the mower's overall appearance and structural integrity.
Finding the Right Diagram for Your Mower
The key to effectively using a John Deere Riding Lawn Mower Parts Diagram is finding the correct one for your specific model. John Deere provides online access to parts catalogs through their website. You'll need your mower's model and serial number, usually found on a sticker or plate on the frame. Once identified, the website will provide interactive diagrams and part lists.
Alternatively, you can often find printed or digital diagrams in your mower's owner's manual. Third-party websites and repair manuals also offer diagrams, but always verify their accuracy before relying on them. Using the wrong diagram can lead to ordering incorrect parts and potentially damaging your mower.
Practical Tips for Using Parts Diagrams
- Start with the Symptom: Before diving into the diagram, clearly identify the problem. This will help you narrow down the potential culprit and focus your search.
- Trace the System: Follow the path of components related to the symptom. For example, if the mower won't start, trace the electrical system from the battery to the starter.
- Use the Part Numbers: Always use the part numbers listed in the diagram when ordering replacements. This minimizes the risk of ordering the wrong part.
- Take Pictures: Before disassembling anything, take pictures of the assembly. This serves as a valuable reference when reassembling the parts.
- Keep it Organized: As you remove parts, label them and keep them organized. This will prevent confusion during reassembly.
Maintenance and Repair: Real-World Examples
Consider a common scenario: your mower's blades aren't cutting cleanly. Using the mower deck diagram, you can identify the blades, spindles, and belts. Inspecting these components for wear and damage will likely reveal the problem. A worn blade needs replacing (using the correct part number!), while a damaged spindle might require complete replacement or bearing repair. Similarly, a slipping belt can indicate wear or incorrect tension.
Another frequent issue is a hard-starting engine. The engine parts diagram will help you troubleshoot the fuel system (fuel filter, carburetor), ignition system (spark plug, ignition coil), and compression. Replacing a clogged fuel filter or cleaning a dirty carburetor are common fixes that can be easily accomplished with the right diagram and tools.
By leveraging the power of the John Deere Riding Lawn Mower Parts Diagram, you can confidently tackle a wide range of maintenance and repair tasks, saving money and extending the life of your trusty lawn-care companion.