
Location Of Crankshaft Positioning Sensor
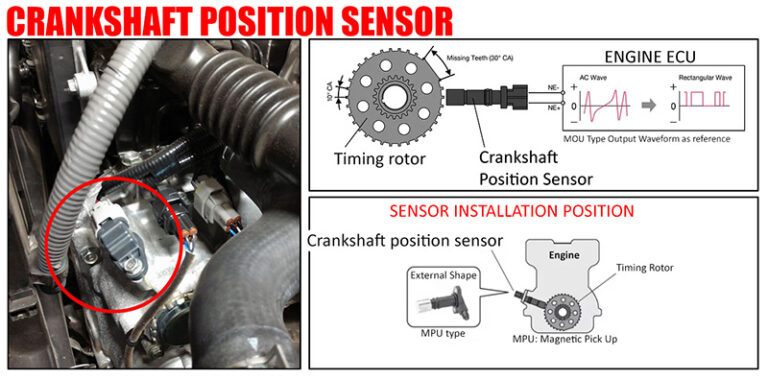
The Crankshaft Position Sensor (CKP), often referred to as the crank sensor, plays a vital role in your car's engine management system. It monitors the position and rotational speed of the crankshaft, providing crucial data to the engine control unit (ECU) or powertrain control module (PCM). This information is used to control ignition timing, fuel injection, and other critical engine functions. Knowing its location, how to maintain it, and troubleshoot common issues can save you time and money, whether you're a car owner or a seasoned mechanic.
Location, Location, Location: Finding the CKP Sensor
The location of the CKP sensor varies depending on the make, model, and engine type of your vehicle. However, there are a few common places to start your search. Generally, it's located near the crankshaft pulley or flywheel/flexplate. Here’s a breakdown of the typical locations:
- Near the Crankshaft Pulley (Front of Engine): This is a very common location, especially on older vehicles and some modern engines. Look for it mounted on the engine block, timing cover, or nearby bracket, positioned to read a reluctor wheel or tone ring attached to the crankshaft pulley.
- Near the Flywheel/Flexplate (Rear of Engine): This location is prevalent in rear-wheel-drive vehicles and some front-wheel-drive models. You'll usually find it mounted on the engine block or transmission bellhousing, aligned with the flywheel or flexplate, which also has a reluctor ring.
- Inside the Distributor (Older Vehicles): On older vehicles with distributors, the CKP sensor might be integrated within the distributor assembly.
Examples:
Toyota Camry (2007-2011, 2.4L): Typically located near the crankshaft pulley, on the front of the engine, accessible after removing the accessory drive belts.
Ford F-150 (2015-2020, 5.0L): Usually found near the flywheel at the rear of the engine, requiring access from underneath the vehicle.
Honda Civic (2012-2015, 1.8L): Located near the crankshaft pulley, but may be somewhat obscured by other engine components.
Finding the Exact Location: The best way to pinpoint the exact location is to consult your vehicle's repair manual or a reliable online database specific to your make and model. These resources often include diagrams or photos that clearly show the sensor's location.
Symptoms of a Failing CKP Sensor
A failing CKP sensor can cause a range of engine problems. Recognizing the symptoms early can help prevent further damage and more costly repairs. Here are some common signs:
- Engine Stalling: This is one of the most common symptoms. The engine may stall intermittently, especially when hot, or may not start at all.
- Hard Starting or No Starting: The engine may crank but fail to start, or it may take several attempts to start.
- Check Engine Light (CEL): The CEL will likely illuminate, and diagnostic trouble codes (DTCs) related to the CKP sensor (e.g., P0335, P0336, P0337, P0338, P0339) will be stored in the ECU's memory.
- Rough Idling: The engine may idle roughly or erratically.
- Reduced Engine Performance: You might experience a decrease in power and acceleration.
- Misfires: The engine may misfire, leading to poor fuel economy and a rough running engine.
- Erratic Tachometer Readings: The tachometer may jump around erratically or not register any RPMs at all.
Troubleshooting and Diagnosis
When you suspect a faulty CKP sensor, a systematic approach to troubleshooting is essential. Here's a step-by-step guide:
- Scan for Diagnostic Trouble Codes (DTCs): Use an OBD-II scanner to retrieve any stored DTCs. Codes related to the CKP sensor, crankshaft position, or engine timing are strong indicators.
- Visual Inspection: Carefully inspect the CKP sensor and its wiring for any signs of damage, such as frayed wires, corrosion, or loose connections. Pay close attention to the connector.
- Check the Wiring and Connectors: Use a multimeter to check the continuity of the wiring harness between the CKP sensor and the ECU. Ensure there are no breaks or shorts in the wires. Clean the connector with electrical contact cleaner.
- Test the Sensor's Resistance: Use a multimeter to measure the resistance of the CKP sensor. Compare the reading to the manufacturer's specifications. An out-of-range reading indicates a faulty sensor. Note: Some sensors require a specific testing procedure with an oscilloscope or specialized tool. Consult your vehicle's repair manual.
- Check the Sensor's Signal: Use an oscilloscope to observe the signal produced by the CKP sensor while the engine is cranking or running. A weak, distorted, or absent signal indicates a problem.
- Inspect the Reluctor Ring/Tone Ring: Check the reluctor ring or tone ring on the crankshaft pulley or flywheel for any damage, such as missing teeth, cracks, or excessive rust. Damage to the reluctor ring can interfere with the sensor's ability to read the crankshaft's position accurately.
Common Causes of CKP Sensor Failure
Understanding the reasons behind CKP sensor failure can help prevent future issues. Here are some common causes:
- Heat: Exposure to high engine temperatures can degrade the sensor's internal components over time.
- Vibration: Constant engine vibration can cause the sensor to loosen or damage its wiring.
- Contamination: Oil, coolant, or other fluids can leak onto the sensor, causing it to malfunction.
- Physical Damage: Impacts or collisions can damage the sensor or its reluctor ring.
- Wiring Issues: Damaged, corroded, or loose wiring can disrupt the sensor's signal.
- Reluctor Ring Damage: A damaged reluctor ring will give the sensor faulty readings.
- Age and Wear: Like any other component, CKP sensors can simply wear out over time.
Replacement and Repair
If you've determined that the CKP sensor is faulty, replacement is usually the best course of action. Here's a general guide:
- Disconnect the Battery: Before starting any work, disconnect the negative battery cable to prevent electrical shocks.
- Locate the Sensor: Refer to your vehicle's repair manual to locate the CKP sensor.
- Disconnect the Connector: Carefully disconnect the electrical connector from the sensor.
- Remove the Sensor: Remove the mounting bolt or screws that hold the sensor in place. Gently pull the sensor out of its bore. Be careful not to damage the reluctor ring.
- Install the New Sensor: Install the new CKP sensor in the reverse order of removal. Ensure it's properly seated and the mounting bolts are tightened to the correct torque specification.
- Reconnect the Connector: Reconnect the electrical connector to the sensor.
- Reconnect the Battery: Reconnect the negative battery cable.
- Clear DTCs: Use an OBD-II scanner to clear any stored DTCs.
- Test the Engine: Start the engine and verify that it runs smoothly. Monitor the engine for any signs of stalling, rough idling, or misfires.
Important Considerations:
Use Quality Replacement Parts: Opt for a reputable brand of CKP sensor to ensure reliability and longevity.
Proper Torque: Tighten the mounting bolts to the correct torque specification to prevent damage to the sensor or engine block.
Check the Reluctor Ring: Always inspect the reluctor ring for damage when replacing the CKP sensor.
Professional Help: If you're not comfortable performing the replacement yourself, consult a qualified mechanic.
Real-World Issues and Solutions
Here are some common scenarios and their solutions:
Problem: Engine stalls intermittently, especially when hot, but restarts after cooling down.
Possible Cause: Heat-sensitive CKP sensor. The sensor malfunctions when it gets too hot.
Solution: Replace the CKP sensor with a new, high-quality unit. Ensure proper ventilation around the sensor.
Problem: Check Engine Light is on with a CKP sensor code, but the engine seems to run fine.
Possible Cause: Intermittent wiring issue or a slightly out-of-range sensor.
Solution: Check the wiring and connectors for corrosion or damage. Clean the connector with electrical contact cleaner. If the problem persists, replace the CKP sensor.
Problem: Engine cranks but won't start after replacing the timing belt.
Possible Cause: The CKP sensor was disturbed during the timing belt replacement, or the timing is incorrect.
Solution: Verify that the CKP sensor is properly connected and positioned. Double-check the timing belt installation and ensure the timing marks are aligned correctly.
Problem: New CKP sensor fails shortly after installation.
Possible Cause: Underlying issue causing the sensor to fail prematurely, such as excessive engine vibration or oil leaks.
Solution: Identify and address the underlying issue. Check engine mounts, look for oil leaks near the sensor, and ensure proper engine maintenance.
Preventative Maintenance and Keeping Your Car in Top Condition
While CKP sensor failure can be unavoidable, proactive maintenance can help extend its lifespan and prevent many issues:
- Regular Engine Maintenance: Keep your engine properly maintained with regular oil changes, tune-ups, and inspections. A healthy engine is less likely to cause stress on the CKP sensor.
- Check for Leaks: Address any oil or coolant leaks promptly to prevent them from contaminating the CKP sensor.
- Inspect Wiring: Periodically inspect the wiring and connectors associated with the CKP sensor for any signs of damage or corrosion.
- Avoid Harsh Driving: Aggressive driving can put extra strain on the engine, potentially leading to premature sensor failure.
- Use Quality Parts: When replacing any engine components, including the CKP sensor, always use high-quality parts from reputable manufacturers.
By understanding the function, location, troubleshooting, and maintenance of the CKP sensor, you can keep your car running smoothly and avoid costly repairs. Whether you're a DIY enthusiast or rely on a professional mechanic, this knowledge empowers you to make informed decisions about your vehicle's care.