Nissan Xterra Supercharger Kit
So, you're thinking about adding a supercharger kit to your Nissan Xterra. Excellent choice! It's a popular modification that can significantly boost your off-road performance and overall driving experience. But before you dive in, let's break down what's involved, what to expect, and some critical considerations to make sure you do it right. We're going to cover everything from the basic components to the nitty-gritty tuning aspects.
Understanding Superchargers and Your Xterra
First, let's ensure we're on the same page regarding superchargers. A supercharger is essentially an air pump that forces more air into your engine's cylinders. This increased air intake allows the engine to burn more fuel, resulting in a substantial increase in horsepower and torque. Unlike a turbocharger which is driven by exhaust gases, a supercharger is mechanically driven by the engine's crankshaft, typically via a belt.
Your Xterra, depending on the year, likely comes with either a 3.3L VG33E V6 or a 4.0L VQ40DE V6 engine. Aftermarket supercharger kits primarily targeted the 3.3L engine, particularly the models from the late 90s to early 2000s. While kits for the VQ40DE are rarer, they exist and often involve more custom fabrication.
Why supercharge instead of a turbo? For the Xterra, superchargers offer a few distinct advantages. Primarily, they provide instant boost. Because they're directly connected to the engine, there's no turbo lag. This instant response is particularly beneficial for off-roading, where you need immediate power to tackle obstacles. They are also less complex than turbo systems, which is a bonus for DIY installation and long-term reliability.
Components of a Typical Xterra Supercharger Kit
A comprehensive supercharger kit includes more than just the supercharger itself. Here's a rundown of the key components you'll typically find:
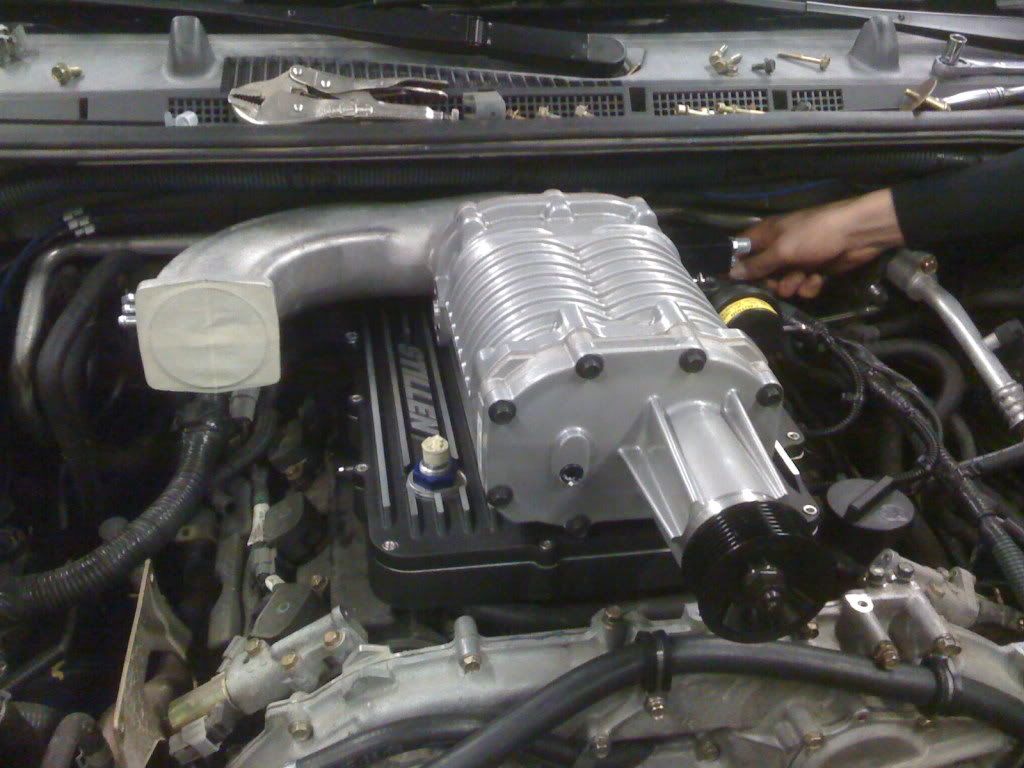
- Supercharger Unit: The heart of the system. Most kits for the VG33E used a roots-type supercharger. These are known for their robust low-end torque. More modern kits for other vehicles might use twin-screw or centrifugal superchargers, but roots-type were common for the Xterra’s generation.
- Intake Manifold: The supercharger needs a way to connect to the engine. The kit includes a modified or replacement intake manifold designed to accommodate the supercharger.
- Belt and Pulleys: A new belt and pulleys are essential to drive the supercharger from the crankshaft. The pulley size determines the supercharger's speed and, consequently, the amount of boost it generates. Pay close attention to belt routing and tension.
- Fuel Injectors: With more air comes the need for more fuel. Larger fuel injectors are crucial to maintain the correct air-fuel ratio (AFR). Incorrect AFR can lead to detonation and engine damage.
- Fuel Pump: The stock fuel pump may not be able to supply enough fuel to the larger injectors, especially under full boost. An upgraded fuel pump is often recommended.
- Intercooler (Optional but Highly Recommended): Superchargers compress air, which increases its temperature. Hot air is less dense and carries less oxygen, negating some of the performance gains. An intercooler cools the compressed air before it enters the engine, improving efficiency and power. These can be air-to-air or air-to-water. Air-to-air is simpler but less efficient.
- Engine Management System (EMS) / Piggyback ECU: The stock ECU will likely not be able to properly manage the increased airflow and fuel demands. An EMS or piggyback ECU allows you to tune the engine's parameters to optimize performance and prevent engine damage. We'll discuss this further below.
- Boost Gauge: A boost gauge allows you to monitor the pressure generated by the supercharger. This is essential for troubleshooting and ensuring the system is operating correctly.
- All Necessary Hardware: This includes hoses, clamps, brackets, and any other small parts needed for a complete installation.
Installation: A Step-by-Step Overview
Installing a supercharger kit is a complex project best suited for experienced DIYers. Here's a general overview of the steps involved:
- Preparation: Disconnect the battery. Gather all the necessary tools and parts. Read the instructions thoroughly before starting. This is crucial!
- Remove Stock Components: Remove the stock intake manifold, air filter, and other components that will be replaced by the supercharger kit. Label all hoses and wiring connectors to avoid confusion during reassembly.
- Install Fuel Injectors and Fuel Pump: Replace the stock fuel injectors with the larger injectors provided in the kit. Install the upgraded fuel pump.
- Install the Supercharger and Intake Manifold: Install the supercharger unit and the associated intake manifold. Ensure all connections are secure and properly torqued.
- Install Belt and Pulleys: Install the new belt and pulleys according to the kit's instructions. Ensure the belt is properly tensioned.
- Install Intercooler (if applicable): Mount the intercooler and connect the necessary hoses. Ensure the intercooler is properly positioned to receive airflow.
- Connect Vacuum Lines and Hoses: Connect all vacuum lines and hoses according to the kit's instructions. Pay close attention to the routing of these lines.
- Install Boost Gauge: Install the boost gauge and connect the necessary wiring and vacuum lines.
- Install EMS or Piggyback ECU: Install the EMS or piggyback ECU and connect the necessary wiring. This step requires careful attention to detail.
- Initial Startup and Testing: Reconnect the battery. Start the engine and check for leaks or unusual noises. Monitor the boost gauge and AFR (if possible).
Tuning: The Key to Success
Simply installing a supercharger kit is not enough. You *must* tune the engine to optimize performance and prevent damage. This is where many DIYers fall short. The goal of tuning is to adjust the engine's parameters to achieve the correct air-fuel ratio (AFR) and ignition timing at all engine speeds and loads. A wideband oxygen sensor is invaluable for monitoring AFR.
Engine Management Options
There are several options for tuning your supercharged Xterra:
- Piggyback ECU: A piggyback ECU intercepts the signals from the stock ECU and modifies them to control fuel and ignition timing. This is a common option for older vehicles. Common brands include AEM and Split Second. These require careful calibration and can be limited in their capabilities.
- Standalone EMS: A standalone EMS replaces the stock ECU entirely. This provides the most control and flexibility, but it also requires significant tuning expertise. Brands like MegaSquirt and Haltech offer options that could potentially be adapted, although significant modification may be needed.
- Professional Tuning: The best option for most people is to have the vehicle professionally tuned by a qualified tuner with experience in supercharged engines. They will have the necessary equipment and expertise to optimize the engine's performance and ensure its reliability.
Critical Tuning Parameters
When tuning, pay close attention to the following parameters:
- Air-Fuel Ratio (AFR): Aim for an AFR of around 12.5:1 to 13.0:1 under boost. This provides a good balance of power and safety. Lean AFRs (higher numbers) can lead to detonation.
- Ignition Timing: Retard the ignition timing under boost to prevent detonation. The amount of timing retard will depend on the engine, boost level, and fuel quality.
- Boost Control: If your kit includes a boost controller, adjust it to achieve the desired boost level. Be careful not to exceed the engine's safe boost limit.
- Knock Detection: Monitor for knock (detonation) using a knock sensor or by listening for audible knock. Detonation can quickly destroy an engine.
Important Considerations and Potential Issues
Supercharging your Xterra is not without its potential downsides. Here are a few things to consider:
- Cost: Supercharger kits can be expensive, ranging from a few thousand dollars to upwards of $10,000, depending on the kit and the level of modification.
- Reliability: Supercharging increases stress on the engine, which can reduce its lifespan if not done correctly. Proper tuning and maintenance are essential.
- Fuel Economy: Expect a decrease in fuel economy, especially under boost.
- Emissions: Supercharging may affect your vehicle's emissions compliance. Check your local regulations before installing a kit.
- Transmission: The stock transmission may not be able to handle the increased power. Consider upgrading the transmission if you plan to run high boost levels. The RE4R01A (automatic) found in many Xterras is known to be relatively robust, but increased power can still shorten its lifespan. Manual transmissions should also be carefully considered for clutch capacity.
- Installation Difficulty: As mentioned earlier, installation requires significant mechanical skill and knowledge. Don't underestimate the complexity of the project.
In Conclusion
Adding a supercharger to your Nissan Xterra can be a rewarding modification, providing a significant boost in power and performance. However, it's essential to do your research, choose a quality kit, and invest in proper tuning. If you're not comfortable with the complexity of the project, seek the help of a qualified professional. With careful planning and execution, you can transform your Xterra into a true off-road beast. Good luck, and happy boosting!