R134a Pressure Chart High And Low Side
Understanding the pressures within your car's air conditioning (A/C) system is crucial for diagnosing problems and ensuring optimal cooling performance. The refrigerant, typically R134a in many older vehicles (and increasingly being replaced by R1234yf in newer models), circulates throughout the system, absorbing heat from the cabin and releasing it outside. By monitoring the high-side and low-side pressures, you can gain valuable insights into the health and efficiency of your A/C system.
What are High-Side and Low-Side Pressures?
Think of your car's A/C system like a miniature refrigeration plant. It has two primary pressure zones:
- High-Side: This is the high-pressure side of the system, located after the compressor and before the expansion valve (or orifice tube). Here, the R134a is a hot, high-pressure gas. The condenser's job is to cool this gas down, turning it into a high-pressure liquid. A typical high-side port is found on the liquid line running from the condenser to the evaporator core.
- Low-Side: This is the low-pressure side, located after the expansion valve (or orifice tube) and before the compressor. Here, the R134a is a cool, low-pressure gas. The evaporator core absorbs heat from the cabin, turning the low-pressure liquid into a low-pressure gas. The low-side port is usually found on the suction line running from the evaporator core to the compressor.
The difference in pressure between these two sides is what drives the cooling process. The compressor creates the pressure differential, and the expansion device (valve or tube) controls the flow of refrigerant, creating the pressure drop.
R134a Pressure Chart: A Guide
An R134a pressure chart is a valuable tool for diagnosing A/C problems. It shows the expected high-side and low-side pressures at various ambient temperatures. Keep in mind that these are guidelines, and slight variations can occur depending on the specific vehicle and system design.
Here's a simplified example of a typical R134a pressure chart:
Ambient Temperature (°F) | Low-Side Pressure (PSI) | High-Side Pressure (PSI)
70°F | 30-40 PSI | 150-170 PSI
80°F | 35-45 PSI | 170-190 PSI
90°F | 40-50 PSI | 190-220 PSI
100°F | 45-55 PSI | 220-250 PSI
Important Notes:
- Engine Running: These pressures are measured with the engine running and the A/C on maximum cooling.
- Proper Charge: The chart assumes the system is properly charged with the correct amount of R134a.
- System Condition: The chart also assumes that all A/C components (compressor, condenser, evaporator, expansion valve/orifice tube) are in good working order.
- Humidity: High humidity can slightly affect readings.
Interpreting Pressure Readings: Common Problems
Deviations from the expected pressure ranges can indicate various A/C problems. Here are some common scenarios:
- Low Low-Side and Low High-Side: This often indicates a low refrigerant charge. There's not enough R134a in the system to create the necessary pressure difference. A leak is likely present. For example, a common issue on older Honda Civics is a slow leak from the compressor shaft seal.
- High Low-Side and High High-Side: This can be caused by overcharging the system, or a restricted condenser. Too much refrigerant overwhelms the system's capacity to dissipate heat. A restricted condenser, often due to debris blockage, prevents proper cooling, leading to high pressures. On a Chevrolet Silverado, for instance, the condenser can become clogged with bugs and road grime.
- Normal Low-Side and Low High-Side: This often points to a failing compressor. The compressor isn't generating enough pressure to drive the cooling process effectively. Imagine a worn-out compressor in a Ford Mustang; it might still run, but it won't build sufficient pressure for optimal cooling.
- High Low-Side and Normal High-Side: This may indicate a restricted expansion valve or orifice tube. The refrigerant isn't flowing properly through the expansion device, causing a buildup of pressure on the low side. A common issue in some Toyota Camrys is a clogged orifice tube.
- Fluctuating Pressures: This can indicate air or moisture in the system, or a failing compressor clutch. Air and moisture prevent proper refrigerant circulation, while a slipping compressor clutch results in inconsistent pressure delivery.
Examples in Popular Cars
Let's look at a few common scenarios across different car brands:
* Honda Civic (Older Models): A common issue is a leaking compressor shaft seal. You might see low low-side and low high-side pressures, indicating a refrigerant leak. * Ford F-150: Condenser issues are not uncommon, especially in trucks used in dusty or off-road environments. A clogged condenser will result in high high-side pressure. * Toyota Camry: A clogged orifice tube can lead to a high low-side and a normal to low high-side pressure. * BMW 3 Series: These cars can be sensitive to proper refrigerant charge. Even a small overcharge can lead to high high-side pressures, especially in hot weather. * Chevrolet Silverado: Similar to the F-150, these trucks often experience condenser blockages due to their exposed condenser location.Tools You'll Need
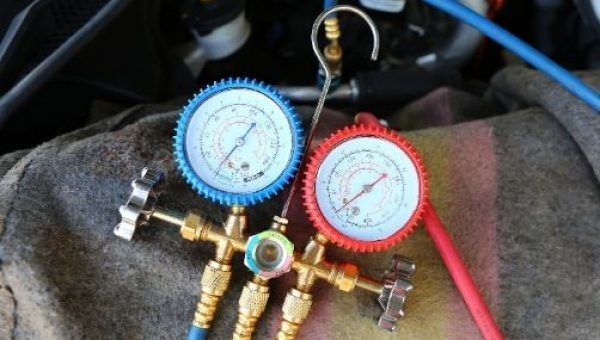
To check your A/C pressures, you'll need a few basic tools:
* A/C Manifold Gauge Set: This is the essential tool for reading both high-side and low-side pressures. * R134a Quick Couplers: These connect the gauge set to the service ports on your car. * Thermometer: To measure the ambient temperature. * Safety Glasses and Gloves: Always wear eye and hand protection when working with refrigerants.Practical Takeaways
Here's how you can apply this knowledge:
- Regularly Check Pressures: Periodically check your A/C pressures, especially before the hot summer months. This can help you catch problems early.
- Compare to the Chart: Use an R134a pressure chart as a guide. Note the ambient temperature and compare your readings to the expected range.
- Diagnose Based on Symptoms: Combine your pressure readings with other symptoms, such as poor cooling or unusual noises from the compressor, to narrow down the problem.
- Know Your Limits: Working with A/C systems can be complex. If you're not comfortable with the diagnosis or repair, take your car to a qualified mechanic. Remember that improper handling of refrigerants can be harmful to the environment and potentially dangerous.
- Consider Professional Help: While adding refrigerant is a common DIY task, more complex repairs, especially those involving opening the system, require specialized equipment (like a vacuum pump) and knowledge. Contaminants like air and moisture can severely damage your A/C system, so it's often best to leave these repairs to a professional.
Understanding R134a pressure charts and how to interpret the readings can empower you to diagnose A/C problems effectively and potentially save money on costly repairs. Always prioritize safety and consult a professional when in doubt.