
Torque On Transmission Pan Bolts
The seemingly simple task of securing a transmission pan can quickly turn into a costly headache if the proper torque specifications aren't followed. While it might seem like just tightening bolts until they're "good and snug" is sufficient, ignoring the manufacturer's recommended torque values can lead to leaks, damaged components, and ultimately, significant repair bills. This article delves into the crucial aspects of torque on transmission pan bolts, providing detailed information for enthusiasts, DIY mechanics, and seasoned professionals alike.
Why Torque Matters: Beyond "Good and Snug"
Understanding why precise torque is critical is the first step in ensuring a successful transmission service. Over-tightening bolts, a common mistake, can stretch or even snap them. More frequently, it deforms the pan itself, especially on pans made of thinner stamped steel. This deformation compromises the seal between the pan and the transmission case, leading to persistent fluid leaks. Conversely, under-tightening allows for movement and vibration, also breaking the seal and causing leaks. Furthermore, loose bolts can back out completely, potentially causing catastrophic engine or transmission damage if they interfere with moving parts.
The importance of proper torque extends beyond just preventing leaks. Achieving the correct torque ensures even pressure distribution across the entire gasket surface. This even pressure is crucial for the gasket to properly compress and create a reliable seal. Uneven pressure, caused by inconsistent torquing, results in localized stress points on the gasket, leading to premature failure and leaks. In some cases, the pan itself may warp or crack under uneven stress.
Finding the Right Torque Specifications
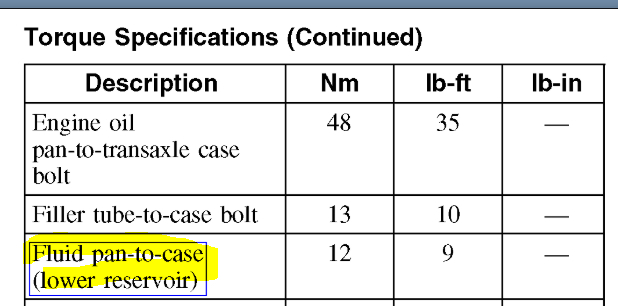
The first step in properly securing a transmission pan is locating the correct torque specifications. The best source for this information is the vehicle's repair manual. This manual, whether a physical book or a digital subscription, provides detailed torque specifications for virtually every fastener on the vehicle, including transmission pan bolts. Look for a section specifically dedicated to the transmission or drivetrain.
If a repair manual isn't readily available, online databases and forums can be helpful resources. However, exercise caution when relying on these sources. Always verify the information with a reputable source or cross-reference it with multiple sources. Sites like ALLDATA DIY or Mitchell 1 offer vehicle-specific repair information, often including torque specifications. Also, consider the specific transmission model. For example, a GM 4L60E transmission will have different torque specs than a Ford 4R70W.
Generic torque charts can also be used as a last resort, but they should be approached with extreme caution. These charts provide torque values based on bolt size and material grade. However, they don't account for specific application requirements or the properties of the transmission pan material. If using a generic chart, err on the side of caution and choose a lower torque value.
Tools of the Trade: Torque Wrenches and Sockets
Using the right tools is essential for achieving accurate torque. The most crucial tool is a torque wrench. Several types of torque wrenches are available, each with its own advantages and disadvantages. Click-type torque wrenches are the most common and affordable. They allow you to preset a desired torque value, and the wrench emits an audible "click" when that value is reached. Beam-type torque wrenches are simpler and more accurate, but they require a visual reading of the torque value on a beam scale. Digital torque wrenches offer the highest level of accuracy and convenience, displaying the torque value on a digital screen and often providing audible and visual alerts when the target torque is reached.
Regardless of the type of torque wrench used, it's crucial to calibrate it regularly. Torque wrenches can lose accuracy over time due to wear and tear. Professional mechanics typically have their torque wrenches calibrated annually. For DIYers, a less frequent calibration schedule might be sufficient, but it's still a good practice to check the accuracy of the wrench periodically.
In addition to a torque wrench, a set of quality sockets is essential. Use sockets that fit the bolt heads snugly to avoid rounding them off. Six-point sockets are preferable to twelve-point sockets, as they provide a better grip and reduce the risk of slippage, especially on slightly corroded or damaged bolts.
The Torqueing Process: Step-by-Step Guide
The torqueing process itself is just as important as using the correct torque specification and tools. Follow these steps for a reliable and leak-free transmission pan installation:
- Prepare the surfaces: Thoroughly clean both the transmission case and the pan surface. Remove any old gasket material, oil, or debris. A plastic scraper or a non-abrasive cleaning pad can be used to avoid scratching the surfaces.
- Install the gasket: Place the new gasket onto the transmission case or the pan, depending on the gasket design. Some gaskets are designed to be installed dry, while others require a thin coating of sealant. Consult the gasket manufacturer's instructions for specific recommendations.
- Install the pan: Carefully position the pan onto the transmission case, aligning the bolt holes. Install all the bolts by hand, tightening them only finger-tight.
- Initial torque sequence: Using the torque wrench set to approximately one-third of the final torque specification, tighten the bolts in a crisscross pattern. This ensures even pressure distribution across the gasket surface.
- Intermediate torque sequence: Repeat the crisscross pattern, this time setting the torque wrench to approximately two-thirds of the final torque specification.
- Final torque sequence: Perform a final pass with the torque wrench set to the full specified torque value, again following the crisscross pattern. This ensures that all bolts are tightened to the correct torque.
- Re-torque (if applicable): Some manufacturers recommend re-torquing the pan bolts after a short period of driving. This allows the gasket to fully compress and accounts for any settling that may occur. Consult the vehicle's repair manual for specific recommendations.
Common Mistakes to Avoid
Several common mistakes can lead to problems when torqueing transmission pan bolts. Avoiding these pitfalls can save time, money, and frustration:
- Over-tightening: As mentioned earlier, over-tightening is a major cause of leaks and damage. Always use a torque wrench and never exceed the specified torque value.
- Using an impact wrench: Impact wrenches provide very little control over torque and are almost guaranteed to over-tighten the bolts. Never use an impact wrench to tighten transmission pan bolts.
- Ignoring the torque sequence: The crisscross torque sequence is crucial for even pressure distribution. Failing to follow this sequence can lead to uneven gasket compression and leaks.
- Reusing old bolts: Transmission pan bolts are often subject to repeated heat cycles and can stretch over time. Reusing old bolts can compromise their integrity and lead to failure. Replace the bolts with new ones whenever possible, especially if they show signs of corrosion or damage.
- Skipping gasket sealant when required: Some gaskets *require* sealant to function correctly. Not all do, and using sealant on a gasket designed to be used dry can also lead to leaks. Follow the manufacturer's instructions.
Real-World Example: A Case of Persistent Leaks
A customer brought in a 2012 Ford Explorer with a persistent transmission fluid leak. The customer had previously attempted to fix the leak himself by replacing the transmission pan gasket. However, the leak persisted, despite the new gasket. Upon inspection, it became clear that the pan was warped from over-tightening the bolts. The customer admitted to using an impact wrench to tighten the pan bolts "until they felt tight." The solution was to replace the transmission pan and gasket, and to properly torque the bolts to the specified value using a torque wrench. The leak was resolved, and the customer learned a valuable lesson about the importance of following proper torque specifications.
Beyond the Bolts: Inspecting the Pan
While proper torque is critical, remember to inspect the transmission pan itself. Dents, cracks, or corrosion can all compromise the seal, even with a new gasket and perfectly torqued bolts. A warped pan, as highlighted in the real-world example, is a common issue caused by over-tightening. Consider replacing the pan if any damage is evident.
For pans with drain plugs, ensure the plug is also properly tightened and sealed. A leaking drain plug can easily be mistaken for a pan gasket leak. Similarly, if the pan has a temperature sensor, make sure it is securely mounted and properly sealed. A small leak around the sensor can also cause a significant loss of fluid over time.
In conclusion, properly torqueing transmission pan bolts is essential for preventing leaks and ensuring the longevity of your transmission. By following the steps outlined in this article, using the correct tools, and avoiding common mistakes, you can confidently tackle this task and keep your transmission running smoothly for years to come.