Toyota Corolla Cabin Air Filter Replacement
The Toyota Corolla, a global icon of reliability and efficiency, often gets overlooked when it comes to routine maintenance. While oil changes and tire rotations are top of mind, the humble cabin air filter is crucial for both passenger comfort and the proper functioning of your vehicle's climate control system. This article will provide a comprehensive guide to replacing the cabin air filter on a modern Corolla, ensuring optimal air quality inside your car.
Why Replace Your Cabin Air Filter?
The cabin air filter's primary purpose is to filter out dust, pollen, mold spores, and other airborne contaminants before they enter the vehicle's cabin. Over time, this filter becomes clogged, reducing airflow through the HVAC system. This can lead to:
- Reduced HVAC Performance: Less efficient cooling and heating.
- Unpleasant Odors: Trapped contaminants can create a stale or musty smell.
- Increased Allergies: Pollen and other allergens can trigger allergic reactions.
- Reduced Fuel Efficiency: A restricted airflow system forces the blower motor to work harder, potentially impacting fuel economy.
Most manufacturers, including Toyota, recommend replacing the cabin air filter every 12,000 to 15,000 miles, or annually. However, if you frequently drive in dusty or heavily polluted areas, you may need to replace it more often.
Tools and Materials Needed
Fortunately, replacing the cabin air filter on a Corolla is a relatively simple task that can be accomplished with basic tools:
- New cabin air filter (ensure it's the correct part for your Corolla's year and model – consult your owner's manual or a parts catalog).
- Flathead screwdriver or trim removal tool (optional, but helpful).
- Shop vacuum (optional, for cleaning the filter housing).
- Gloves (recommended, to keep your hands clean).
Step-by-Step Replacement Procedure
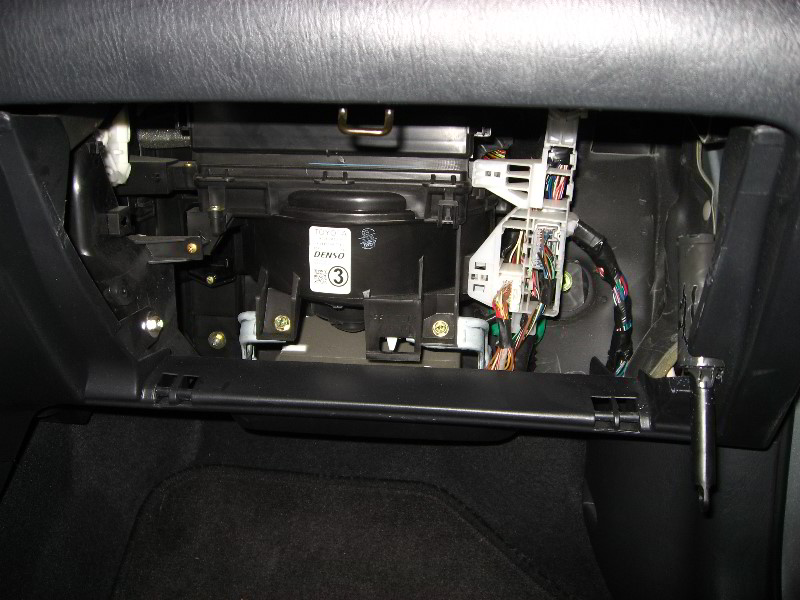
The cabin air filter is typically located behind the glove box. Here's the process:
- Prepare the Area: Park your Corolla on a level surface and turn off the ignition. Clear the glove box of any items.
- Open the Glove Box: Open the glove box fully.
- Release the Dampener (If Equipped): Many Corollas have a dampener arm that slows the glove box's descent. Disconnect this arm by gently squeezing the retaining clip and sliding it off the post.
- Release the Glove Box Stops: On either side of the glove box, you'll find retaining clips or stops. These prevent the glove box from opening too far. Gently push inward on the sides of the glove box to release these stops. The glove box should now swing down further, exposing the filter housing.
- Locate the Filter Housing: The cabin air filter housing is a rectangular plastic cover behind the glove box opening. It usually has clips or screws securing it in place.
- Remove the Filter Housing Cover: Depending on the model, you may need to use a flathead screwdriver or trim removal tool to gently pry open the clips or remove screws. Be careful not to damage the plastic.
- Remove the Old Filter: Carefully slide the old cabin air filter out of the housing. Note the direction of airflow – an arrow is usually printed on the filter to indicate airflow direction. This is crucial for proper installation of the new filter.
- Clean the Housing (Optional): Use a shop vacuum to clean any debris or leaves that may have accumulated in the filter housing.
- Install the New Filter: Install the new cabin air filter, ensuring it's oriented correctly with the airflow arrow pointing in the same direction as the old filter.
- Reinstall the Filter Housing Cover: Secure the filter housing cover by snapping the clips back into place or tightening the screws.
- Reinstall the Glove Box Stops: Push the sides of the glove box inward and align them with the stops. Snap the stops back into their original position.
- Reconnect the Dampener (If Equipped): Reattach the dampener arm to its post.
- Close the Glove Box: Close the glove box.
Post-Replacement Check
After replacing the cabin air filter, start the engine and turn on the HVAC system. Verify that the airflow is stronger and that the air smells fresh. If you experience any issues, double-check that the filter is installed correctly and that the filter housing is properly sealed.
Conclusion
Replacing the cabin air filter on your Toyota Corolla is a simple yet important maintenance task that can significantly improve your driving experience. By following these steps, you can ensure clean, fresh air inside your vehicle and maintain optimal HVAC performance for years to come. Don't neglect this often-overlooked component – a clean cabin air filter contributes to a healthier and more comfortable driving environment.