
Toyota Rav4 Mass Air Flow Sensor Location
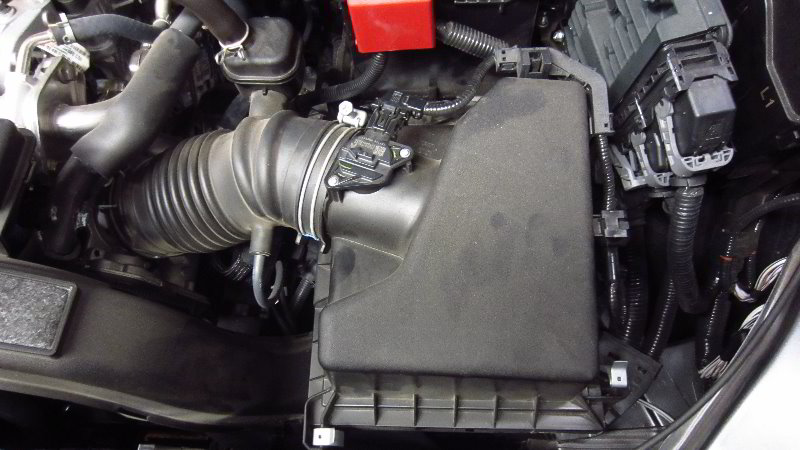
The Toyota RAV4, a ubiquitous sight on roads globally, owes its efficiency and performance to a sophisticated network of sensors and actuators working in concert. Among these critical components is the Mass Air Flow (MAF) sensor. This guide will delve into the intricacies of the RAV4 MAF sensor, its function, typical locations across different generations, and factors to consider when identifying or replacing it.
Understanding the Mass Air Flow (MAF) Sensor
Before pinpointing the sensor's location, it's crucial to understand its role. The MAF sensor is a fundamental component of the engine's electronic fuel injection (EFI) system. Its primary function is to measure the mass of air entering the engine. This measurement is critical for the engine control unit (ECU) to calculate the precise amount of fuel to inject, ensuring optimal combustion, fuel efficiency, and emissions control. Without accurate MAF sensor data, the engine can experience a range of issues, from poor fuel economy and rough idling to hesitation and even stalling.
Two common types of MAF sensors exist: hot-wire and vane-meter. The hot-wire type, more prevalent in modern vehicles like the RAV4, uses a heated wire or film element. As air flows across this element, it cools down. The amount of electrical current needed to maintain the element at a constant temperature is directly proportional to the mass of air flowing past it. This data is then relayed to the ECU. Vane-meter types, while older, use a spring-loaded vane that moves in proportion to the airflow. The vane's position is translated into an electrical signal for the ECU.
RAV4 MAF Sensor Location by Generation
The location of the MAF sensor on a RAV4 is generally consistent within each generation but can vary slightly between different model years or engine configurations. It's almost always situated in the intake tract, between the air filter box and the throttle body. This placement ensures that the sensor measures all the air entering the engine after filtration.
First Generation (1996-2000)
On the first-generation RAV4, typically equipped with the 3S-FE engine, the MAF sensor is usually found directly attached to the air filter housing. Look for a rectangular sensor with a wiring harness connector, bolted or screwed onto the housing itself. Tracing the intake duct from the air filter box towards the engine will lead you directly to it. It's generally very accessible for inspection or replacement.
Second Generation (2001-2005)
The second-generation RAV4, often utilizing the 1AZ-FE or 2AZ-FE engine, typically positions the MAF sensor in a similar location to the first generation. It's usually mounted on the air filter housing or the intake tube immediately downstream of the housing. The connector is usually a four or five-pin connector. The MAF sensor unit often integrates with the air intake temperature (IAT) sensor as a single unit in many 2nd generation RAV4s.
Third Generation (2006-2012)
In the third-generation RAV4, with engines like the 2AZ-FE (initially) and later the 2AR-FE, the MAF sensor continues to be located in the intake tract, usually attached to the air filter housing or the intake tube connected to it. However, the precise mounting orientation might differ slightly depending on the specific sub-model and year. A key identifier is the wiring harness connecting to it. Always disconnect the negative battery terminal before working on any electrical components.
Fourth Generation (2013-2018)
The fourth-generation RAV4, commonly featuring the 2AR-FE engine (again), maintains the MAF sensor's general location in the intake system. You'll still find it attached to the air filter housing or the immediate intake tube. A visual inspection of the intake system, starting from the air filter box, will quickly reveal its location. Again, look for the electrical connector and the sensor body bolted or screwed to the intake tract.
Fifth Generation (2019-Present)
The fifth-generation RAV4, employing the A25A-FKS engine (and hybrid variants), generally places the MAF sensor in a familiar location: within the intake tract, close to the air filter housing. While the engine bay layout may differ compared to previous generations, the principle remains the same. Start your search by examining the intake duct leading from the air filter box towards the throttle body. Remember to consult the vehicle's service manual for the most accurate location and specific removal/installation instructions.
Factors Affecting MAF Sensor Location and Identification
While the general location of the MAF sensor remains consistent across RAV4 generations, several factors can influence its precise placement and identification:
- Engine Type: Different engine families (e.g., 3S-FE, 1AZ-FE, 2AR-FE, A25A-FKS) may have slightly varying intake system designs, influencing the exact MAF sensor mounting point.
- Model Year: Minor design changes from year to year within a generation can result in subtle variations in component placement.
- Country of Origin: Manufacturing variations for different markets can sometimes affect component layout.
- Aftermarket Modifications: If the vehicle has been modified with an aftermarket air intake system, the MAF sensor might be relocated or require an adapter.
Identifying a Faulty MAF Sensor
A malfunctioning MAF sensor can trigger various engine problems. Common symptoms include:
- Poor fuel economy
- Rough idling
- Hesitation or stumbling during acceleration
- Stalling
- Check Engine Light (CEL) illumination with codes related to MAF sensor performance (e.g., P0100, P0101, P0102, P0103)
While these symptoms can indicate a faulty MAF sensor, it's crucial to perform proper diagnostics before replacement. This may involve using a scan tool to read diagnostic trouble codes (DTCs) and monitoring MAF sensor data in real-time. A multimeter can also be used to check the sensor's voltage output. A visual inspection for damage or contamination is also advisable.
Replacing the MAF Sensor
Replacing a MAF sensor is a relatively straightforward task, but it's essential to follow proper procedures:
- Disconnect the negative battery terminal: This prevents electrical shorts during the replacement process.
- Locate the MAF sensor: Refer to the information above for your specific RAV4 generation and engine type.
- Disconnect the wiring harness connector: Carefully release the locking mechanism and pull the connector straight out.
- Remove the MAF sensor: Unbolt or unscrew the sensor from the air filter housing or intake tube.
- Install the new MAF sensor: Install it with a new O-ring if provided, and ensuring correct orientation. Tighten the bolts or screws to the specified torque.
- Reconnect the wiring harness connector: Ensure it clicks securely into place.
- Reconnect the negative battery terminal:
- Clear any DTCs: Use a scan tool to clear any stored trouble codes.
- Test the engine: Start the engine and observe its performance. Monitor for any unusual behavior or the return of the Check Engine Light.
Important Note: When installing a new MAF sensor, it's crucial to use a high-quality replacement from a reputable brand. Cheap or counterfeit sensors may not provide accurate readings and can lead to further engine problems.
In conclusion, the Toyota RAV4's MAF sensor is a vital component that plays a crucial role in engine management. By understanding its function, location, and potential issues, you can effectively diagnose and address any MAF sensor-related problems, ensuring optimal performance and efficiency from your RAV4. Always consult your vehicle's service manual for specific instructions and torque specifications.