Toyota Sequoia Back Door Latch Replacement
The Toyota Sequoia, a full-size SUV known for its robust build and ample space, occasionally encounters a common issue: a malfunctioning back door latch. Understanding the mechanics behind this latch and the process of replacing it isn't just about fixing a problem; it's a fascinating glimpse into automotive engineering. This guide will walk you through the intricacies of the Sequoia's back door latch mechanism, focusing on the replacement procedure.
Understanding the Sequoia Back Door Latch
Before diving into the replacement, it's crucial to grasp the function of the latch. The back door latch, often referred to as the tailgate latch, is responsible for securing the rear door shut and allowing it to open smoothly. It's a surprisingly complex assembly, integrating both mechanical and, in some cases, electrical components.
Mechanical Components
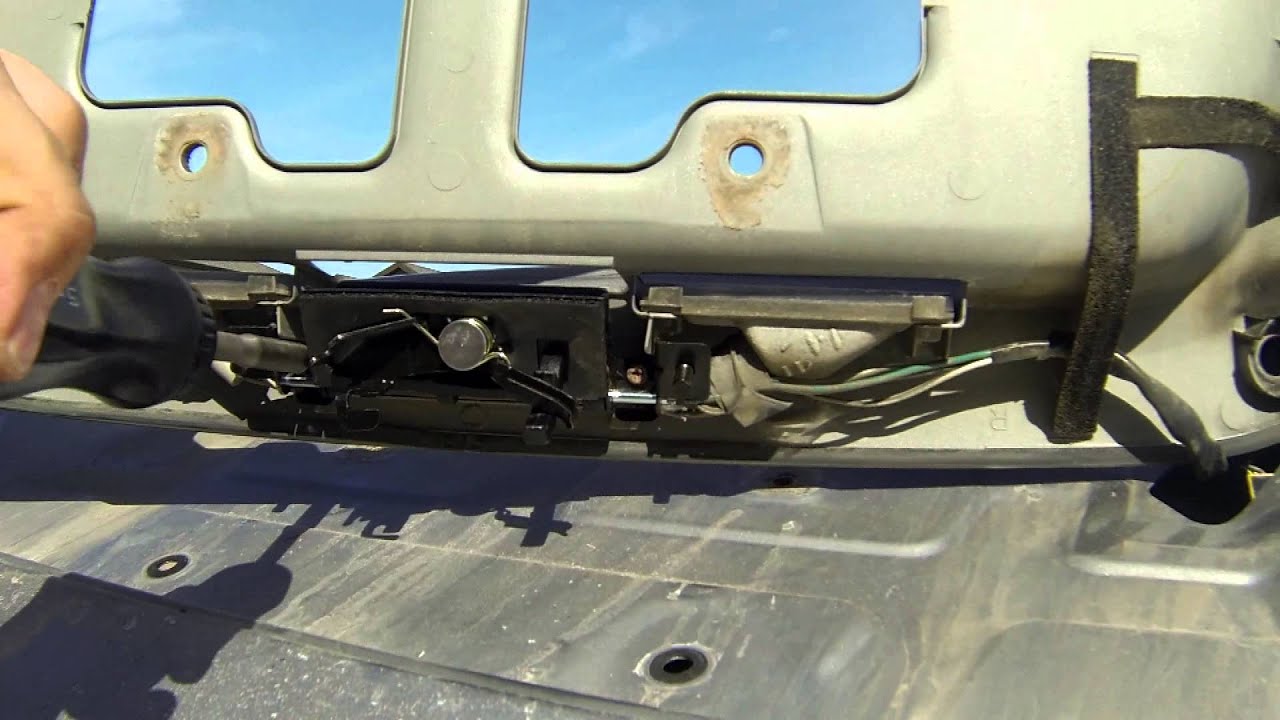
The core of the latch is the rotating striker mechanism. A metal loop, the striker, is mounted on the vehicle's body. When the door closes, a forked latch, integrated within the door-mounted mechanism, engages with the striker. Springs and levers ensure a secure grip, preventing the door from popping open during driving. These components are designed for high durability, but wear and tear, corrosion, or impact can compromise their integrity.
Electrical Components (if applicable)
Depending on the Sequoia model and trim level, the back door latch may include electrical components. These often include a solenoid actuator that allows for remote operation via the key fob or an interior switch. A latch position sensor can communicate the door's status (open or closed) to the vehicle's computer, activating the interior lights and displaying warnings on the dashboard. Damage to these electrical components can manifest as an inability to open the door remotely or inaccurate door status readings.
Diagnosing a Faulty Back Door Latch
The first step in addressing a back door latch issue is accurate diagnosis. Common symptoms include:
- The back door won't open, even when the handle is pulled or the remote is used.
- The back door won't close securely, or it pops open while driving.
- The interior lights stay on, even when the back door is closed (indicating a faulty latch position sensor).
- The key fob or interior switch fails to open the back door.
A visual inspection is crucial. Check for any obvious signs of damage, such as bent linkage, corrosion, or loose connections. If the latch is electrically operated, check the fuses related to the rear door and the wiring harness for any breaks or shorts. A multimeter can be used to test the solenoid for continuity. Pay close attention to the wiring diagram specific to your Sequoia model.
Replacing the Back Door Latch: A Step-by-Step Guide
Disclaimer: This guide is for informational purposes only. Always consult your vehicle's repair manual and take necessary safety precautions when working on your vehicle. Disconnect the negative battery terminal before beginning any electrical work.
Tools and Materials Required:
- New Back Door Latch (Specific to your Sequoia model year)
- Socket Set
- Wrench Set
- Screwdrivers (Phillips and Flathead)
- Panel Removal Tools
- Multimeter (if applicable)
- Penetrating Oil
- Gloves
- Safety Glasses
Procedure:
- Accessing the Latch:
Start by opening the back door (if possible). Use panel removal tools to carefully detach the interior trim panel. These panels are usually held in place by plastic clips, which can break easily if forced. Work slowly and methodically, prying gently around the edges.
- Disconnecting Electrical Connectors (if applicable):
Once the trim panel is removed, you'll see the latch mechanism. Disconnect any electrical connectors attached to the latch. Note their positions and orientations to ensure proper reconnection later. Use a small screwdriver to gently release the locking tabs on the connectors.
- Removing the Linkage:
The latch is connected to the exterior handle and sometimes an interior release lever via metal rods or cables (linkage). Carefully detach these linkage components. Some may be held in place by clips or small bolts. Take pictures or make notes to remember the correct order and orientation of these parts. Penetrating oil can help loosen any corroded components.
- Removing the Latch Assembly:
The latch assembly is typically secured to the door with bolts or screws. Use the appropriate socket or screwdriver to remove these fasteners. The latch assembly may be slightly stuck due to corrosion or sealant. Gently wiggle it free.
- Installing the New Latch:
Position the new latch assembly in the door and secure it with the bolts or screws. Ensure the latch is properly aligned with the striker on the vehicle's body. Tighten the fasteners to the manufacturer's specified torque.
- Reconnecting the Linkage:
Reattach the linkage components to the new latch. Refer to your notes or photos to ensure they are connected in the correct order and orientation. Make sure the linkage moves freely and smoothly.
- Reconnecting Electrical Connectors (if applicable):
Reconnect the electrical connectors to the new latch. Ensure the connectors are fully seated and the locking tabs are engaged.
- Testing the Latch:
Before reinstalling the trim panel, test the latch to ensure it opens and closes properly. Check the operation of the exterior handle, interior release lever (if applicable), and remote operation (if applicable). Verify that the door closes securely and the interior lights turn off when the door is closed.
- Reinstalling the Trim Panel:
Carefully reinstall the interior trim panel. Align the clips with their corresponding holes in the door and gently press the panel into place. Ensure all clips are securely engaged.
Post-Replacement Checks
After completing the replacement, perform a thorough check to ensure everything is working correctly. Verify the following:
- The back door opens and closes smoothly and securely.
- The exterior handle, interior release lever (if applicable), and remote operation (if applicable) function correctly.
- The interior lights turn off when the back door is closed.
- There are no unusual noises or vibrations when opening or closing the door.
- If equipped with a power liftgate, ensure it functions properly.
Troubleshooting
If you encounter any problems after replacing the latch, consider the following:
- Door doesn't close securely: Check the alignment of the striker. It may need to be adjusted slightly.
- Electrical components don't work: Double-check the electrical connections and the fuses. Use a multimeter to test for voltage and continuity.
- Linkage binds: Ensure the linkage components are properly lubricated and move freely.
Replacing a back door latch on a Toyota Sequoia might seem daunting, but by understanding the underlying mechanics and following a systematic approach, it can be a rewarding learning experience. Remember to prioritize safety, consult your vehicle's repair manual, and take your time. With patience and attention to detail, you can restore the functionality of your Sequoia's back door and gain a deeper appreciation for automotive engineering.