Trailer Socket 7 Pin Wiring
Towing a trailer opens up a world of possibilities, from hauling equipment for work to transporting recreational vehicles for leisure. However, a safe and functional trailer connection is paramount. At the heart of this connection lies the 7-pin trailer socket, responsible for transmitting essential electrical signals between your vehicle and the trailer. Correct 7-pin trailer socket wiring is crucial for proper operation of your trailer lights, brakes, and other electrical components. A mistake in the wiring can lead to dangerous situations on the road, including brake failure, inoperable lights, and potential fines. This article provides a comprehensive guide to understanding and correctly wiring a 7-pin trailer socket.
Understanding the 7-Pin Trailer Socket
The 7-pin trailer socket is the most common type used in North America and other regions. It allows for the transfer of seven distinct electrical functions from the tow vehicle to the trailer. These functions typically include:
- Tail Lights: Illuminates the trailer's tail lights, providing visibility from behind.
- Brake Lights: Signals when the tow vehicle is braking.
- Left Turn Signal: Activates the left turn signal on the trailer.
- Right Turn Signal: Activates the right turn signal on the trailer.
- Reverse Lights: Illuminates the trailer's reverse lights when the tow vehicle is in reverse.
- Electric Brakes: Sends power to the trailer's electric brake system (if equipped).
- Auxiliary Power: Provides a 12V power supply for various functions, such as interior lights or charging a trailer battery.
The specific arrangement of these functions within the 7-pin socket is standardized to ensure compatibility between different vehicles and trailers. However, variations can occur, so always double-check the wiring diagram specific to your trailer and vehicle.
7-Pin Trailer Socket Wiring Standards: RV Blade Style
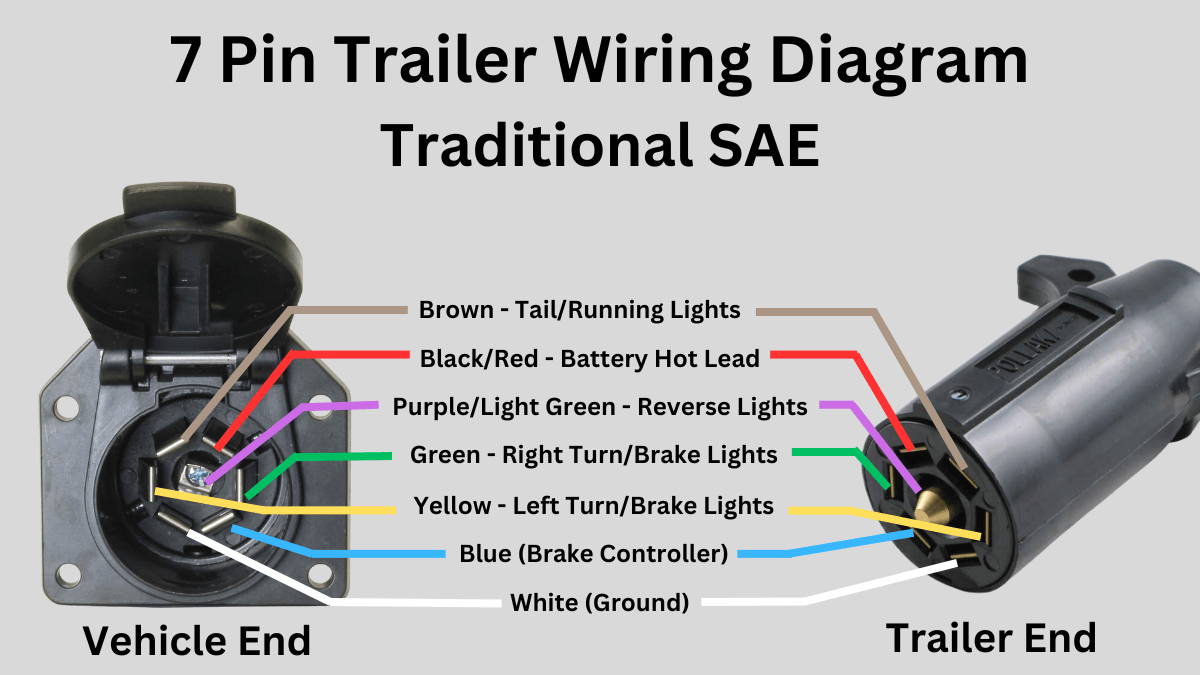
The RV Blade style is the most prevalent 7-pin connector configuration. Each pin corresponds to a specific function:
- Pin 1 (White): Ground - Provides a grounding path for all electrical circuits. A good ground connection is absolutely essential for proper operation.
- Pin 2 (Blue): Electric Brakes - Activates the trailer's electric brakes when the tow vehicle's brakes are applied.
- Pin 3 (Yellow): Left Turn/Stop - Controls the left turn signal and stop light on the trailer.
- Pin 4 (Green): Right Turn/Stop - Controls the right turn signal and stop light on the trailer.
- Pin 5 (Brown): Tail/Running Lights - Activates the trailer's tail lights and running lights.
- Pin 6 (Red): Stop Lamp - Provides the stop lamp signal.
- Pin 7 (Black): 12V Auxiliary Power - Provides a 12V power supply for various functions.
Important Note: While color-coding is standardized, it's crucial to verify the wiring diagram specific to your trailer and tow vehicle. Deviations, although rare, can occur. Always confirm with a multimeter or circuit tester after wiring.
Tools and Materials Needed for Wiring
Before you begin the wiring process, gather the necessary tools and materials:
- 7-Pin Trailer Socket: Choose a high-quality socket that is compatible with your trailer and tow vehicle.
- Wiring: Use appropriately sized wiring for each circuit. Consult a wiring chart for the correct gauge based on amperage draw. Generally, 12-gauge wire is suitable for brake circuits and auxiliary power, while 14- or 16-gauge wire is sufficient for lighting circuits.
- Wire Strippers: To remove insulation from the wires without damaging the conductors.
- Crimping Tool: To securely attach wire connectors.
- Wire Connectors: Use butt connectors, ring terminals, or spade connectors for making secure connections. Consider using heat-shrink connectors for added weather protection.
- Electrical Tape: To insulate and protect connections.
- Multimeter or Circuit Tester: To verify proper wiring and troubleshoot any issues.
- Wiring Diagram: A detailed wiring diagram for your specific trailer and tow vehicle.
- Screwdrivers (Various Sizes): Depending on the type of connectors and mounting hardware used.
- Pliers: For gripping and manipulating wires.
Step-by-Step Wiring Instructions
Follow these steps to properly wire your 7-pin trailer socket:
- Disconnect Power: Before beginning any electrical work, disconnect the negative terminal of the tow vehicle's battery to prevent accidental shorts.
- Identify Wires: Carefully identify the wires coming from your tow vehicle and trailer. Use a wiring diagram to determine the function of each wire.
- Prepare Wires: Strip approximately 1/2 inch of insulation from the end of each wire.
- Connect Ground Wire: Connect the white ground wire from the trailer to the ground pin (Pin 1) on the socket. Ensure a secure and clean connection. A poor ground is the most common cause of trailer lighting problems.
- Connect Electric Brake Wire: Connect the blue wire (electric brakes) from the trailer to the corresponding pin (Pin 2) on the socket. This wire is essential for trailers equipped with electric brakes.
- Connect Left Turn/Stop Wire: Connect the yellow wire (left turn/stop) from the trailer to the corresponding pin (Pin 3) on the socket.
- Connect Right Turn/Stop Wire: Connect the green wire (right turn/stop) from the trailer to the corresponding pin (Pin 4) on the socket.
- Connect Tail/Running Lights Wire: Connect the brown wire (tail/running lights) from the trailer to the corresponding pin (Pin 5) on the socket.
- Connect Stop Lamp Wire: Connect the red wire (stop lamp) from the trailer to the corresponding pin (Pin 6) on the socket.
- Connect Auxiliary Power Wire: Connect the black wire (auxiliary power) from the trailer to the corresponding pin (Pin 7) on the socket. This wire provides a 12V power supply for various functions.
- Secure Connections: Use wire connectors to securely connect each wire to the corresponding pin on the socket. Ensure that the connections are tight and properly insulated.
- Test Wiring: After completing the wiring, reconnect the tow vehicle's battery. Use a multimeter or circuit tester to verify that each circuit is functioning correctly. Test the tail lights, brake lights, turn signals, reverse lights, and auxiliary power.
- Protect Connections: Wrap the connections with electrical tape to provide additional insulation and protection from the elements.
- Secure Wires: Secure the wires to the trailer frame using zip ties or other suitable fasteners to prevent them from dangling or rubbing against sharp edges.
Troubleshooting Common Wiring Problems
Even with careful wiring, problems can sometimes arise. Here are some common issues and their potential solutions:
- No Lights: Check the ground connection first. Also, check the tow vehicle's fuses and trailer wiring for any breaks or shorts.
- Dim Lights: Indicates a poor ground connection or undersized wiring.
- Lights Not Working Correctly: Double-check the wiring diagram and ensure that each wire is connected to the correct pin on the socket.
- Brakes Not Working: Check the electric brake wiring, the brake controller in the tow vehicle, and the trailer's brake magnets.
- Blown Fuses: Indicates a short circuit in the wiring. Inspect the wiring for any damaged insulation or exposed wires.
Safety Precautions
Working with electrical systems can be dangerous. Always follow these safety precautions:
- Disconnect Power: Always disconnect the tow vehicle's battery before working on the electrical system.
- Wear Safety Glasses: To protect your eyes from debris.
- Use Proper Tools: Use the correct tools for the job to avoid damaging wires or connectors.
- Inspect Wiring: Regularly inspect the trailer wiring for any signs of damage or wear.
- If in Doubt, Consult a Professional: If you are not comfortable working with electrical systems, consult a qualified trailer mechanic.
Regular Maintenance
To ensure the long-term reliability of your 7-pin trailer socket, perform regular maintenance:
- Clean Connections: Periodically clean the pins on the socket with a wire brush to remove corrosion.
- Apply Dielectric Grease: Apply a small amount of dielectric grease to the pins to prevent corrosion and improve conductivity.
- Inspect Wiring: Regularly inspect the wiring for any signs of damage or wear.
- Replace Damaged Components: Replace any damaged sockets, connectors, or wiring immediately.
By understanding the 7-pin trailer socket wiring and following these guidelines, you can ensure a safe and reliable connection between your tow vehicle and trailer. Remember to always double-check your work and prioritize safety. Proper wiring is essential for safe towing and protecting yourself and others on the road. Neglecting proper wiring can lead to serious accidents and costly repairs. Taking the time to understand and correctly wire your 7-pin trailer socket is an investment in your safety and peace of mind.
"Always prioritize safety when working with electrical systems. If you are unsure about any aspect of the wiring process, consult a qualified professional."