What Grit Sandpaper For Car Paint Removal
Removing car paint, whether to address rust, prepare for a new coat, or simply undo a questionable DIY job, is a process that demands both patience and precision. Arguably, the most critical element of this process is selecting the appropriate sandpaper grit. Using the wrong grit can lead to irreparable damage to the underlying metal or body filler, costing you significantly more time and money in the long run. This guide will delve into the science and strategy behind choosing the right sandpaper grit for effective and safe paint removal.
Understanding Sandpaper Grit: Abrasive Particle Size
Sandpaper grit numbers are inversely proportional to the size of the abrasive particles. A lower number signifies larger, coarser particles, ideal for aggressive material removal. Conversely, a higher number indicates finer particles, suitable for polishing and creating smooth surfaces. The grit range for automotive work generally falls between 40 and 2000, but for paint removal, we're primarily concerned with the lower to middle end of that spectrum.
It's important to understand the composition of sandpaper as well. Most automotive sandpaper consists of abrasive grains (like aluminum oxide or silicon carbide) bonded to a backing material (paper or cloth). The backing material influences the sandpaper's flexibility and durability. For paint removal, a more durable, waterproof paper or cloth backing is generally preferred, especially when wet sanding.
Grit Selection Based on Paint Condition and Thickness
Heavily Damaged or Multiple Layers of Paint
When dealing with severely damaged paint – think extensive rust, peeling, cracking, or multiple layers of old paint – a more aggressive approach is required. In these situations, starting with coarser grits is often necessary. However, it's crucial to proceed with caution. Starting too coarse can gouge the metal beneath the paint.
A reasonable starting point is often 80-grit sandpaper. This grit is aggressive enough to quickly remove thick layers of paint and rust. However, it also leaves deep scratches, requiring subsequent sanding with finer grits to smooth the surface. Use this only on heavily damaged areas, and avoid applying excessive pressure. Consistent, even strokes are key.
Another option, especially if rust is a major concern, is to consider a 40-grit sandpaper. This is a very aggressive grit and should be reserved for areas with significant rust or extremely thick, failing paint. Proceed with utmost caution and be prepared for a longer refinement process.
Sound Paint with Minor Imperfections
If the paint is generally in good condition but has minor imperfections like scratches, swirls, or slight orange peel, a less aggressive approach is recommended. Starting with coarser grits can needlessly remove more material than necessary and potentially damage the underlying surface.
In this scenario, a 180-grit or 220-grit sandpaper may be a more appropriate starting point. These grits will effectively remove imperfections without being overly aggressive. These are good all-around grits for leveling slight imperfections or feathering edges of existing paint.
Blending and Feathering Edges
When blending newly applied paint with existing paint, or feathering the edges of repaired areas, you need a grit that provides a smooth transition without removing too much material. This is where finer grits come into play.
320-grit to 400-grit sandpaper are excellent choices for this task. These grits will gently smooth the edges of the paint, creating a seamless transition. They are also used after coarser grits to remove the deeper scratches left behind.
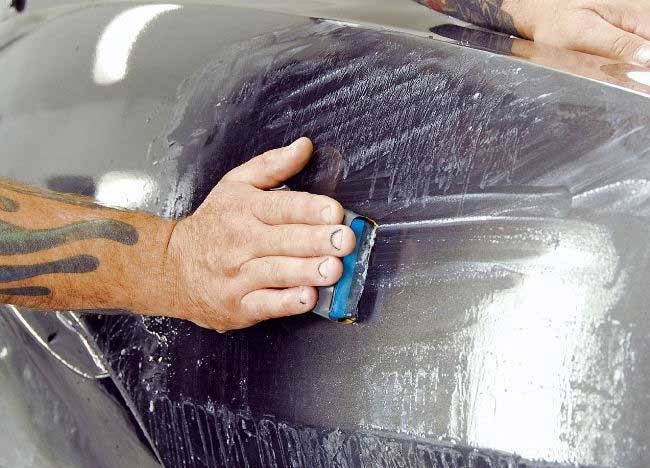
The Importance of Wet Sanding
Wet sanding involves using water as a lubricant during the sanding process. This technique offers several advantages:
- Reduces Heat Buildup: Water dissipates heat generated by friction, preventing the sandpaper from clogging and the paint from softening or melting.
- Lubricates the Surface: Water acts as a lubricant, allowing the sandpaper to glide smoothly over the surface and reducing the risk of scratches.
- Removes Debris: Water flushes away sanding debris, preventing it from becoming embedded in the sandpaper and causing scratches.
- Dust Control: Significantly reduces airborne dust, improving visibility and minimizing the risk of inhaling harmful particles.
When wet sanding, use waterproof sandpaper specifically designed for this purpose. A squirt bottle or a bucket of clean water can be used to keep the surface and sandpaper wet. Regularly clean the sandpaper with a brush to remove any accumulated debris.
The Sanding Process: A Step-by-Step Guide
- Preparation: Thoroughly clean the surface to remove any dirt, grease, or wax. Mask off any areas you don't want to sand.
- Initial Sanding: Select the appropriate starting grit based on the condition of the paint (as outlined above). Sand in consistent, overlapping strokes. Avoid applying excessive pressure. If wet sanding, keep the surface and sandpaper wet.
- Intermediate Sanding: After the initial sanding, inspect the surface for any remaining imperfections. If necessary, repeat the sanding process with the same grit. If the scratches are too deep, move to a slightly coarser grit.
- Refinement Sanding: Once the major imperfections are removed, begin refining the surface with progressively finer grits. For example, after using 80-grit, move to 180-grit, then 220-grit, and so on. Each grit will remove the scratches left by the previous grit.
- Final Sanding: The final sanding stage involves using very fine grits (320-grit, 400-grit) to create a smooth, uniform surface that is ready for priming or painting.
- Cleaning: Thoroughly clean the surface with a tack cloth to remove any remaining sanding dust.
Safety Precautions
Sanding car paint can generate harmful dust. It's essential to take appropriate safety precautions to protect yourself from exposure.
- Wear a Respirator: A properly fitted respirator will protect your lungs from inhaling sanding dust.
- Wear Eye Protection: Safety glasses or goggles will protect your eyes from flying debris.
- Wear Gloves: Gloves will protect your hands from skin irritation and cuts.
- Work in a Well-Ventilated Area: Good ventilation will help to remove sanding dust from the air.
- Dispose of Sandpaper Properly: Used sandpaper may contain lead or other harmful substances. Dispose of it properly according to local regulations.
Alternatives to Sandpaper: Abrasive Pads and Blasting
While sandpaper is the most common abrasive, other options exist. Abrasive pads, like those made of non-woven nylon impregnated with abrasive particles, can be useful for scuff sanding and preparing surfaces for paint. They are less aggressive than sandpaper and conform better to curved surfaces.
For heavy-duty paint and rust removal, particularly in hard-to-reach areas, media blasting (sandblasting, bead blasting, etc.) may be considered. This involves projecting abrasive particles at high velocity onto the surface. While effective, media blasting can be aggressive and requires specialized equipment and expertise. It's generally best left to professionals.
The key to successful paint removal lies in selecting the appropriate sandpaper grit, using proper technique, and taking necessary safety precautions. Starting with too coarse a grit can damage the underlying surface, while using too fine a grit will waste time and effort. Patience and attention to detail are crucial.
By understanding the principles outlined in this guide, you can confidently tackle car paint removal projects and achieve professional-quality results.