What To Use To Clean Mass Air Flow Sensor
The Mass Air Flow (MAF) sensor is a critical component in modern vehicles, responsible for measuring the amount of air entering the engine. This data is crucial for the engine control unit (ECU) to calculate the correct air-fuel mixture for optimal combustion. A dirty or contaminated MAF sensor can lead to a range of performance issues, including poor fuel economy, rough idling, hesitation during acceleration, and even a check engine light. Therefore, proper cleaning is essential for maintaining your vehicle's performance and fuel efficiency. But what should you use to clean it safely and effectively?
Understanding the MAF Sensor and Why Cleaning is Necessary
Before diving into cleaning solutions, it's crucial to understand the MAF sensor's function and construction. Most MAF sensors use a heated wire or film (a hot-wire MAF or hot-film MAF) to measure airflow. As air passes over the heated element, it cools down. The ECU measures the amount of electrical current needed to maintain the element's temperature, which is directly proportional to the airflow. Over time, contaminants like dust, oil vapor from the crankcase ventilation system, and other debris can accumulate on the sensor element. This insulates the element, causing it to misread the airflow, leading to the aforementioned performance problems.
Cleaning the MAF sensor removes these contaminants, restoring its ability to accurately measure airflow. However, due to the delicate nature of the sensor element, using the wrong cleaning solution or technique can easily damage it, rendering it useless.
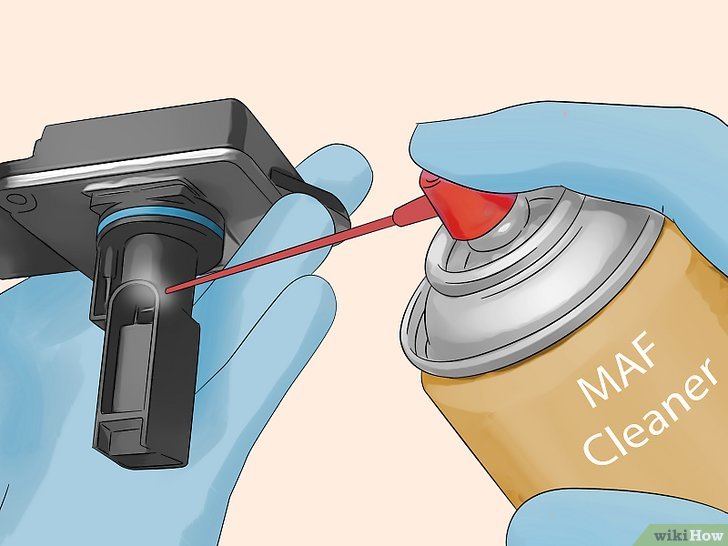
The Only Recommended Cleaning Solution: MAF Sensor Cleaner
The only cleaning solution recommended for MAF sensors is a dedicated MAF sensor cleaner. These cleaners are specifically formulated with solvents that effectively dissolve contaminants without harming the delicate sensor element or its protective coating. They are typically available in aerosol cans for easy application.
Why not use other cleaners?
- Carburetor Cleaner: Too aggressive and can damage the sensor's coating.
- Brake Cleaner: Also too harsh and often leaves a residue.
- Electronics Cleaner: While seemingly similar, some electronics cleaners contain lubricants or additives that can interfere with the MAF sensor's operation.
- WD-40: Not a cleaner; it's a lubricant and water displacement product, and will leave a residue that attracts more dirt.
- Gasoline or other fuels: Extremely dangerous and can easily damage the sensor and potentially cause a fire hazard.
Using anything other than a dedicated MAF sensor cleaner is a gamble that could cost you a new MAF sensor, which can be quite expensive.
How to Clean Your MAF Sensor: A Step-by-Step Guide
Here's a general guide on how to clean your MAF sensor. Always consult your vehicle's repair manual for specific instructions and torque specifications:
- Safety First: Disconnect the negative battery terminal to prevent accidental electrical shorts.
- Locate the MAF Sensor: The MAF sensor is usually located in the intake duct between the air filter box and the throttle body.
- Disconnect the Electrical Connector: Gently disconnect the electrical connector from the MAF sensor. Avoid pulling on the wires.
- Remove the MAF Sensor: Use the appropriate screwdriver or socket to remove the screws or bolts securing the MAF sensor to the intake duct.
- Inspect the Sensor: Visually inspect the sensor element for signs of contamination.
- Apply the Cleaner: Hold the MAF sensor cleaner can a few inches away from the sensor element and spray it liberally, ensuring the entire element is saturated. Do not touch the sensor element with the spray nozzle or anything else.
- Allow to Dry: Let the sensor air dry completely (usually 10-15 minutes). Do not use compressed air or a cloth to dry it, as this could damage the delicate element.
- Reinstall the Sensor: Carefully reinstall the MAF sensor into the intake duct, tightening the screws or bolts to the correct torque specification.
- Reconnect the Electrical Connector: Reconnect the electrical connector to the MAF sensor.
- Reconnect the Battery: Reconnect the negative battery terminal.
- Test Drive: Start the engine and take the vehicle for a test drive to ensure the problem is resolved.
Real-World Use Case: Restoring Fuel Economy
I once worked on a 2010 Honda Civic that was experiencing a significant drop in fuel economy. The owner had replaced the air filter and spark plugs, but the problem persisted. After scanning the ECU, there were no relevant fault codes. A visual inspection of the MAF sensor revealed a build-up of dark residue on the sensor element. I cleaned the MAF sensor with a dedicated cleaner, and after a short test drive, the vehicle's fuel economy returned to its normal range. This simple cleaning procedure saved the owner the cost of a new MAF sensor and restored their vehicle's efficiency.
Conclusion
Cleaning your MAF sensor is a relatively simple and inexpensive procedure that can significantly improve your vehicle's performance and fuel economy. However, it's crucial to use the correct cleaning solution – specifically, a dedicated MAF sensor cleaner. Avoid using any other type of cleaner, as it could damage the delicate sensor element. By following the steps outlined in this article, you can safely and effectively clean your MAF sensor and keep your engine running smoothly.