
Where Is Blower Motor Resistor Located
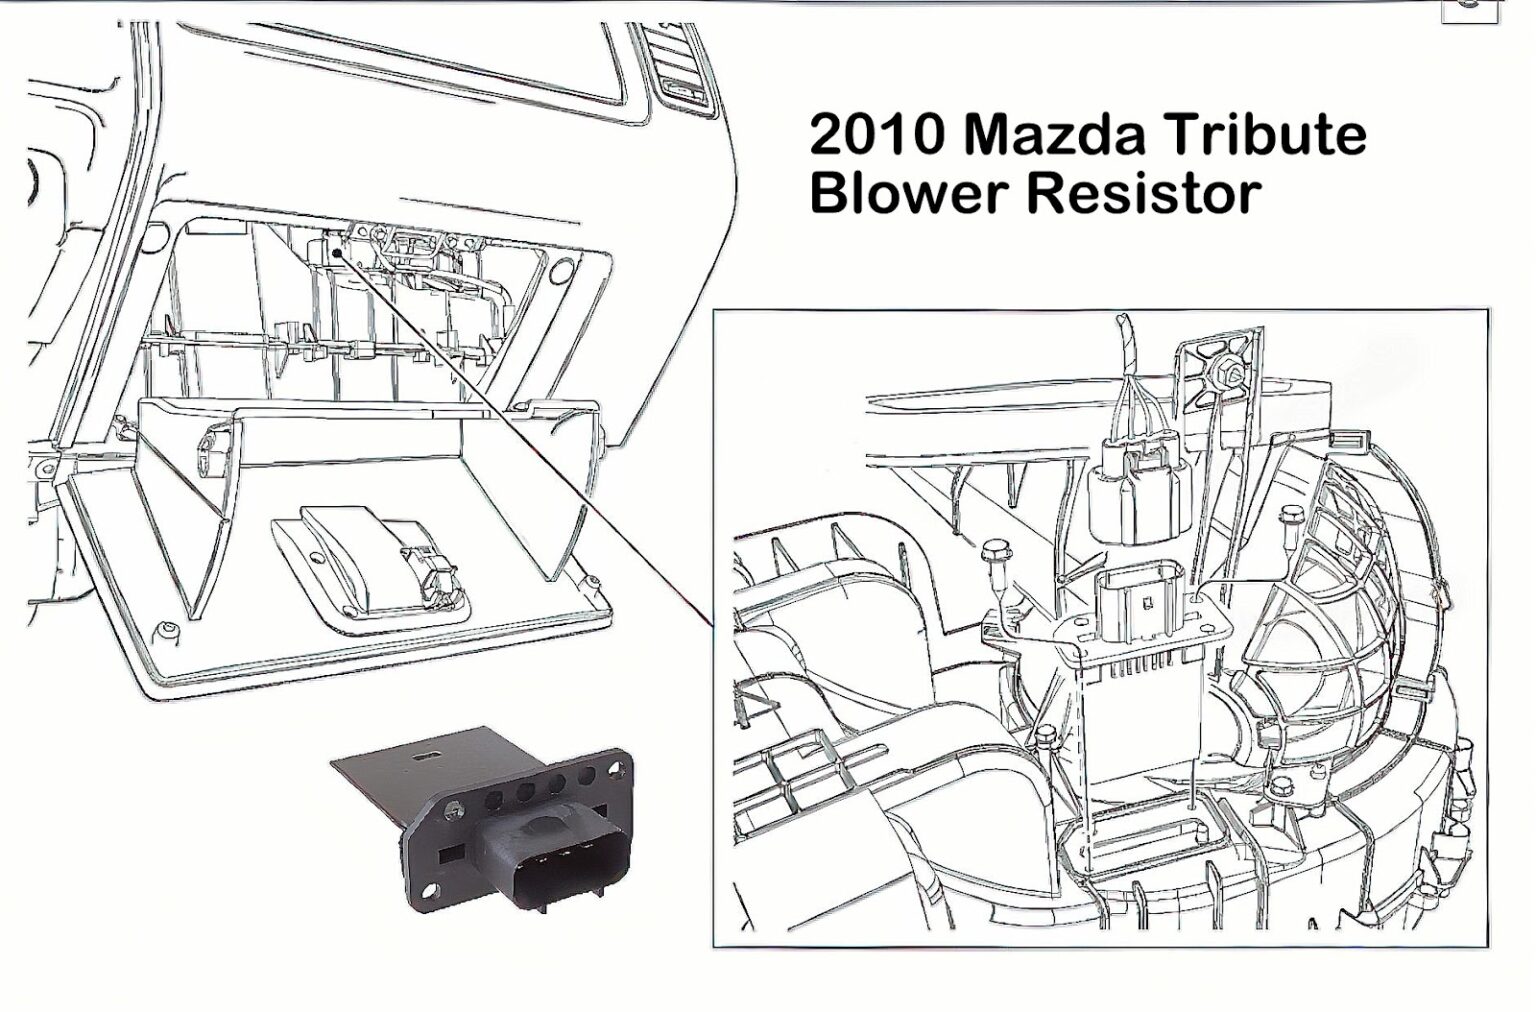
Locating the blower motor resistor, or the blower control module in newer vehicles, can sometimes feel like a game of automotive hide-and-seek. Its placement varies widely depending on the vehicle make, model, and year. However, understanding the common areas where manufacturers typically install this crucial component can significantly speed up your diagnostic and repair process.
Understanding the Blower Motor Resistor and its Function
Before diving into the location hunt, let’s briefly recap the function of the blower motor resistor. This component controls the speed of the blower motor, which in turn regulates the airflow through your vehicle's heating, ventilation, and air conditioning (HVAC) system. In essence, it manages the voltage supplied to the blower motor, offering multiple speed settings beyond just "on" and "off." When a blower motor resistor fails, you might experience a complete loss of fan function, or the fan might only operate at one speed, typically the highest setting.
Common Locations: A Vehicle-Specific Guide
The most common locations for the blower motor resistor are within the HVAC housing itself, typically under the dashboard on the passenger side. This placement allows the resistor to benefit from the airflow circulating through the system, aiding in heat dissipation. However, there are many variations. Here's a breakdown by common location types:
Under the Passenger Side Dashboard
This is perhaps the most frequently encountered location. You'll usually find the resistor attached to the HVAC housing, often secured with screws. You might need to remove a lower dashboard panel or kick panel to gain access. Look for a rectangular component with a wiring harness connected to it. Examples:
- General Motors (GM) Vehicles: Many GM vehicles, including trucks and SUVs from the late 1990s through the 2010s, position the resistor under the passenger side dash. Specific models like the Chevy Silverado, GMC Sierra, and various Buick sedans follow this pattern. You may need to remove the lower hush panel for access.
- Ford Vehicles: Similar to GM, Ford often places the blower motor resistor under the passenger side dash in models like the Ford F-150 (especially older generations), Ford Explorer, and Ford Taurus.
Inside the HVAC Housing
Some manufacturers integrate the resistor directly into the HVAC housing. This can make access a bit more challenging, potentially requiring disassembly of portions of the housing. The resistor is still generally positioned to take advantage of the airflow.
- Honda/Acura Vehicles: Certain Honda and Acura models, such as the Honda Civic, Accord, and Acura Integra, may have the resistor embedded within the HVAC box. Access might involve removing glove box components or sections of the dashboard to expose the HVAC unit.
- Toyota Vehicles: Some Toyota models, including the Camry and Corolla, also utilize this internal mounting strategy.
Near the Blower Motor
Less commonly, the resistor might be located in close proximity to the blower motor itself. This location is often found in older vehicles or those with simpler HVAC systems.
- Older American Cars: Classic cars from the 1960s and 1970s sometimes had the resistor mounted directly on the firewall near the blower motor, especially if the HVAC system was an add-on unit.
Under the Hood (Rare)
While unusual, there are instances where the blower motor resistor is located in the engine compartment, often near the firewall. This placement is more common in older vehicles or in applications where space under the dashboard is limited.
Blower Control Module (Newer Vehicles)
In newer vehicles, the traditional resistor is often replaced by a blower control module (BCM). This electronic module provides more precise control over the blower motor speed and incorporates diagnostic capabilities. The BCM is often located in similar areas as the resistor – under the dash or within the HVAC housing – but can also be found in more integrated locations as part of the vehicle's electronic architecture. Always consult the vehicle's service manual to find the exact location and troubleshooting procedures for the BCM.
Diagnostic Steps and Tools
Before embarking on the location hunt, it's crucial to confirm that the blower motor resistor is indeed the culprit. Here are some diagnostic steps:
- Check the Blower Motor Fuse: Always start with the basics. A blown fuse is a common cause of blower motor issues. Consult your vehicle's owner's manual for the fuse location.
- Test the Blower Motor Directly: Apply 12V directly to the blower motor to see if it runs. If it doesn't, the motor itself may be faulty.
- Inspect the Wiring: Look for damaged or corroded wiring and connectors leading to the resistor and blower motor.
- Use a Multimeter: With the ignition on and the blower switch set to different speeds, use a multimeter to check for voltage at the resistor's terminals. A lack of voltage or inconsistent readings indicates a potential resistor failure.
- OBD-II Scanner (For BCMs): If your vehicle has a blower control module, use an OBD-II scanner to check for diagnostic trouble codes (DTCs) related to the HVAC system. Codes like B1071 (Blower Motor Control Circuit Low) can help pinpoint the issue.
Tools you'll likely need include:
- Screwdrivers (various sizes): For removing panels and securing screws.
- Socket Set: For removing larger components.
- Pliers: For disconnecting wiring harnesses.
- Multimeter: For testing voltage and continuity.
- OBD-II Scanner (if applicable): For reading diagnostic trouble codes.
- Wiring Diagram: A wiring diagram specific to your vehicle model will be invaluable in tracing circuits.
Finding the Resistor: A Practical Approach
Given the variations in location, a systematic approach is key:
- Consult the Vehicle's Service Manual: This is your best resource. It will provide the precise location and removal instructions for your specific vehicle.
- Search Online Forums: Car-specific online forums often have threads detailing the location of the resistor for common models. Other owners might have already documented the process.
- Start with the Passenger Side Dashboard: This is the most likely location. Remove the lower panel or kick panel and inspect the area around the HVAC housing.
- Follow the Wiring: Trace the wires leading from the blower motor switch or the blower motor itself. These wires should lead to the resistor or BCM.
- Use a Mirror and Flashlight: A small mirror and flashlight can help you see behind panels and in tight spaces.
Real-World Example: Ford F-150
Let's consider a common scenario: a Ford F-150 (2004-2008). In these models, the blower motor resistor is typically located under the passenger side dashboard, near the center console. To access it, you'll need to:
- Remove the lower passenger side kick panel (usually held in place with clips).
- Locate the rectangular resistor, which is attached to the HVAC housing with two screws.
- Disconnect the wiring harness from the resistor.
- Remove the screws and carefully detach the resistor.
Remember to disconnect the negative battery terminal before working on any electrical components to prevent accidental shorts.
Preventative Maintenance
While the blower motor resistor is a relatively robust component, there are steps you can take to prolong its lifespan:
- Keep the HVAC System Clean: A clogged cabin air filter can restrict airflow, causing the blower motor and resistor to work harder. Replace the cabin air filter regularly.
- Avoid Running the Blower Motor at High Speed Continuously: Prolonged operation at high speed can generate excessive heat, potentially damaging the resistor.
- Inspect Wiring Regularly: Check for damaged or corroded wiring and connectors. Repair or replace any damaged components promptly.
Conclusion
Finding the blower motor resistor can be a straightforward task with the right information and a systematic approach. By understanding the common locations, diagnostic procedures, and preventative maintenance tips, you can effectively troubleshoot and repair your vehicle's HVAC system. Always consult the vehicle's service manual for the most accurate and specific information for your particular make and model. Remember safety first – disconnect the battery before working on electrical components. With patience and persistence, you can conquer this automotive challenge!