
Where Is Flasher Relay Located
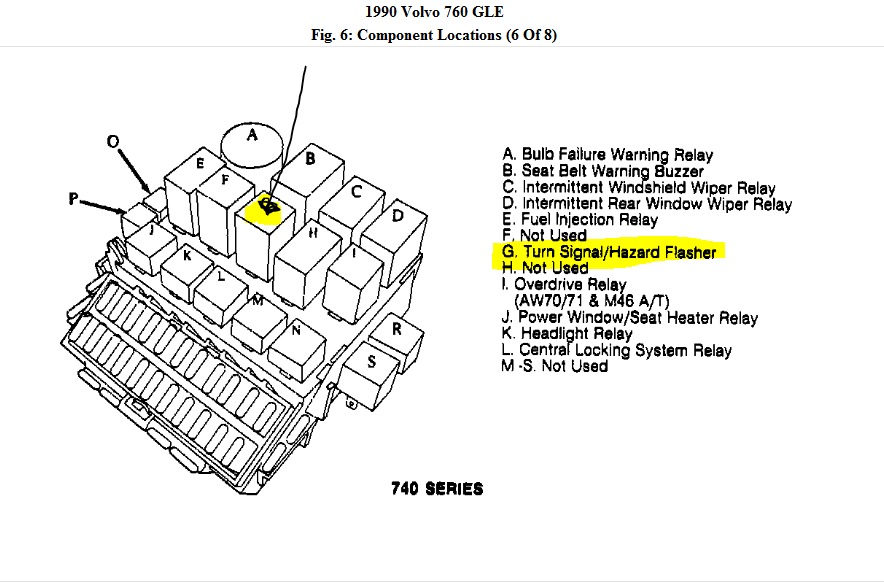
The humble flasher relay, often overlooked until it starts acting up, is a critical component in your vehicle's signaling system. Its primary job? To create the intermittent flashing action for your turn signals and hazard lights. While seemingly simple, its malfunction can lead to safety issues and, depending on your location, potential legal repercussions. Understanding where to find it in your car is, therefore, a valuable piece of automotive know-how.
The Hunt Begins: Common Locations for the Flasher Relay
Pinpointing the exact location of the flasher relay can be a bit of a treasure hunt, as it varies significantly across different makes, models, and even model years. However, there are several common areas where manufacturers typically hide this little device. Let's explore these prime suspects:
Under the Dashboard: The Most Likely Suspect
The most frequent hiding spot for the flasher relay is under the dashboard, usually on the driver's side. You'll often find it nestled within the fuse box or mounted nearby. Why the dashboard? It's a central location for many of the car's electrical systems, making wiring runs simpler and shorter. Accessing it usually involves contorting yourself under the steering wheel, but the relative ease of access makes it the first place to check. Look for a small, rectangular or cylindrical component, often encased in plastic.
Real-world example: In many Honda and Toyota models from the late 90s to the mid-2000s, the flasher relay is clipped to a bracket just above and to the left of the main fuse box under the dashboard. You might need a flashlight to get a good look, and potentially remove a lower dash panel for easier access.
Within the Fuse Box: A Neat and Tidy Solution
Sometimes, manufacturers integrate the flasher relay directly into the fuse box itself. In this scenario, the relay will be a plug-in component, clearly labeled on the fuse box diagram (which is usually located on the inside of the fuse box cover). This is a particularly common setup in more modern vehicles where space is at a premium. The fuse box itself is usually located either under the dashboard, in the engine compartment, or sometimes in the glove box.
Technical Note: If the flasher relay is integrated into the fuse box, it might be a solid-state relay, rather than a traditional electromechanical relay. Solid-state relays are more durable and reliable, as they have no moving parts, but they can be more expensive to replace.
Behind the Glove Box: A Less Common but Possible Location
While less common than the under-dash location, some vehicles stash the flasher relay behind the glove box. This requires removing the glove box assembly, usually by releasing retaining clips or screws. Once removed, you'll have access to the wiring and components behind the dash. Check for the relay mounted to a bracket or integrated into a secondary fuse panel.
Practical Tip: Before removing the glove box, check your car's service manual. Some glove boxes require specific removal procedures to avoid damaging the mechanism or any connected sensors or lights.
In the Steering Column: Rarely, but It Happens
In some older vehicles, particularly those with simpler electrical systems, the flasher relay might be located within the steering column. This is a more challenging location to access, as it often requires removing the steering wheel and associated trim pieces. This should generally be attempted by experienced mechanics only, as messing with the steering system can have serious safety implications.
Safety First: Always disconnect the battery before working on any electrical components, especially those in or around the steering column. This prevents accidental shorts and potential injury.
Under the Hood: Occasionally near the Firewall
Although less frequent, some manufacturers place the flasher relay in the engine compartment, usually near the firewall (the panel separating the engine bay from the passenger cabin). This location is more exposed to the elements, so the relay is typically well-sealed. Look for a weatherproof connector and a securely mounted relay.
Important Note: Engine compartment relays are often exposed to high temperatures. Make sure any replacement relay is rated for the operating temperature range of your vehicle.
Identifying the Flasher Relay: What to Look For
Once you've narrowed down the potential locations, the next step is to identify the flasher relay itself. Here's what to look for:
- Shape and Size: Flasher relays are typically small, rectangular or cylindrical components, usually measuring between 1 to 3 inches in length.
- Color: They are often encased in black, gray, or orange plastic.
- Number of Pins: Most flasher relays have two to five pins or terminals for electrical connections. The number of pins depends on the relay's function and the complexity of the circuit.
- Markings: The relay should have markings indicating its voltage (usually 12V for automotive applications), amperage rating, and sometimes a circuit diagram. Look for the letters "FLA" or a symbol indicating a flasher function.
- Sound: With the ignition on and the turn signal activated, a working flasher relay will typically make a distinct clicking sound. If you can hear the clicking sound coming from a specific location, that's a strong indicator that the relay is nearby.
Pro Tip: Consult your car's owner's manual or a service manual for a diagram of the fuse box and relay locations. These manuals often provide detailed information and illustrations that can save you time and effort.
Troubleshooting Tips: Is it Really the Flasher Relay?
Before you start tearing apart your dashboard, it's important to confirm that the flasher relay is indeed the culprit. Here are a few troubleshooting steps:
- Check the Bulbs: A burnt-out turn signal bulb can mimic a faulty flasher relay. Inspect all turn signal and hazard light bulbs to ensure they are working correctly.
- Listen for the Click: As mentioned earlier, a working flasher relay typically makes a clicking sound. If you don't hear the click, the relay could be faulty or not receiving power.
- Test with a Known Good Relay: If possible, swap the suspected faulty relay with a known good relay from another circuit (e.g., the horn relay, if it's the same type). If the turn signals now work, you've confirmed that the original relay was the problem.
- Use a Multimeter: If you're comfortable using a multimeter, you can test the relay's input and output voltages to see if it's functioning properly. A wiring diagram is essential for this step.
Warning: Working with electrical systems can be dangerous. If you're not comfortable performing these tests, it's best to consult a qualified mechanic.
Replacing the Flasher Relay: A Step-by-Step Guide
Once you've located and identified the faulty flasher relay, replacing it is usually a straightforward process:
- Disconnect the Battery: Always disconnect the negative battery terminal before working on any electrical components.
- Locate the Relay: Refer to the previous sections to find the relay's location.
- Remove the Old Relay: Gently pull the relay out of its socket or clip. Some relays may have a locking tab that needs to be released.
- Install the New Relay: Align the pins of the new relay with the socket and push it firmly into place. Ensure it's securely seated.
- Reconnect the Battery: Reconnect the negative battery terminal.
- Test the Turn Signals and Hazard Lights: Turn on the ignition and test the turn signals and hazard lights to ensure they are working correctly.
Purchasing Tip: When buying a replacement flasher relay, make sure it's the correct type for your vehicle. Check the part number, voltage, and amperage rating. Using the wrong relay can damage your electrical system.
Advanced Diagnostics: When It's Not Just the Relay
Sometimes, the problem isn't the flasher relay itself, but rather an issue with the wiring, switch, or other components in the turn signal circuit. In these cases, more advanced diagnostic techniques are required. This might involve using a multimeter to trace the wiring, checking the continuity of the switch, or inspecting the wiring harness for damage.
Common Causes: Problems with wiring, faulty turn signal switch, corroded connectors, ground issues.
In conclusion, locating the flasher relay in your car requires a bit of detective work, but with the right knowledge and tools, it's a task that most car enthusiasts and DIY mechanics can handle. Remember to always prioritize safety and consult a professional if you're unsure about any aspect of the repair. Happy hunting!