Where Is The Iat Sensor Located
The Intake Air Temperature (IAT) sensor is a crucial component in modern vehicles, playing a vital role in optimizing engine performance and fuel efficiency. It measures the temperature of the air entering the engine's intake manifold, allowing the engine control unit (ECU) to adjust the air-fuel mixture for optimal combustion. Knowing where the IAT sensor is located can be helpful for troubleshooting engine problems or performing routine maintenance. However, the location can vary depending on the vehicle's make, model, and year.
Understanding the Importance of the IAT Sensor
Before diving into the specific locations, it's important to understand why the IAT sensor is so important. The temperature of the intake air significantly affects its density. Colder air is denser, meaning it contains more oxygen per unit volume. The ECU uses the IAT sensor reading, along with other sensor data, to determine the correct amount of fuel to inject into the engine. This ensures the ideal air-fuel ratio for efficient combustion, minimizing emissions, and maximizing power.
If the IAT sensor fails or provides inaccurate readings, the ECU may miscalculate the required fuel injection, leading to a variety of problems, including:
- Poor fuel economy
- Reduced engine power
- Rough idling
- Hesitation during acceleration
- Increased emissions
- Check engine light illumination
Therefore, a properly functioning IAT sensor is essential for the overall health and performance of your vehicle.
Common IAT Sensor Locations
While the exact location of the IAT sensor varies, there are a few common places to look:
1. In the Intake Manifold
One of the most common locations is directly in the intake manifold. In this configuration, the IAT sensor is typically threaded into the manifold itself, often near the throttle body. This placement allows the sensor to directly measure the temperature of the air just before it enters the engine's cylinders.
To find it in this location, visually inspect the intake manifold, looking for a small sensor with an electrical connector. The sensor is typically cylindrical or cone-shaped. Sometimes, it may be combined with the Mass Air Flow (MAF) sensor which we will discuss next.
2. Integrated with the Mass Air Flow (MAF) Sensor
In some vehicles, the IAT sensor is integrated directly into the Mass Air Flow (MAF) sensor. The MAF sensor measures the volume of air entering the engine, and combining the IAT sensor with the MAF sensor simplifies the system and reduces the number of individual components. The MAF sensor is usually located in the intake ducting between the air filter box and the throttle body.
If your vehicle has a MAF sensor, examine it closely. Look for a small temperature-sensing element integrated into the MAF sensor housing. This element is often a small thermistor that changes its resistance based on the air temperature. If the IAT is integrated into the MAF sensor, replacing the MAF sensor will often replace the IAT sensor as well.
3. Inside the Air Filter Housing
Less commonly, the IAT sensor may be located inside the air filter housing. This location is more prevalent in older vehicles. While it might seem counterintuitive, placing the sensor in the air filter housing provides a relatively stable and protected environment for temperature measurement.
If you suspect the IAT sensor might be in the air filter housing, remove the air filter and inspect the housing for the sensor. It will likely be a small, cylindrical sensor protruding into the airflow. Be careful when removing the air filter to avoid damaging the sensor if it's present.
4. On the Air Intake Tube
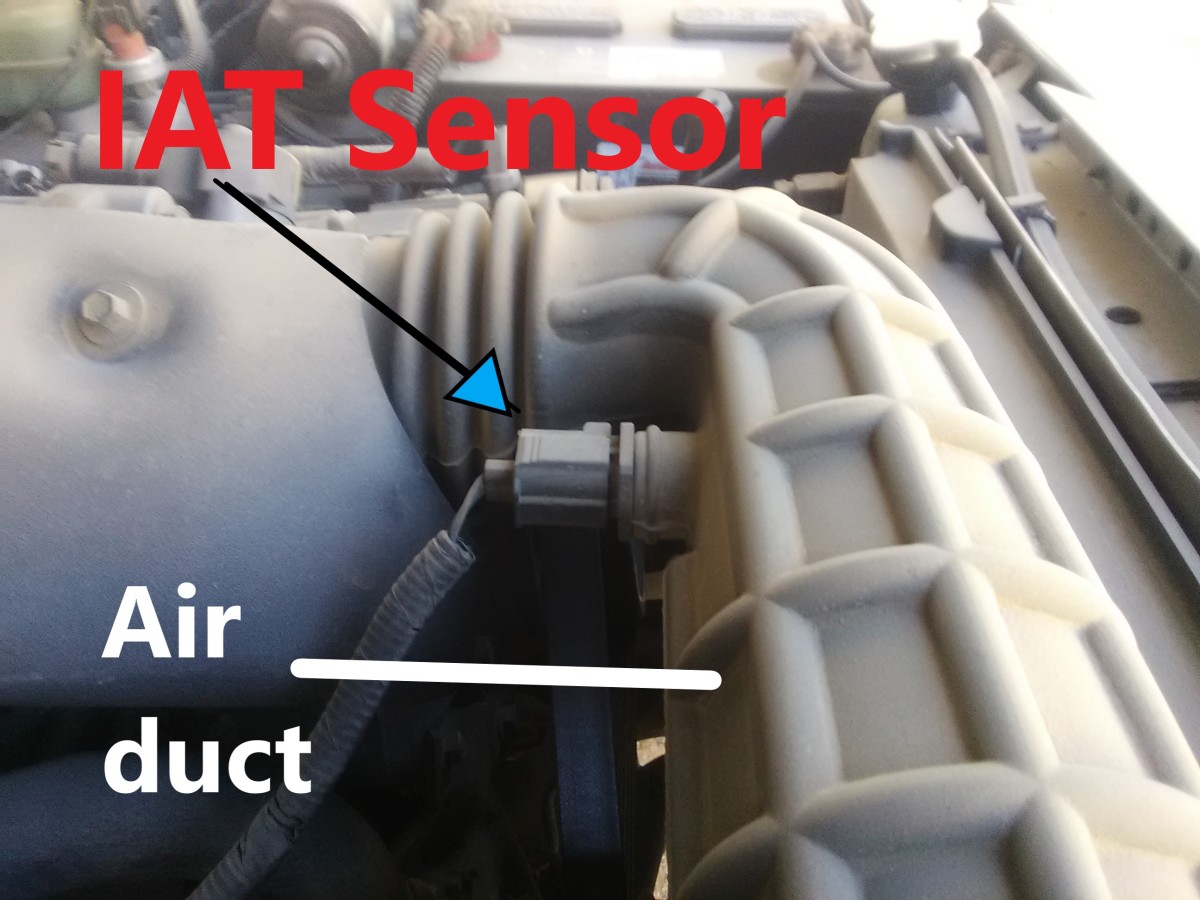
Another potential location for the IAT sensor is on the air intake tube itself, between the air filter box and the throttle body. This location is similar to the MAF sensor placement, but the IAT sensor is a separate component mounted directly on the tube.
Visually inspect the intake tube for a small sensor with an electrical connector. This location is often easily accessible for inspection and replacement.
How to Locate the IAT Sensor on Your Specific Vehicle
Finding the IAT sensor can sometimes be tricky, but here's a systematic approach to help you locate it:
- Consult Your Vehicle's Repair Manual: This is the best and most reliable resource. The repair manual will provide detailed diagrams and instructions specific to your vehicle's make, model, and year. It will pinpoint the exact location of the IAT sensor and provide guidance on how to remove and replace it.
- Search Online Forums and Databases: Many online forums and databases dedicated to specific vehicle makes and models contain valuable information shared by other owners. Search for your vehicle's information online, using search terms like "[Your Vehicle Make and Model] IAT sensor location". You may find pictures or videos that illustrate the sensor's location.
- Use an Online Parts Catalog: Online auto parts retailers often have detailed diagrams and parts listings. By searching for the IAT sensor for your specific vehicle, you may be able to view a diagram that shows its location.
- Visually Inspect the Common Locations: As mentioned above, start by checking the intake manifold, MAF sensor, air filter housing, and air intake tube. Use a flashlight to get a better view of hard-to-reach areas.
- Trace the Wiring: If you can identify the IAT sensor connector, try tracing the wiring back to the sensor itself. This can help you pinpoint its location, especially if it's hidden behind other components.
- Consider Professional Assistance: If you're still unable to locate the IAT sensor, or if you're uncomfortable working on your vehicle, consider seeking help from a qualified mechanic. They have the experience and tools to quickly locate the sensor and diagnose any problems.
Tools Needed for IAT Sensor Replacement
If you plan to replace the IAT sensor yourself, you'll typically need the following tools:
- Socket set or wrench set: The IAT sensor is usually threaded into its mounting location and can be removed with a socket or wrench.
- Screwdrivers: You may need screwdrivers to remove any covers or clamps that are obstructing access to the sensor.
- Electrical connector release tool: Some electrical connectors have locking mechanisms that require a special tool to release.
- Multimeter (optional): A multimeter can be used to test the IAT sensor's resistance and verify its functionality.
- Penetrating oil (optional): If the sensor is stuck, penetrating oil can help loosen it.
- New IAT sensor: Make sure you purchase the correct IAT sensor for your vehicle's make, model, and year.
Always disconnect the negative battery terminal before working on any electrical components in your vehicle.
Conclusion
The IAT sensor is a vital component for optimal engine performance. Understanding its location and function can empower you to diagnose engine problems and perform basic maintenance. While the specific location varies, knowing the common placements and utilizing resources like repair manuals and online forums can help you pinpoint its location on your vehicle. Remember to always consult your vehicle's repair manual for accurate information and prioritize safety when working on your vehicle.