03 Nissan Altima Crank Sensor
The crankshaft position sensor, often called the crank sensor, is a critical component in modern internal combustion engines. Think of it as the engine's heartbeat sensor. It monitors the position and speed of the crankshaft, the main rotating shaft that converts the pistons' up-and-down motion into rotational force to drive the wheels. This information is absolutely vital for the engine control unit (ECU), also known as the engine's "brain," to accurately control ignition timing and fuel injection.
Crank Sensors in the 03 Nissan Altima: A Closer Look
Specifically, let's focus on the 2003 Nissan Altima. The Altima, especially that model year, is a popular car that many enthusiasts work on themselves. Understanding its crank sensor system is beneficial. The '03 Altima typically utilizes a magnetic-type crank sensor. These sensors, also known as inductive sensors, work by generating an alternating current (AC) voltage when a toothed wheel (reluctor ring) attached to the crankshaft passes by the sensor's tip. The ECU interprets the frequency and amplitude of this AC signal to determine the crankshaft's position and speed. The reluctor ring has missing teeth, or a unique tooth pattern, to provide a specific reference point for the ECU to accurately synchronize fuel injection and ignition timing with the piston's position.
Imagine a bicycle wheel with equally spaced spokes. Now, imagine removing one or two spokes. As the wheel spins, a sensor counts each spoke as it passes. When it encounters the missing spokes, it knows it has reached a specific point in the wheel's rotation. This is analogous to how the reluctor ring and crank sensor work together.
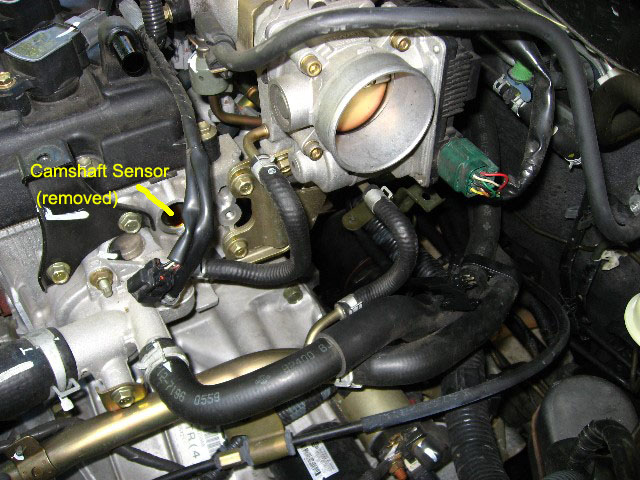
The location of the crank sensor can vary. On the '03 Altima, it is commonly found near the crankshaft pulley at the front of the engine, or sometimes near the transmission bellhousing. Consult a repair manual specific to your engine (QR25DE or VQ35DE) for the exact location. Different engine configurations, even within the same model year of a car, might have slightly different sensor placements. For example, on some Honda Civics (like the EK or EG generation), the crank sensor is integrated within the distributor, while on newer Honda models like the Accord, it's typically located near the crankshaft pulley, similar to the Altima.
Why is the Crank Sensor Important?
The crank sensor provides critical data to the ECU. This information is used to manage several vital engine functions:
- Ignition Timing: The ECU uses the crank sensor signal to determine when to fire the spark plugs. Incorrect timing can lead to reduced power, poor fuel economy, engine knocking, and even engine damage. Think of it like trying to push a swing at exactly the right moment to make it go higher. If you push too early or too late, you waste energy and the swing doesn't reach its full potential.
- Fuel Injection: The crank sensor tells the ECU when to inject fuel into the cylinders. Without accurate information, the engine could run too rich (too much fuel) or too lean (not enough fuel), leading to poor performance, emissions problems, and potential engine damage. Imagine trying to bake a cake without knowing the oven temperature or the amount of ingredients. The result will be a disaster.
- Engine Speed (RPM): The ECU calculates engine speed (RPM - Revolutions Per Minute) based on the crank sensor signal. This information is used for various purposes, including controlling the transmission, activating the rev limiter, and displaying the RPM on the instrument cluster.
- Engine Start/Stop: The crank sensor is essential for starting the engine. If the ECU doesn't receive a signal from the crank sensor, it won't know when to fire the spark plugs or inject fuel, and the engine won't start. Imagine trying to start a lawnmower with a broken pull cord; it simply won't work.
Symptoms of a Failing Crank Sensor
A failing crank sensor can cause a variety of problems. It's important to recognize these symptoms to diagnose the issue quickly. Here are some common signs that your '03 Altima's crank sensor might be failing:
- Engine Stalling: This is one of the most common symptoms. The engine may stall randomly, especially when it's hot or under load. The sudden loss of the crank signal interrupts the timing and fuel delivery, causing the engine to die.
- Hard Starting or No Start: The engine may be difficult to start, or it may not start at all. This is because the ECU needs a signal from the crank sensor to initiate the fuel injection and ignition processes. It's like trying to send a text message without a cell signal; the message simply won't go through.
- Check Engine Light: A failing crank sensor will often trigger the check engine light. The diagnostic trouble code (DTC) associated with the crank sensor is usually something like P0335 (Crankshaft Position Sensor A Circuit Malfunction).
- Poor Engine Performance: The engine may run rough, hesitate during acceleration, or lack power. This is because the incorrect timing and fuel delivery negatively affect the combustion process.
- Reduced Fuel Economy: Inaccurate fuel injection caused by a faulty crank sensor can lead to decreased fuel efficiency.
- Engine Misfires: The engine may misfire, especially at higher RPMs. This occurs because the spark plugs are not firing at the correct time.
Keep in mind that these symptoms can also be caused by other issues, such as a faulty camshaft position sensor, ignition coil problems, or fuel delivery problems. However, if you experience these symptoms on your '03 Altima, it's a good idea to check the crank sensor.
Diagnosing and Replacing the Crank Sensor
Diagnosing a faulty crank sensor typically involves the following steps:
- Read the Diagnostic Trouble Codes (DTCs): Use an OBD-II scanner to check for any stored trouble codes. A code related to the crank sensor is a strong indication of a problem. Autozone or similar stores often provide free code reading services.
- Visual Inspection: Inspect the crank sensor and its wiring for any signs of damage, such as cracks, frayed wires, or corrosion. Make sure the connector is securely attached.
- Testing the Sensor:
- Resistance Test: Use a multimeter to measure the resistance across the sensor's terminals. Consult the service manual for the correct resistance range. An out-of-range reading indicates a faulty sensor.
- Voltage Test: With the engine running (if possible), use a multimeter or oscilloscope to check the sensor's output voltage. You should see a fluctuating AC voltage signal as the crankshaft rotates. Again, refer to the service manual for the correct voltage specifications.
- Air Gap Test: Check the air gap between the sensor tip and the reluctor ring. An incorrect air gap can prevent the sensor from generating a proper signal.
If the tests confirm that the crank sensor is faulty, replacement is usually straightforward. Here's a general outline of the replacement procedure:
- Disconnect the Negative Battery Cable: This is a crucial safety precaution.
- Locate the Crank Sensor: Consult the repair manual to find the sensor's location.
- Disconnect the Electrical Connector: Carefully disconnect the wiring harness connector from the sensor.
- Remove the Sensor: Remove the bolt or screws holding the sensor in place. Gently pull the sensor out.
- Install the New Sensor: Install the new sensor, making sure it's properly seated. Tighten the mounting bolt or screws to the specified torque.
- Reconnect the Electrical Connector: Reconnect the wiring harness connector to the sensor.
- Reconnect the Negative Battery Cable:
- Clear the Diagnostic Trouble Codes: Use an OBD-II scanner to clear any stored trouble codes.
- Test Drive: Test drive the vehicle to ensure the engine runs smoothly.
Important Note: Always use a high-quality replacement crank sensor from a reputable manufacturer. Cheap aftermarket sensors may not meet OEM specifications and could fail prematurely. Brands like Bosch, Denso, and Delphi are generally considered reliable.
Practical Takeaways for '03 Altima Owners
Here are some practical things to keep in mind regarding your '03 Nissan Altima and its crank sensor:
- Be aware of the symptoms: Learn to recognize the signs of a failing crank sensor, such as stalling, hard starting, and poor engine performance. Early detection can prevent more serious problems.
- Regular Maintenance: While the crank sensor doesn't typically require routine maintenance, keeping your engine properly maintained can help extend its lifespan. This includes regular oil changes and spark plug replacements.
- Check the wiring: Periodically inspect the wiring and connector for the crank sensor to ensure they are in good condition. Corrosion and damaged wires can cause intermittent problems.
- Use a reliable scanner: Invest in a good quality OBD-II scanner to read and clear diagnostic trouble codes. This can save you money in the long run by allowing you to diagnose problems yourself.
- Don't ignore the Check Engine Light: If the check engine light comes on, don't ignore it. Get the codes read and diagnose the problem promptly. A small issue can quickly turn into a major repair if left unchecked.
- Consult the Service Manual: When working on your car, always refer to the service manual for specific instructions and torque specifications. This will help you avoid mistakes and ensure that the job is done correctly.
By understanding how the crank sensor works and what to look for, you can keep your '03 Nissan Altima running smoothly for years to come. A little knowledge can go a long way in preventing headaches and saving money on costly repairs.