09 Nissan Altima Belt Diagram
Okay, so you're dealing with a belt issue on your 2009 Nissan Altima. It's a pretty common concern, and thankfully, often not too difficult to resolve. Whether your belt snapped, is squealing like crazy, or you're just doing some preventative maintenance, understanding the belt routing diagram is crucial. Let's get you sorted out.
Understanding Your 2009 Altima's Belt System
Before we dive into the diagram itself, let's quickly cover the basics. Your Altima, depending on the engine (usually a 2.5L 4-cylinder or a 3.5L V6), uses a serpentine belt. This single, long belt is responsible for powering several essential components, including:
- The alternator (charges your battery).
- The power steering pump (makes steering easier).
- The air conditioning compressor (keeps you cool).
- Sometimes, the water pump (cools the engine - though sometimes this is driven by the timing chain).
A problem with the belt can therefore lead to a cascading failure of these systems. A squealing belt is a common warning sign, but ignoring it can lead to a completely snapped belt, leaving you stranded and potentially causing further damage.
Why Do I Need a Belt Diagram?
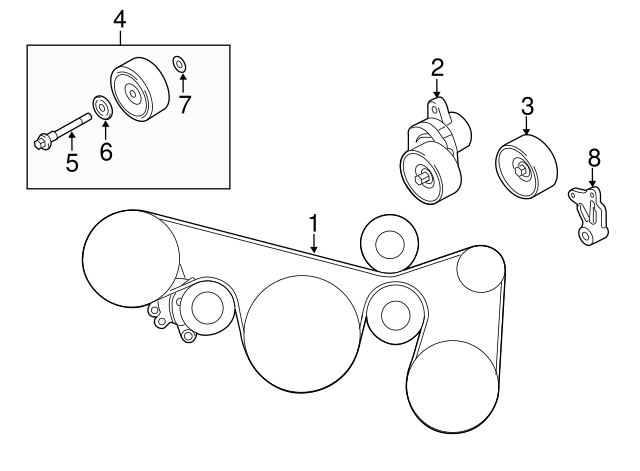
The belt routing diagram is essential because it shows the exact path the serpentine belt takes around all the pulleys. Without it, re-installing a new belt or even just inspecting the old one becomes a guessing game. Incorrect routing can lead to:
- The belt slipping or falling off.
- Damage to the belt or pulleys.
- Failure of the components powered by the belt.
Finding the 2009 Nissan Altima Belt Diagram
Good news! The easiest place to find the diagram is usually right under the hood of your Altima. Look for a sticker, often located near the radiator support or on the underside of the hood itself. This sticker *should* display the belt routing diagram specific to your engine type. The engine type is usually stamped on the engine itself if you don't know it.
If the sticker is missing or illegible (it happens!), here are a few alternative options:
- Owner's Manual: While not always the case, some owner's manuals include a diagram. Check yours first.
- Online Resources: A quick Google image search for "2009 Nissan Altima Serpentine Belt Diagram [Engine Type]" (e.g., "2009 Nissan Altima Serpentine Belt Diagram 2.5L") will often yield several results. Make sure the diagram matches your engine configuration!
- Auto Parts Stores: Reputable auto parts stores like AutoZone, O'Reilly, or Advance Auto Parts can often provide a belt diagram for your specific vehicle. They can look it up in their system based on your VIN.
- Repair Manuals: A Haynes or Chilton repair manual for your 2009 Altima will definitely contain the belt routing diagram, along with a wealth of other useful information.
Important Note: Always double-check the diagram against the actual pulley arrangement in your engine bay. Small variations can occur, so trust what you see physically over what you find online.
Replacing Your 2009 Altima's Serpentine Belt: A Step-by-Step Guide
If you're planning to replace the belt yourself, here's a general overview of the process. Safety first! Disconnect the negative battery terminal before starting any work under the hood. Also, make sure the engine is cool.
- Locate the Belt Tensioner: The tensioner is a spring-loaded pulley that maintains tension on the serpentine belt. You'll need to relieve this tension to remove and install the belt.
- Relieve the Tension: Most tensioners have a square hole or a bolt head that you can use with a wrench or a tensioner tool (a specialized wrench designed for this purpose). Using the wrench or tool, rotate the tensioner arm *away* from the belt to release the tension. This will create slack in the belt.
- Remove the Old Belt: While holding the tensioner, carefully slip the old belt off one of the pulleys. Once it's off one pulley, you can usually remove the rest of the belt easily.
- Inspect the Pulleys: Before installing the new belt, inspect all the pulleys for damage (cracks, chips, wobbling). Also, check if they spin freely. A seized or damaged pulley can quickly destroy a new belt. Replace any faulty pulleys.
- Install the New Belt: Using the belt routing diagram as your guide, carefully route the new belt around all the pulleys *except* for the tensioner pulley.
- Engage the Tensioner: Once the belt is correctly routed, use the wrench or tensioner tool to again rotate the tensioner arm, creating slack. Slip the belt over the tensioner pulley.
- Verify the Routing: Double, triple-check that the belt is correctly seated in all the grooves of each pulley. Make sure no part of the belt is twisted or misaligned.
- Release the Tensioner: Slowly release the tensioner arm, allowing it to apply tension to the belt.
- Start the Engine (Briefly): Start the engine for a few seconds and then shut it off. This helps the belt seat properly. Inspect the belt again to ensure it's still correctly routed.
- Check Belt Tension: The belt should have some give, but not be excessively loose. If you can deflect it more than about ½ inch in the middle of its longest span, it might need further adjustment (some tensioners are adjustable).
Tools You'll Need
- Wrench set (metric)
- Serpentine belt tensioner tool (highly recommended)
- Socket set (metric)
- Gloves
- Safety glasses
- Flashlight or work light
Common Problems and Troubleshooting
- Belt Squealing: A squealing belt is usually a sign of slippage. This could be due to a worn belt, a loose belt (insufficient tension), or a contaminated belt (oil, coolant). Inspect the belt for wear and tear, check the tension, and clean the belt and pulleys with a degreaser if necessary. If the squealing persists, the tensioner itself may be weak.
- Belt Cracking: Cracks in the belt indicate that it's deteriorating and needs to be replaced.
- Belt Snapping: A snapped belt is usually the result of neglect – a belt that's been worn or damaged for too long. It can also be caused by a seized pulley.
- Incorrect Routing: Even a slightly incorrect routing can cause problems. The belt might slip, wear prematurely, or damage the pulleys. Always double-check the diagram!
Estimated Repair Costs
The cost of replacing a serpentine belt varies depending on several factors, including the engine type and your location. Here's a rough estimate:
- DIY: If you replace the belt yourself, the cost is primarily the price of the new belt, which typically ranges from $20 to $50. The tensioner tool, if you don't already have one, might add another $20-$40.
- Professional Repair: A mechanic will charge for labor in addition to the cost of the belt. Expect to pay anywhere from $80 to $200 or more, depending on the shop's hourly rate and the complexity of the job. If the tensioner or a pulley also needs to be replaced, that will add to the cost. A tensioner replacement might add another $100-$300.
Important Disclaimer: These are just estimates. Always get a quote from a reputable mechanic before authorizing any repairs.
When to Seek Professional Help
While replacing a serpentine belt is often a DIY-friendly task, there are times when it's best to consult a professional mechanic:
- If you're not comfortable working on your car.
- If you suspect there's a more serious problem, such as a seized pulley or a faulty tensioner.
- If you're having difficulty accessing the belt or tensioner.
- If you're unsure about the correct belt routing.
By understanding the belt system and having access to the correct diagram, you're well-equipped to tackle this common maintenance task on your 2009 Nissan Altima. Good luck!