2001 Nissan Frontier Vacuum Hose Diagram
Let's face it, for those of us who wrench on our own rides, the 2001 Nissan Frontier is a beloved, yet sometimes frustrating, workhorse. Simple in many ways, but like any machine built before the onslaught of pervasive electronics, mastering the nuances often involves getting intimately familiar with its anatomy. And when it comes to vacuum lines, well, let's just say they can be a maze worthy of Theseus. This article dives deep into the 2001 Nissan Frontier vacuum hose diagrams, highlighting differences between models and engine configurations to help you conquer that under-hood spaghetti.
Navigating the Vacuum Labyrinth: A Model Year Breakdown
The 2001 model year for the Nissan Frontier offered a few key variations that directly impact the vacuum hose layout. Primarily, we're talking about two distinct engine options: the 2.4L KA24DE inline-four and the 3.3L VG33E V6. Beyond the engine, 2WD versus 4WD configurations, as well as manual versus automatic transmissions, can introduce subtle differences.
KA24DE (2.4L Inline-Four)
The KA24DE is the workhorse engine, known for its reliability and relatively simple vacuum system. The vacuum lines are primarily focused on emissions control, power brake booster function, and controlling components like the EGR valve. Due to the engine's simpler design compared to the V6, the vacuum system is generally less complex and easier to diagnose.
VG33E (3.3L V6)
The VG33E, being a V6, naturally has a more intricate vacuum system. Expect to find more lines related to idle air control, fuel pressure regulation, and emissions. This engine also often features additional vacuum-operated accessories depending on the specific trim level. Pay close attention to the routing around the intake manifold, as this is a common area for leaks to develop.
Key Components and Their Vacuum Connections
Understanding where the vacuum lines connect is crucial for troubleshooting. Here's a breakdown of some essential components and their vacuum dependencies:
- Intake Manifold: The heart of the system, providing the vacuum source for almost everything.
- Power Brake Booster: A large-diameter hose runs directly from the intake manifold to the booster for brake assist.
- EGR Valve: Vacuum operated, controlled by the ECU to reduce NOx emissions.
- Fuel Pressure Regulator: Uses vacuum to maintain consistent fuel pressure.
- Idle Air Control (IAC) Valve: Vacuum lines influence idle speed, especially crucial in the VG33E.
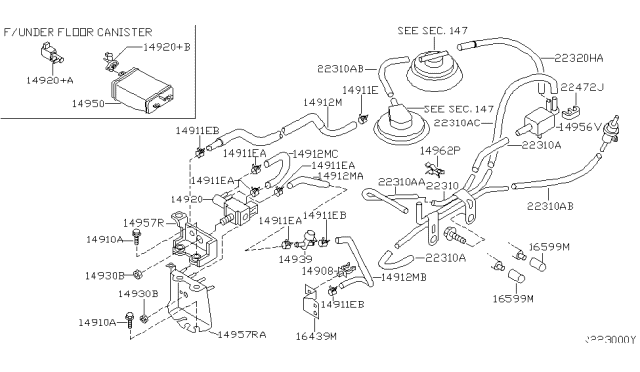
- Evaporative Emissions (EVAP) System: Several vacuum lines connect to the charcoal canister and purge valve to manage fuel vapor.
- 4WD Actuator (4WD Models): Vacuum controls the engagement of the front differential on 4WD Frontiers.
Visual Aids: Finding the Right Diagram
While a written description is helpful, nothing beats a good diagram. Fortunately, several resources are available:
- Factory Service Manual (FSM): The gold standard. Search for a digital copy online or purchase a physical one.
- Online Forums: Nissan Frontier forums often have members who have scanned and posted diagrams.
- Auto Parts Stores: Some stores can provide basic diagrams, especially when purchasing replacement vacuum hoses.
Always double-check the diagram to ensure it matches your specific model year and engine! Differences can exist even within the same model year due to mid-year production changes.
Troubleshooting Vacuum Leaks: Common Symptoms and Solutions
Vacuum leaks can manifest in a variety of ways, from subtle performance issues to obvious drivability problems. Here are some common symptoms:
- Rough Idle: A common indicator, especially with the VG33E.
- Poor Fuel Economy: Leaks can throw off the air-fuel mixture.
- Hesitation or Stalling: Particularly noticeable during acceleration.
- Check Engine Light (CEL): Often triggered by lean codes (e.g., P0171, P0174).
- Hissing Sound: Sometimes, you can hear the vacuum leak, especially in quiet environments.
Diagnosing vacuum leaks can be tricky. Here's a systematic approach:
- Visual Inspection: Check all hoses for cracks, damage, or disconnection. Pay close attention to hose ends and areas near heat sources.
- Vacuum Gauge: Connect a vacuum gauge to the intake manifold to measure vacuum pressure. Low vacuum readings indicate a leak.
- Smoke Test: The most effective method. Introduce smoke into the vacuum system and look for escaping smoke to pinpoint the leak.
- Carburetor Cleaner/Starting Fluid: Carefully spray small amounts of carburetor cleaner or starting fluid around vacuum lines and connections. If the engine RPM changes, you've likely found a leak in that area. Use extreme caution when using flammable sprays around a hot engine!
Spec Table: Vacuum Hose Size and Material
| Hose Location | Approximate Inner Diameter (ID) | Common Material |
|---|---|---|
| Power Brake Booster Hose | 1/2" - 3/4" | Reinforced Rubber |
| EGR Valve Control Hose | 1/8" - 3/16" | Rubber or Silicone |
| Fuel Pressure Regulator Hose | 1/8" - 3/16" | Rubber or Silicone |
| EVAP System Hoses | 1/4" - 3/8" | Rubber or Plastic |
| 4WD Actuator Hoses | 1/8" - 3/16" | Rubber or Plastic |
Note: These are approximate sizes. Always verify the correct size before replacing any hose.
Pros and Cons of the 2001 Frontier Vacuum System
Pros:
- Relatively simple compared to modern vehicles.
- Easy to understand the function of each line.
- Parts are readily available and affordable.
Cons:
- Rubber hoses degrade over time, leading to leaks.
- Can be difficult to trace lines without a diagram.
- VG33E has a more complex system than the KA24DE.
Real-World Driving Impressions: Vacuum Leaks and Performance
Having spent countless hours under the hood of my own 2001 Frontier (a VG33E 4x4), I can attest to the impact of vacuum leaks. A seemingly minor leak in a hose connected to the IAC valve transformed my smooth-idling truck into a sputtering, fuel-guzzling mess. The carb cleaner trick
helped me locate the culprit, and a $5 hose replacement brought it back to life. The difference was night and day – smoother acceleration, improved fuel economy, and a return to that characteristic Nissan reliability. Owners of the KA24DE often report similar experiences, albeit with slightly less dramatic symptoms due to the engine's inherently simpler design. The key takeaway? Don't underestimate the impact of a small vacuum leak!
The Final Word
Mastering the 2001 Nissan Frontier vacuum hose diagram isn't just about fixing leaks; it's about understanding the intricacies of your vehicle and gaining a deeper appreciation for its design. Armed with the right knowledge and a few basic tools, you can conquer that under-hood spaghetti and keep your Frontier running strong for years to come. So, grab your wrench, consult your diagram, and get ready to dive in!
Now for the fun part: Which vacuum leak diagnostic method do you swear by? Smoke test, carb cleaner, or the old-fashioned ear-to-hose approach? Let the debate begin!