2001 Nissan Xterra Engine Coolant Temperature Sensor Location
Delving into the intricate world of automotive diagnostics, we often encounter sensors playing pivotal roles in engine management. One such component, frequently encountered in DIY repairs and crucial for optimal engine performance, is the Engine Coolant Temperature (ECT) sensor. This guide focuses specifically on the 2001 Nissan Xterra, providing a detailed exploration of the ECT sensor's location, function, and the implications of its malfunction.
The ECT Sensor: More Than Just a Thermometer
Before we pinpoint the sensor's location on your 2001 Xterra, let's clarify its purpose. The ECT sensor isn't merely reporting the engine's temperature; it's providing critical data to the Engine Control Unit (ECU). This data is used to adjust several engine parameters, including:
- Fuel Injection: A cold engine requires a richer air/fuel mixture. The ECT sensor informs the ECU to increase fuel delivery during startup and warm-up.
- Ignition Timing: Similarly, ignition timing is often advanced when the engine is cold for improved combustion.
- Idle Speed: The ECU uses ECT data to raise the idle speed during cold starts to prevent stalling.
- Cooling Fan Operation: In some Xterra models (particularly those without a viscous fan clutch), the ECU may control the electric cooling fan based on ECT sensor readings.
- Emission Control: The ECT sensor helps the ECU determine when the engine is warm enough to activate certain emission control systems, such as the evaporative emission control (EVAP) system.
In essence, the ECT sensor is a key player in maintaining optimal engine performance, fuel efficiency, and emissions control. A faulty sensor can lead to a range of problems, from poor fuel economy and rough idling to difficulty starting and even overheating.
Pinpointing the ECT Sensor on the 2001 Nissan Xterra
Now, let's get to the heart of the matter: locating the ECT sensor on a 2001 Nissan Xterra. This location can vary slightly depending on the engine – either the 3.3L VG33E V6 or the 2.4L KA24DE inline-4. However, the principle remains the same.
General Location and Identification
The ECT sensor is typically found near the engine's coolant passages, allowing it to accurately measure the coolant temperature. In both engines, it's commonly located on or near the intake manifold, close to where the coolant flows into or out of the engine block. Look for a sensor with two wires connected to it. This distinguishes it from other sensors, like the coolant temperature sending unit (for the temperature gauge on your dash), which typically has only one wire.
Specific Locations by Engine Type:
3.3L VG33E V6 Engine
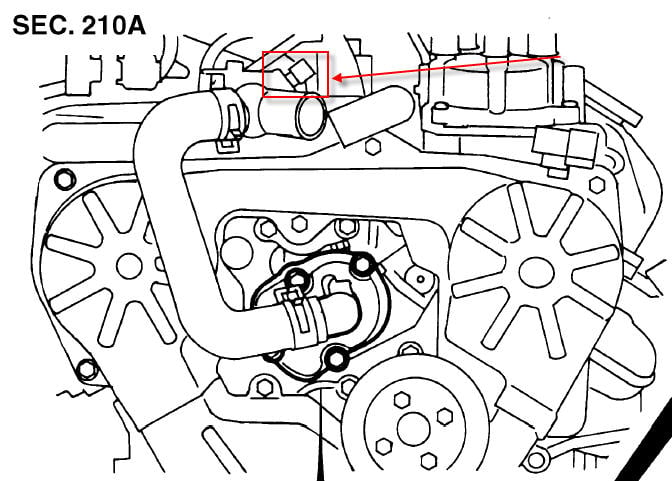
For the 3.3L VG33E V6, the ECT sensor is generally located on the intake manifold, often near the thermostat housing. You'll typically find it on the driver's side of the engine, towards the front. To find it precisely:
- Locate the thermostat housing. This is where the upper radiator hose connects to the engine.
- Trace the coolant passages from the thermostat housing along the intake manifold.
- The ECT sensor will usually be threaded into the manifold, close to these coolant passages. Look for a small sensor with a two-wire connector. It is often brass in color.
Important Note: There might be other sensors in the vicinity, so ensure you're identifying the correct one. The ECT sensor will have two wires, and it's directly measuring coolant temperature.
2.4L KA24DE Inline-4 Engine
On the 2.4L KA24DE inline-4, the ECT sensor's location is similar in principle but slightly different in execution. You will find the sensor is in the vicinity of the thermostat housing. It might be either directly on the thermostat housing, or a passage very close to the thermostat.
- Locate the thermostat housing. It is the connection point for the upper radiator hose to the engine.
- The ECT sensor will be mounted to the thermostat housing, or in a threaded port immediately adjacent to the thermostat housing. It will have two wires connected to it.
Tip: Using a flashlight and a mirror can be helpful in locating the sensor, especially in tight spaces. Taking a picture with your phone for a closer inspection is another helpful technique.
Diagnosing a Faulty ECT Sensor
Several symptoms can indicate a failing ECT sensor. Here are some common signs:
- Poor Fuel Economy: The ECU might be over-fueling the engine, resulting in reduced MPG.
- Rough Idling: The engine might idle unevenly, especially when cold.
- Difficulty Starting: The engine might be hard to start, particularly in cold weather.
- Check Engine Light (CEL): A faulty ECT sensor will often trigger a CEL, with diagnostic trouble codes (DTCs) such as P0116, P0117, P0118, P0119.
- Overheating: In some cases, a faulty ECT sensor can prevent the cooling fan from activating, leading to overheating.
To confirm a faulty ECT sensor, you can perform several tests:
- Scan for DTCs: Use an OBD-II scanner to check for any related diagnostic trouble codes.
- Live Data Monitoring: Use the scanner to monitor the ECT sensor's readings in real-time. Compare the readings to the actual engine temperature. A significant discrepancy indicates a problem.
- Resistance Test: Disconnect the sensor and use a multimeter to measure its resistance at different temperatures. The resistance should change proportionally with the temperature. Consult a repair manual for the correct resistance values.
- Voltage Test: With the sensor connected, backprobe the connector (carefully insert the multimeter probes into the back of the connector without damaging the wires) to measure the voltage. The voltage should be within a specific range (typically 5V reference voltage) and change with temperature.
Replacing the ECT Sensor
Replacing the ECT sensor is a relatively straightforward task, but it requires some basic mechanical skills and safety precautions. Here's a general guide:
- Safety First: Ensure the engine is cool before starting. Hot coolant can cause severe burns. Disconnect the negative battery cable to prevent electrical shorts.
- Drain Coolant: Partially drain the cooling system to a level below the ECT sensor. This prevents coolant from gushing out when you remove the sensor. Use the radiator drain cock to drain the coolant into a suitable container.
- Disconnect the Connector: Carefully disconnect the electrical connector from the ECT sensor.
- Remove the Sensor: Use a wrench or socket to unscrew the ECT sensor from the intake manifold or thermostat housing. Be prepared for some coolant to spill, even after draining.
- Install the New Sensor: Apply a small amount of thread sealant to the threads of the new ECT sensor. Screw the sensor into the hole and tighten it to the specified torque (refer to a repair manual).
- Reconnect the Connector: Reconnect the electrical connector to the new ECT sensor.
- Refill Coolant: Refill the cooling system with the appropriate type and amount of coolant.
- Bleed the System: Bleed the cooling system to remove any air pockets. This is crucial for proper cooling system operation.
- Check for Leaks: Start the engine and check for any leaks around the ECT sensor.
- Verify Operation: Use an OBD-II scanner to monitor the new ECT sensor's readings and ensure it's functioning correctly. Clear any DTCs.
Caution: Over-tightening the ECT sensor can damage the threads in the intake manifold or thermostat housing. Use a torque wrench and refer to the repair manual for the correct torque specifications.
Conclusion
The Engine Coolant Temperature sensor is a vital component in your 2001 Nissan Xterra's engine management system. Understanding its function, location, and potential failure symptoms can empower you to diagnose and address issues effectively. By following the steps outlined in this guide, you can confidently tackle ECT sensor replacement and ensure your Xterra continues to run smoothly and efficiently. Remember to always prioritize safety and consult a repair manual for specific torque specifications and procedures relevant to your vehicle. Good luck!