2005 Nissan Altima Light Bulb
The 2005 Nissan Altima, a popular mid-size sedan of its time, relies on a network of bulbs to ensure safe and legal operation. Understanding the different types of bulbs used, how to replace them, and potential issues you might encounter is crucial for any Altima owner, whether you're a seasoned mechanic or just someone who likes to keep their car in good shape. This article provides a comprehensive guide to the various light bulbs in your 2005 Altima.
Understanding the Bulb Landscape of the 2005 Altima
The 2005 Altima uses several different types of bulbs, each designed for a specific function. Let's break down the main categories:
- Headlights: These are your primary illumination source for nighttime driving. The 2005 Altima typically uses halogen bulbs for the headlights.
- Turn Signals: Located at the front and rear of the car, turn signal bulbs flash to indicate your intention to turn or change lanes.
- Taillights: These red lights at the rear of the car are essential for visibility, especially at night or in poor weather. They include brake lights, which illuminate when you press the brake pedal.
- Parking Lights: These low-intensity lights are used to increase visibility when parked on the side of the road, especially at night.
- Side Marker Lights: Located on the sides of the vehicle, these lights enhance visibility from the side.
- Interior Lights: These illuminate the cabin, including dome lights, map lights, and sometimes lights in the door panels.
- License Plate Light: Illuminates the rear license plate, ensuring it's visible to law enforcement.
Each of these bulb locations typically uses a different bulb type, which is characterized by its base, wattage, and sometimes color. Using the correct bulb is crucial for optimal performance and safety. Refer to your owner's manual for a detailed list of the specific bulb types required for your 2005 Altima. Alternatively, most auto parts stores can quickly identify the correct bulbs based on your vehicle's year, make, and model.
Halogen Headlights: A Closer Look
The 2005 Altima, like many cars of its era, primarily used halogen headlights. Halogen bulbs work by passing an electric current through a tungsten filament inside a glass envelope filled with halogen gas. This causes the filament to heat up and emit light. While relatively inexpensive and readily available, halogen bulbs aren't as energy-efficient or long-lasting as newer technologies like LEDs or HIDs (High-Intensity Discharge). Think of it like the difference between an old-fashioned incandescent bulb and a modern LED lightbulb in your house.
Halogen bulbs also produce a significant amount of heat. When replacing them, avoid touching the glass portion of the bulb with your bare hands. The oils from your skin can create hot spots on the bulb, leading to premature failure. Use gloves or a clean cloth to handle the bulb.
Common halogen headlight bulb types used in cars include H4, H7, and 9005/9006 bulbs. While I don't have the exact bulb type for the 2005 Altima headlights, checking your owner’s manual or a parts retailer online will confirm it. Other cars utilizing halogen headlights included the Honda Civic and the Toyota Corolla of similar model years.
Incandescent Bulbs for Other Lighting Functions
Beyond the headlights, the 2005 Altima relies heavily on incandescent bulbs for its other lighting functions. These are simpler and cheaper than halogen bulbs but generally have a shorter lifespan.
For turn signals, brake lights, and taillights, you'll typically find 1157 or 3157 type bulbs. These bulbs often have two filaments, one for the taillight function and another, brighter filament for the brake light or turn signal function. This allows a single bulb to perform multiple tasks. The 1157 and 3157 bulb numbers are the most common ones used in many car models like Ford F-150 and Chevrolet Silverado in their tail and brake lights.
Smaller incandescent bulbs, like 194 or 168 types, are commonly used for parking lights, side marker lights, and license plate lights. Interior lights often use festoon bulbs or smaller wedge-based bulbs.
Replacing Bulbs: A Step-by-Step Guide
Replacing a light bulb in your 2005 Altima is a relatively straightforward process that most owners can handle themselves. However, always consult your owner's manual for specific instructions and safety precautions.
- Safety First: Before you begin, turn off the engine and remove the key from the ignition. Allow the bulb to cool down if it was recently in use.
- Accessing the Bulb: The method for accessing the bulb varies depending on its location. For headlights, you'll typically need to open the hood and remove a plastic cover or access panel. For taillights, you may need to remove the taillight assembly from the vehicle. Interior lights often require prying off a lens cover. Consult your owner's manual for specific instructions.
- Removing the Old Bulb: Once you have access to the bulb, carefully remove it from its socket. Some bulbs twist and lock into place, while others are held in by a spring clip or friction. Again, consult your owner's manual for the correct removal procedure.
- Installing the New Bulb: Insert the new bulb into the socket, ensuring it's properly aligned and securely in place. If the bulb twists and locks, make sure it's fully engaged.
- Testing the New Bulb: Before reassembling the housing, turn on the ignition and test the new bulb to ensure it's working correctly. If it doesn't light up, double-check the bulb type, the socket connection, and the fuse.
- Reassembly: Once you've confirmed that the new bulb is working, reassemble the housing and any access panels.
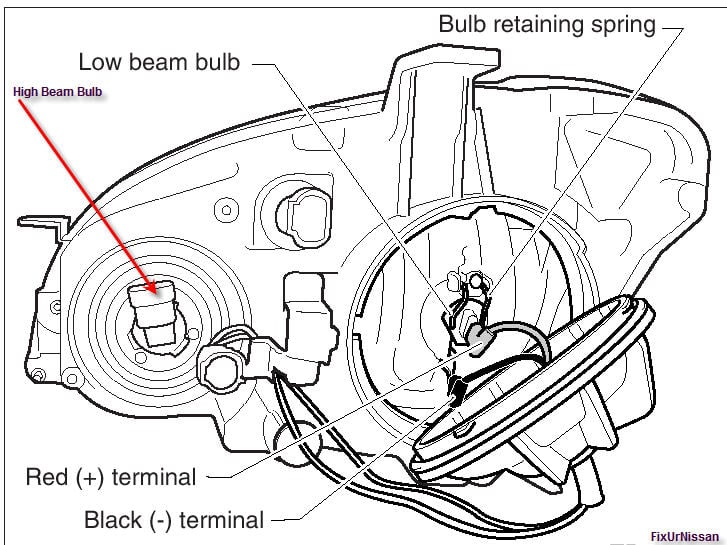
Example: Replacing a Headlight Bulb
Imagine you're replacing a headlight bulb. You pop the hood, find the headlight assembly, and there's usually a rubber or plastic cap behind it. Twist this cap off. Inside, you'll see a connector plugged into the bulb. Unplug the connector. Then, depending on the bulb type, there might be a wire clip holding the bulb in place. Unclip it. Now, you can carefully pull the old bulb out. Insert the new bulb, secure the clip, plug the connector back in, replace the cap, and you're done!
Troubleshooting Common Bulb Issues
Even with careful replacement, you might encounter some common issues with your Altima's light bulbs:
- Bulb Doesn't Light Up: This could be due to a blown bulb, a loose connection, or a blown fuse. Check the bulb filament for signs of damage. Inspect the socket for corrosion or loose wires. Consult your owner's manual to locate the fuse for the affected light and check if it's blown.
- Bulb Burns Out Quickly: This could be caused by using the wrong bulb type, voltage spikes in the electrical system, or excessive vibration. Ensure you're using the correct bulb and consider having your car's electrical system checked by a mechanic.
- Dim Light: A dim light could be caused by corrosion in the socket, a weak battery, or a failing alternator. Clean the socket contacts with a wire brush. Have your battery and alternator tested by a mechanic.
- Flickering Light: A flickering light is often caused by a loose connection or a faulty bulb. Check the socket and wiring for looseness or damage. Try replacing the bulb.
Fuses: The Circuit Protectors
A fuse is a safety device designed to protect your car's electrical system from overloads. When a circuit draws too much current, the fuse blows, breaking the circuit and preventing damage to the wiring and components. If a light bulb doesn't work, always check the fuse first. The fuse box location is typically under the dash on the driver's side or in the engine compartment. Your owner's manual will have a diagram showing the location of each fuse.
Example: Checking and replacing a fuse
Let's say your right taillight isn't working. You check the bulb, and it looks fine. Next, you locate the fuse box (usually under the dash or in the engine compartment). Using the diagram in your owner's manual, you find the fuse labeled "Right Tail Light." You pull the fuse out – it's a small, plastic-encased fuse with a metal strip inside. If the metal strip is broken, the fuse is blown and needs replacing. Replace it with a fuse of the same amperage (usually printed on the fuse itself).
Upgrading Your Altima's Lighting
While the 2005 Altima came standard with halogen headlights, you might consider upgrading to brighter or more efficient lighting options. LED headlight bulbs are a popular choice, offering brighter light, longer lifespan, and lower energy consumption. However, be sure to choose LED bulbs that are designed for your vehicle's headlight housings to ensure proper beam pattern and avoid blinding other drivers. HID (High-Intensity Discharge) headlights are another option, but they often require more extensive modifications to the headlight housings and electrical system.
Important Note: Ensure that any lighting upgrades you make comply with local laws and regulations. Some modifications may be illegal or require specific approvals.
Practical Takeaways
- Know Your Bulbs: Familiarize yourself with the specific bulb types required for your 2005 Altima. Keep a spare set of bulbs on hand for emergencies.
- Safety First: Always disconnect the battery or turn off the ignition before working on the electrical system.
- Handle with Care: Avoid touching halogen bulbs with your bare hands.
- Check the Fuses: If a bulb doesn't work, check the fuse first.
- Consult the Manual: Your owner's manual is your best resource for detailed information on bulb replacement and troubleshooting.
- Consider Upgrades: Explore LED or HID headlight upgrades for improved visibility, but ensure compliance with local laws.
By understanding the lighting system of your 2005 Nissan Altima and following these tips, you can keep your lights working properly, ensuring safe and enjoyable driving.