2005 Nissan Sentra Crank Sensor Location
Alright, let's dive into the crankshaft position (CKP) sensor on your 2005 Nissan Sentra. This sensor is a crucial component for engine timing and overall performance. Knowing its location and how to access it is essential for troubleshooting issues like a no-start condition, rough idling, or a general lack of power. While this guide focuses on the 2005 Sentra, the principles and general location often apply to other Nissan models from that era using similar engines.
Understanding the Crankshaft Position Sensor
Before we get into the nitty-gritty of locating the sensor, let's quickly review what it does. The CKP sensor's primary function is to monitor the rotational speed and position of the crankshaft. This information is then relayed to the engine control unit (ECU), also sometimes referred to as the powertrain control module (PCM). The ECU uses this data to accurately time fuel injection and ignition events. Without a properly functioning CKP sensor, the engine won't know when to fire the spark plugs or inject fuel, leading to serious performance problems.
There are typically two main types of CKP sensors:
- Magnetic Reluctance Sensors: These sensors generate a voltage signal based on the changes in a magnetic field as the crankshaft rotates. They often have two wires.
- Hall Effect Sensors: These sensors use a semiconductor to produce a voltage signal when exposed to a magnetic field. They typically have three wires – power, ground, and signal.
The 2005 Sentra generally uses a magnetic reluctance sensor, but it’s always wise to visually confirm before purchasing a replacement.
Common Symptoms of a Failing CKP Sensor
Recognizing the symptoms of a failing CKP sensor can save you time and prevent unnecessary repairs. Here are some common indicators:
- No-Start Condition: This is perhaps the most common symptom. If the ECU isn't receiving a signal from the CKP sensor, it won't allow the engine to start. The engine might crank, but it won't fire.
- Rough Idling: A faulty CKP sensor can cause the engine to idle erratically or stall frequently.
- Engine Misfires: Incorrect timing due to a bad sensor can lead to misfires, resulting in a loss of power and poor fuel economy.
- Check Engine Light: The "Check Engine Light" (CEL) will often illuminate, and a diagnostic scan will reveal a trouble code related to the CKP sensor, such as P0335, P0336, P0337, or P0339. These codes indicate issues with the CKP sensor circuit or signal.
- Stalling: The engine may stall unexpectedly, especially when decelerating or coming to a stop.
Locating the CKP Sensor on a 2005 Nissan Sentra (1.8L Engine)
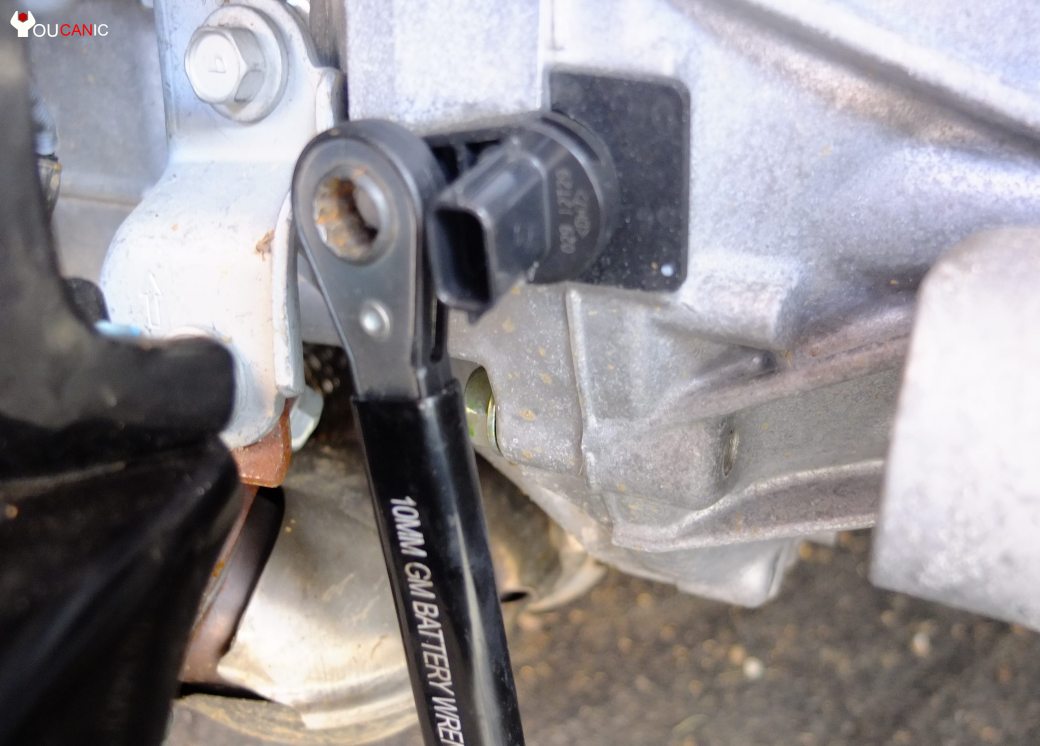
Now, let’s pinpoint the location of the CKP sensor on your 2005 Nissan Sentra. For the 1.8L engine (QG18DE), the CKP sensor is typically located near the rear of the engine block, on the transmission side. It's positioned close to the flywheel or flexplate, which has teeth that the sensor uses to determine the crankshaft's position.
Here's a step-by-step guide to help you find it:
- Safety First: Disconnect the negative battery terminal. This prevents any accidental electrical shorts during the process. Use a wrench to loosen the nut on the negative terminal and carefully remove the cable. Tuck the cable away from the battery post to ensure it doesn't accidentally reconnect.
- Locate the Transmission: Stand on the driver's side of the vehicle and look down towards the transmission. The CKP sensor is typically mounted on the engine block, close to where the transmission bolts to the engine.
- Search for the Sensor: The sensor is usually black or dark gray and cylindrical in shape. It will have a wiring harness connected to it. Look for the sensor with two wires coming out of it. It will be held in place by a single bolt, usually a 10mm or 12mm.
- Visual Aids: If you're having trouble finding it, consider using a flashlight to get a better view. You can also search online for images or diagrams of the 2005 Nissan Sentra CKP sensor location. Many online resources, including forums and repair manuals, provide visual aids that can be extremely helpful.
- Potential Obstructions: Be aware that other components, such as wiring harnesses, hoses, or brackets, may partially obstruct your view. You might need to gently move these components aside to get a clear view of the sensor. Don't force anything; carefully inspect the area to identify the sensor.
Important Note: Access to the CKP sensor can be a bit tight depending on your vehicle. You may need to work from underneath the car. If you choose to do so, always use jack stands to securely support the vehicle. Never work under a vehicle supported only by a jack.
Replacing the CKP Sensor
Once you've located the CKP sensor, replacing it is a relatively straightforward process. Here's a general outline:
- Disconnect the Wiring Harness: Carefully disconnect the wiring harness from the sensor. There's usually a small clip or locking mechanism that needs to be released. Avoid pulling on the wires themselves; instead, grip the connector firmly and gently pull it apart.
- Remove the Mounting Bolt: Use a socket wrench to remove the bolt securing the sensor to the engine block.
- Remove the Old Sensor: Gently wiggle the sensor and pull it straight out. Be careful not to damage the sensor mounting hole. If the sensor is stuck, try gently twisting it back and forth while pulling.
- Install the New Sensor: Install the new sensor in the reverse order of removal. Make sure the sensor is seated properly in the mounting hole.
- Tighten the Mounting Bolt: Tighten the mounting bolt to the manufacturer's specified torque. Refer to a repair manual for the correct torque specification. Over-tightening the bolt can damage the sensor or the engine block.
- Reconnect the Wiring Harness: Reconnect the wiring harness to the sensor, ensuring the connector is fully seated and the locking mechanism is engaged.
- Reconnect the Battery: Reconnect the negative battery terminal.
- Clear the Diagnostic Codes: Use an OBD-II scanner to clear any diagnostic trouble codes related to the CKP sensor.
- Test Drive: Start the engine and take the vehicle for a test drive to ensure the issue is resolved. Monitor the engine's performance and check for any unusual noises or symptoms.
Tips and Considerations
- Use Quality Parts: When replacing the CKP sensor, use a high-quality replacement part from a reputable manufacturer. A cheap or poorly made sensor can fail prematurely or provide inaccurate readings.
- Inspect the Wiring Harness: Before installing the new sensor, carefully inspect the wiring harness and connector for any signs of damage, such as frayed wires, cracked insulation, or corroded terminals. If you find any damage, repair or replace the harness as needed.
- Lubricate the O-Ring: If the new sensor comes with an O-ring, apply a small amount of silicone grease to the O-ring before installation. This will help ensure a proper seal and prevent leaks.
- Torque Specifications: Always refer to a repair manual for the correct torque specifications when tightening the mounting bolt. Over-tightening can damage the sensor or the engine block.
- Scan Tool is Your Friend: Using a scan tool to clear any stored diagnostic trouble codes is essential after replacing the sensor. If you don't have a scan tool, you can often borrow one from an auto parts store.
Important Note: Sometimes, what seems like a faulty CKP sensor can be caused by other issues, such as a faulty wiring harness, a loose connection, or a problem with the ECU. If you're unsure about the diagnosis or repair, it's always best to consult with a qualified mechanic.
By following these steps, you should be able to locate and replace the CKP sensor on your 2005 Nissan Sentra. Remember to prioritize safety, use quality parts, and consult a repair manual for specific instructions and torque specifications. Good luck, and happy wrenching!
Disclaimer: This article provides general guidance and is not a substitute for professional automotive advice. Always consult with a qualified mechanic if you're unsure about any aspect of the repair process. The author is not responsible for any damages or injuries that may occur as a result of following these instructions.