2006 Honda Pilot Oxygen Sensor Location
The 2006 Honda Pilot, a stalwart of the mid-size SUV market, relies on a sophisticated engine management system to achieve optimal fuel economy and minimize emissions. A critical component of this system is the oxygen (O2) sensor, often referred to as an O2 sensor, lambda sensor, or HEGO (Heated Exhaust Gas Oxygen) sensor. These sensors provide vital feedback to the Engine Control Unit (ECU), enabling it to finely tune the air-fuel mixture.
Understanding Oxygen Sensor Functionality
Before diving into the specific locations on a 2006 Pilot, it's crucial to understand why these sensors are so important. In essence, oxygen sensors measure the amount of oxygen present in the exhaust gas. This information is then relayed to the ECU, which uses it to determine whether the engine is running rich (too much fuel, not enough oxygen) or lean (too much oxygen, not enough fuel).
The ideal air-fuel ratio for complete combustion in a gasoline engine is approximately 14.7:1 (often referred to as stoichiometric). Oxygen sensors provide the ECU with the data needed to maintain this precise ratio, ensuring optimal engine performance, fuel efficiency, and reduced emissions. Running rich can lead to wasted fuel, reduced power, and increased emissions of hydrocarbons (HC) and carbon monoxide (CO). Running lean, on the other hand, can cause engine knocking, overheating, and increased emissions of oxides of nitrogen (NOx).
Oxygen sensors are typically made from zirconia or titania. Zirconia sensors generate a voltage proportional to the difference in oxygen concentration between the exhaust gas and the ambient air. Titania sensors, conversely, change their resistance based on the oxygen concentration. In either case, the ECU interprets these signals to make adjustments to the fuel injection system.
2006 Honda Pilot Oxygen Sensor Locations: A Detailed Guide
The 2006 Honda Pilot, equipped with a V6 engine, utilizes two sets of oxygen sensors: upstream and downstream. Each bank of the engine has its own upstream and downstream sensor. Understanding the function of each sensor is key to understanding its location.
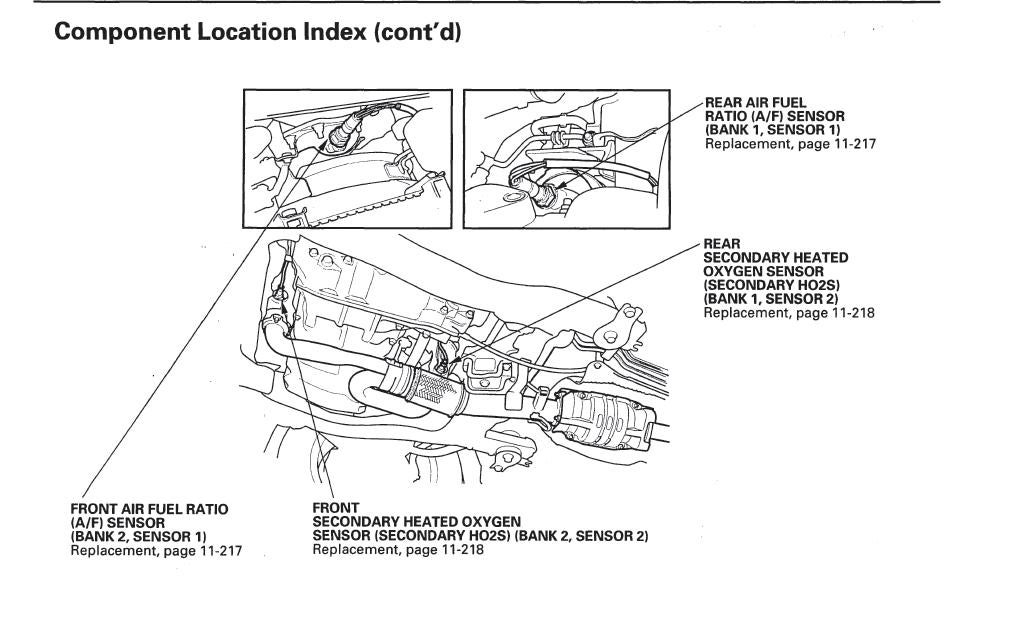
Upstream Oxygen Sensors (Bank 1 Sensor 1 & Bank 2 Sensor 1)
The upstream oxygen sensors, also known as pre-catalytic converter sensors, are located before the catalytic converter in the exhaust system. They are designated as Bank 1 Sensor 1 and Bank 2 Sensor 1. These sensors are the primary sensors used by the ECU to regulate the air-fuel mixture. They provide the most accurate and immediate feedback on the combustion process.
Location Specifics:
Bank 1 refers to the bank of cylinders that contains cylinder number 1. On the 2006 Honda Pilot, this is typically the rear bank of cylinders (closest to the firewall).
Bank 2 refers to the other bank of cylinders (closest to the radiator).
Sensor 1 always refers to the sensor before the catalytic converter.
To find Bank 1 Sensor 1, locate the exhaust manifold for the rear bank of cylinders. The sensor will be threaded into the exhaust pipe, usually quite close to the manifold itself. Similarly, Bank 2 Sensor 1 is located on the exhaust manifold for the front bank of cylinders, upstream of its catalytic converter. Access can be challenging, requiring patience and possibly the removal of other components for better visibility and wrench access. Expect to use a specialized oxygen sensor socket to prevent damage to the sensor and its wiring.
Downstream Oxygen Sensors (Bank 1 Sensor 2 & Bank 2 Sensor 2)
The downstream oxygen sensors, also known as post-catalytic converter sensors, are located after the catalytic converter in the exhaust system. They are designated as Bank 1 Sensor 2 and Bank 2 Sensor 2. Their primary function is not to directly control the air-fuel mixture. Instead, they monitor the efficiency of the catalytic converter.
The catalytic converter's job is to convert harmful pollutants in the exhaust gas (HC, CO, and NOx) into less harmful substances (carbon dioxide, water, and nitrogen). The downstream oxygen sensor measures the oxygen content of the exhaust gas after it has passed through the converter. By comparing the readings from the upstream and downstream sensors, the ECU can determine how effectively the catalytic converter is functioning. If the downstream sensor readings are too similar to the upstream sensor readings, it suggests the catalytic converter is not working properly.
Location Specifics:
As with the upstream sensors, Bank 1 refers to the bank of cylinders containing cylinder number 1 (rear bank).
Bank 2 refers to the other bank of cylinders (front bank).
Sensor 2 always refers to the sensor after the catalytic converter.
To locate Bank 1 Sensor 2, follow the exhaust pipe from the rear catalytic converter downstream. The sensor will be threaded into the pipe, typically a short distance after the converter. Bank 2 Sensor 2 is located similarly, downstream of the front catalytic converter. Access to these sensors is generally easier than accessing the upstream sensors, as they are usually more exposed and less obstructed by other engine components.
Identifying Oxygen Sensor Problems
Several symptoms can indicate a failing oxygen sensor. These include:
- Check Engine Light (CEL): This is often the first indication of a problem. The ECU will store a diagnostic trouble code (DTC) related to the oxygen sensor. Common codes include P0130-P0167 (O2 Sensor Circuit Malfunction), P0420 (Catalyst System Efficiency Below Threshold), and P1166/P1167 (Honda-specific O2 sensor codes).
- Poor Fuel Economy: A faulty upstream oxygen sensor can cause the ECU to miscalculate the air-fuel mixture, leading to excessive fuel consumption.
- Rough Idling: An inaccurate air-fuel mixture can cause the engine to idle erratically.
- Hesitation or Stalling: In severe cases, a failing oxygen sensor can cause the engine to hesitate during acceleration or even stall.
- Failed Emissions Test: A malfunctioning catalytic converter (often due to a failing upstream sensor) will result in elevated levels of pollutants, leading to a failed emissions test.
Diagnosis and Replacement
Diagnosing oxygen sensor problems requires specialized equipment, such as an OBD-II scanner. This scanner can read the DTCs stored by the ECU and provide valuable information about the nature of the fault. In addition, a multimeter can be used to check the sensor's voltage output and heater circuit resistance.
Replacing an oxygen sensor is a relatively straightforward process, but it's important to follow these steps:
- Disconnect the negative battery terminal: This prevents electrical shorts during the replacement process.
- Locate the faulty sensor: Use the diagnostic information to identify the correct sensor.
- Disconnect the sensor's electrical connector: Take care not to damage the connector or wiring.
- Remove the old sensor: Use an oxygen sensor socket to loosen and remove the sensor. If the sensor is seized, you may need to use penetrating oil and heat.
- Install the new sensor: Apply anti-seize compound to the threads of the new sensor to prevent it from seizing in the future. Torque the sensor to the manufacturer's specifications.
- Reconnect the electrical connector: Ensure the connector is securely fastened.
- Reconnect the negative battery terminal: Clear the DTCs from the ECU using an OBD-II scanner.
- Test the system: Drive the vehicle to ensure the new sensor is functioning correctly and that the Check Engine Light does not reappear.
Conclusion
The oxygen sensors are vital components of the 2006 Honda Pilot's engine management system. Understanding their location and function is crucial for diagnosing and resolving engine performance issues. By following the guidelines outlined in this article, you can gain a deeper understanding of your vehicle's O2 sensor system and potentially save money on costly repairs. Remember to always consult your vehicle's service manual and use appropriate tools and safety precautions when working on your vehicle.