2009 Nissan Altima Dash Cover
Alright, let's talk about dash covers for the 2009 Nissan Altima. We're not just slapping a piece of fabric up there. We're discussing how to protect your investment, improve aesthetics, and potentially even mitigate safety issues. This isn't a beginner-level mod, but if you're comfortable with basic tools and have a good eye for detail, you can definitely tackle this project. We’ll cover everything from material types to installation techniques.
Why a Dash Cover?
Before we dive into the how-to, let's establish the *why*. The dashboard of your 2009 Altima is subjected to a lot. Think about it: constant UV exposure, temperature swings from sub-zero to scorching, and the general wear and tear of daily driving. This can lead to:
- Cracking and Fading: Prolonged sun exposure degrades the plastic polymers in your dash, causing unsightly cracks and fading.
- Glare: A damaged or reflective dashboard can create dangerous glare, especially during sunrise and sunset, hindering visibility.
- Heat Buildup: A dark dashboard absorbs heat, making your cabin unbearably hot in the summer.
- Cosmetic Imperfections: Scratches, spills, or general grime can make your interior look worn.
A well-chosen dash cover addresses all these issues. It acts as a shield against UV rays, reduces glare, helps regulate temperature, and conceals existing damage. It's also a relatively inexpensive way to give your Altima's interior a fresh look. However, selecting the *right* cover is key.
Material Matters: Choosing the Right Dash Cover
Dash covers come in various materials, each with its pros and cons. Understanding these differences is crucial for making an informed decision.
1. Carpet
Carpet dash covers are a classic choice, known for their affordability and ability to absorb sunlight. They’re typically made from a synthetic fiber like polypropylene or polyester. These materials offer decent UV resistance and are relatively easy to clean.
Pros: Affordable, effective at absorbing sunlight, decent UV resistance.
Cons: Can look dated, prone to fading over time, may attract dust and dirt, may shed fibers.
Installation: Usually secured with Velcro strips or adhesive.
2. Velour
Velour offers a softer, more luxurious feel compared to carpet. It’s also generally more resistant to fading and wear. However, it might not be as effective at absorbing sunlight as carpet.
Pros: Soft and comfortable, better fade resistance than carpet, adds a touch of luxury.
Cons: Can be more expensive than carpet, might not absorb sunlight as effectively, can show dirt easily.
Installation: Similar to carpet, using Velcro or adhesive.
3. Molded Plastic/ABS
Molded dash covers offer a more rigid and custom-fit solution. They’re typically made from ABS plastic or similar materials and are designed to match the contours of your specific dashboard. These often cover the whole dashboard instead of just the top, so require more involved installation.
Pros: Durable, precise fit, OEM-like appearance, easy to clean.
Cons: More expensive than fabric options, can be challenging to install correctly, may not be as effective at reducing glare as darker fabrics, and prone to cracking under extreme heat.
Installation: Involves carefully aligning the cover and securing it with adhesive and/or screws. *Professional installation is often recommended.*
4. Suede/Faux Suede
Suede or faux suede offers a premium look and feel. They provide excellent glare reduction and are relatively resistant to wear and tear. However, they can be more expensive and require more careful cleaning.
Pros: Luxurious appearance, excellent glare reduction, durable.
Cons: More expensive, requires careful cleaning, can be prone to staining.
Installation: Typically secured with Velcro or adhesive.
5. Dash Mats
Dash mats are typically a silicone or rubberized material that clings to the dash without adhesive. They prioritize heat resistance and are generally easy to install.
Pros: Easy to install/remove, good heat resistance, easy to clean.
Cons: May not be as aesthetically pleasing as other options, may not conform perfectly to the dash contours, might slide around in extreme conditions.
Installation: Simply placed on the dashboard, no adhesive required.
Installation: A Step-by-Step Guide
The installation process varies depending on the type of dash cover you choose. Here's a general guide, but always refer to the manufacturer's instructions for your specific product.
Tools You'll Need:
- Cleaning Supplies: Mild soap, water, microfiber cloths.
- Adhesive Remover: If you're replacing an old cover.
- Rubbing Alcohol: For cleaning the dashboard before applying adhesive.
- Velcro Strips or Adhesive: Typically included with the dash cover. (Use 3M Automotive double-sided tape for a more secure and permanent solution.)
- Scissors or Utility Knife: For trimming Velcro strips.
- Screwdriver (if applicable): For molded covers that require screws.
- Panel Removal Tool (Optional): For safely removing vents or other dashboard components.
- Heat Gun or Hair Dryer (Optional): For softening the adhesive for better adhesion in colder climates.
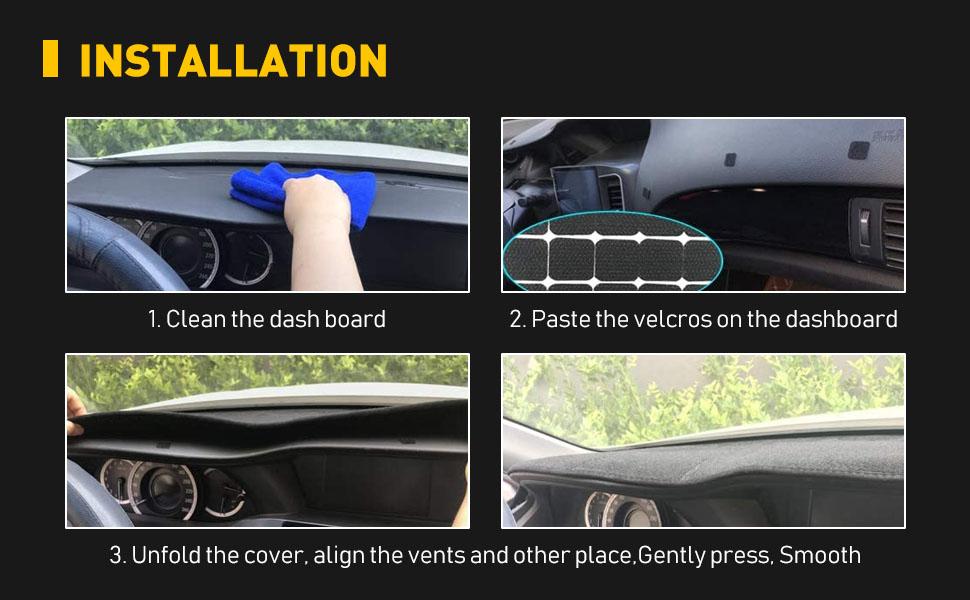
Step-by-Step Instructions:
- Preparation is Key: Thoroughly clean your dashboard with mild soap and water. Remove any dirt, dust, or debris. If you're replacing an old cover, use adhesive remover to remove any residual glue. Finally, wipe the dashboard with rubbing alcohol to remove any remaining residue and ensure proper adhesion.
- Test Fit: Before applying any adhesive, carefully position the dash cover on your dashboard to ensure a proper fit. Pay close attention to the cutouts for vents, sensors, and other features. Make any necessary adjustments.
- Secure with Velcro or Adhesive: If using Velcro strips, attach them to the underside of the dash cover and to the corresponding areas on your dashboard. Ensure the Velcro strips are evenly spaced for uniform support. If using adhesive, apply a thin, even layer to the underside of the dash cover. *Avoid applying adhesive directly to the dashboard unless absolutely necessary.*
- Press and Hold: Carefully position the dash cover on your dashboard and press firmly to ensure good contact with the Velcro or adhesive. Hold for several minutes to allow the adhesive to bond properly.
- Trim Excess Material: If necessary, use scissors or a utility knife to trim any excess material around vents or other features.
- Reinstall Components: If you removed any vents or other dashboard components, reinstall them carefully.
- Cure Time: Allow the adhesive to fully cure according to the manufacturer's instructions. This may take several hours or even overnight. Avoid driving your car during this time.
Specific Considerations for the 2009 Altima
The 2009 Nissan Altima has a relatively straightforward dashboard design, but there are a few things to keep in mind:
- Sensor Placement: Be mindful of the automatic climate control sensor located near the center of the dashboard. Ensure the dash cover does not obstruct this sensor.
- Airbag Deployment: *This is crucial!* Ensure that the dash cover does not interfere with the deployment of the passenger-side airbag. Look for covers specifically designed to accommodate airbag deployment. Many covers have a pre-cut seam that allows the airbag to deploy properly. Never compromise airbag safety!
- Vent Cutouts: The vent cutouts should align perfectly with the vents on your dashboard. If they don't, you may need to trim the cover.
Troubleshooting
Even with careful planning, you might encounter a few hiccups. Here are some common issues and their solutions:
- Dash Cover Won't Stay in Place: Use stronger adhesive or add more Velcro strips. Ensure the dashboard is thoroughly clean before applying adhesive.
- Bubbles or Wrinkles: Gently smooth out the bubbles or wrinkles with your fingers. If necessary, use a heat gun or hair dryer to soften the adhesive and make it more pliable.
- Misaligned Cutouts: Carefully trim the cutouts with scissors or a utility knife.
- Glare Still Present: Consider using a darker-colored dash cover or applying an anti-glare film to your windshield.
Maintenance
To keep your dash cover looking its best, regularly vacuum or brush it to remove dust and dirt. For fabric covers, you can use a mild detergent and water to spot clean any stains. For molded plastic covers, simply wipe them down with a damp cloth. Avoid using harsh chemicals or abrasive cleaners, as they can damage the material.
Conclusion
Installing a dash cover on your 2009 Nissan Altima is a worthwhile investment that can protect your dashboard, improve visibility, and enhance the overall appearance of your interior. By carefully selecting the right material and following the installation steps, you can achieve a professional-looking result. Remember to prioritize safety, especially regarding airbag deployment. With a little patience and attention to detail, you can enjoy the benefits of a new dash cover for years to come.