2011 Nissan Versa Rear Brakes
The 2011 Nissan Versa, known for its affordability and fuel efficiency, often requires attention to its rear braking system. Understanding common problems, proper maintenance, and effective troubleshooting techniques can save you money and keep your Versa safely on the road. Unlike front disc brakes, the Versa's rear brakes typically feature drum brakes, which require a different approach to maintenance and repair.
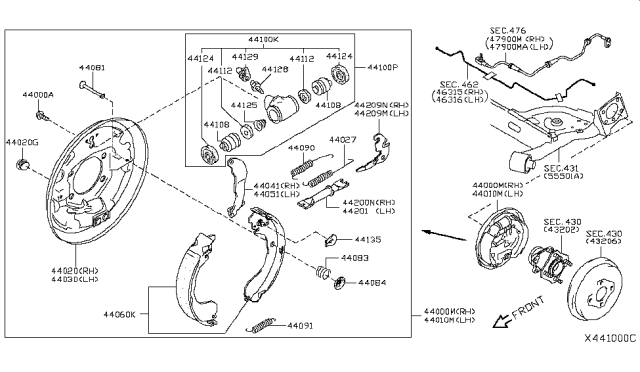
Understanding 2011 Nissan Versa Rear Drum Brakes
Drum brakes operate with shoes that press outward against the inside of a rotating drum. This friction slows the vehicle. The system includes several key components: brake shoes, wheel cylinders, return springs, and an adjuster mechanism. Knowing these parts helps in diagnosing issues.
Common Problems and Solutions
Symptom: Squealing or Grinding Noises from the Rear
Problem: This is perhaps the most common complaint. Squealing often indicates worn brake shoes. Grinding usually points to metal-on-metal contact, meaning the brake lining is completely gone, and the metal shoe is scraping against the drum.
Causes:
- Worn brake shoes: Normal wear and tear.
- Contamination: Dirt, debris, or brake dust buildup.
- Glazed brake shoes: Overheating can cause the brake shoe material to become glazed, reducing friction and causing noise.
- Damaged brake drums: Scratches or grooves on the drum surface.
Solutions:
- Replace brake shoes: This is usually the first step. Choose quality brake shoes for optimal performance and longevity. For example, Wagner or Bendix are reputable brands.
- Clean brake components: Use brake cleaner to remove dust and debris. Never use compressed air without proper respiratory protection, as brake dust can contain asbestos (especially in older vehicles).
- Resurface or replace brake drums: If the drums are deeply scored or out-of-round, resurfacing (if possible) or replacing them is necessary. Consider replacing them if the drums are close to the maximum diameter specification.
- Inspect and replace hardware: Check the condition of the return springs, hold-down springs, and adjuster mechanism. Replace any worn or damaged parts.
Example: Imagine a similar scenario in a Toyota Corolla with rear drum brakes. Grinding noises would be addressed using the same diagnostic and repair steps. The same principles apply across different makes and models that utilize drum brakes.
Symptom: Weak or Spongy Brake Pedal
Problem: A soft or spongy brake pedal suggests air in the brake lines or a failing component. This can significantly reduce braking power.
Causes:
- Air in the brake lines: Usually introduced during brake work or if the brake fluid reservoir runs dry.
- Leaking wheel cylinder: Fluid leaking from the wheel cylinder can introduce air into the system.
- Low brake fluid: Indicates a leak somewhere in the system.
- Master cylinder failure: Internal leakage within the master cylinder.
- Worn or damaged brake lines: Corrosion or physical damage can lead to leaks.
Solutions:
- Bleed the brake lines: This removes air from the system. Start with the wheel furthest from the master cylinder (usually the right rear) and work your way forward.
- Inspect and replace wheel cylinders: Look for signs of leakage around the wheel cylinder. Replace if necessary.
- Check brake fluid level and look for leaks: Inspect brake lines, hoses, master cylinder, and wheel cylinders for leaks. Repair any leaks immediately.
- Test and replace the master cylinder: If bleeding the brakes doesn't solve the problem and no leaks are found, the master cylinder may be failing. A professional mechanic can perform a pressure test to confirm this.
- Inspect and replace brake lines: Check for corrosion, cracks, or swelling in the brake lines. Replace any damaged lines.
Example: This symptom is also common in older Honda Civics. A leaking wheel cylinder would present similarly, with a noticeable drop in brake fluid level and a spongy brake pedal. Bleeding the brakes after replacing the cylinder is crucial.
Symptom: Rear Wheels Locking Up
Problem: This is a dangerous situation where one or both rear wheels suddenly stop rotating during braking, potentially causing a skid.
Causes:
- Seized wheel cylinder: The wheel cylinder piston may be stuck in the extended position, constantly applying the brakes.
- Sticking brake shoes: Corrosion or debris can cause the brake shoes to stick to the drum.
- Malfunctioning adjuster mechanism: An over-adjusted brake shoe can cause it to bind against the drum.
- Contaminated brake lining: Oil or grease on the brake shoes can cause them to grab suddenly.
Solutions:
- Replace seized wheel cylinder: If the wheel cylinder is seized, replacement is necessary.
- Clean and lubricate brake shoe contact points: Use brake grease to lubricate the contact points between the brake shoes and the backing plate.
- Adjust brake shoes: Ensure the brake shoes are properly adjusted. Refer to the vehicle's service manual for the correct adjustment procedure.
- Replace contaminated brake shoes: If the brake shoes are contaminated with oil or grease, they should be replaced.
Example: This issue could manifest in a similar way in a Ford Focus with rear drum brakes. A sticking wheel cylinder would prevent the brakes from releasing, leading to wheel lock-up.
Symptom: Parking Brake Not Holding
Problem: The parking brake fails to prevent the vehicle from rolling, especially on an incline.
Causes:
- Stretched or broken parking brake cable: The cable that connects the parking brake lever to the rear brakes can stretch, fray, or break.
- Worn brake shoes: If the brake shoes are worn, they may not provide enough friction to hold the vehicle.
- Incorrectly adjusted parking brake: The parking brake may not be properly adjusted.
Solutions:
- Inspect and replace parking brake cable: Check the cable for signs of damage or stretching. Replace if necessary.
- Replace worn brake shoes: As mentioned earlier, worn brake shoes can affect parking brake performance.
- Adjust parking brake: Adjust the parking brake cable according to the vehicle's service manual. There is usually an adjustment point under the vehicle or near the parking brake lever inside the cabin.
Example: A similar issue can occur in a Chevrolet Cruze equipped with rear drum brakes. A stretched parking brake cable would prevent the parking brake from engaging effectively.
Maintenance Tips for 2011 Nissan Versa Rear Brakes
Regular maintenance is crucial for preventing brake problems. Here are some tips:
- Inspect brake shoes and drums annually: Check for wear, cracks, and contamination.
- Check brake fluid level regularly: Low fluid indicates a leak.
- Bleed brakes every two years: This removes moisture and air from the system.
- Lubricate brake shoe contact points: Use brake grease to prevent sticking.
- Adjust parking brake periodically: Ensure it holds the vehicle securely.
- Use quality brake components: Opt for reputable brands.
Real-World Considerations
Many owners of the 2011 Nissan Versa report that the rear brakes tend to wear faster than expected, especially in urban driving conditions with frequent stops. It's essential to be proactive with inspections and maintenance. Also, consider the quality of brake shoes used; cheaper alternatives may wear out more quickly and produce more noise.
When replacing brake shoes, it's highly recommended to replace the hardware kit (springs, clips, etc.) as well. These parts can weaken over time, affecting brake performance and potentially causing premature wear. It’s often a small additional cost that provides significant benefits.
Keeping Your Car in Top Condition
Beyond the rear brakes, maintaining other aspects of your 2011 Nissan Versa will contribute to its overall longevity and reliability:
- Follow the manufacturer's recommended maintenance schedule for oil changes, filter replacements, and fluid flushes.
- Inspect tires regularly for wear and proper inflation.
- Check and top off all fluids, including coolant, power steering fluid, and windshield washer fluid.
- Listen for unusual noises and investigate any potential problems promptly.
By paying attention to your car's needs and addressing issues early, you can keep your 2011 Nissan Versa running smoothly and safely for years to come. Regular maintenance is an investment that pays off in the long run, preventing costly repairs and ensuring your vehicle's reliability.