2012 Nissan Frontier 4.0 Crankshaft Position Sensor Replacement
Okay, so you're tackling a crankshaft position sensor (CKP) replacement on your 2012 Nissan Frontier with the 4.0L V6 (VQ40DE) engine. This is a job that, while not inherently difficult, requires a bit of patience and attention to detail. A failing CKP sensor can cause a range of problems, from intermittent stalling and rough running to a complete no-start condition. We're going to walk through the process step-by-step, assuming you've already diagnosed the issue and confirmed the need for replacement.
Understanding the Crankshaft Position Sensor
Before we dive into the procedure, let's quickly cover what the CKP sensor does. This sensor plays a vital role in engine management. It monitors the rotational speed and position of the crankshaft. This information is crucial for the Engine Control Module (ECM), often referred to as the engine computer, to accurately control ignition timing and fuel injection. Essentially, the ECM needs to know exactly where each piston is in its stroke to optimize engine performance and efficiency.
The CKP sensor on the VQ40DE engine is typically a magnetic reluctance or Hall effect sensor. Without getting overly technical, these sensors work by detecting changes in a magnetic field as the crankshaft rotates. A toothed reluctor wheel, also called a trigger wheel, is attached to the crankshaft. As the teeth pass the sensor, they disrupt the magnetic field, generating a signal that the ECM interprets. A faulty CKP sensor will deliver an erratic or absent signal, causing the ECM to miscalculate engine timing and fuel delivery.
Tools and Materials You'll Need
Before you start, gather all the necessary tools and materials. This will make the job smoother and prevent frustrating interruptions.
- New Crankshaft Position Sensor (Ensure it's the correct part for your vehicle!)
- Socket Set (Metric) – Typically 10mm and 12mm sockets
- Ratchet and Extensions
- Wrench Set (Metric) – Similar sizes to the socket set
- Screwdrivers (Phillips and Flathead)
- Pliers (Needle-nose and Regular)
- Jack and Jack Stands
- Wheel Chocks
- Work Light
- Penetrating Oil (Optional, but recommended for stubborn bolts)
- Scan Tool (for clearing trouble codes after replacement)
- Gloves
- Safety Glasses
- Shop Rags
Safety Precautions
Safety is paramount! Before starting any work on your vehicle, observe the following precautions:
- Chock the rear wheels to prevent the vehicle from rolling.
- Engage the parking brake firmly.
- Disconnect the negative battery terminal. This prevents accidental electrical shorts during the repair process. Allow at least 10 minutes for the vehicle's electrical system to fully discharge.
- Work in a well-ventilated area, especially if using penetrating oil or other chemicals.
- Wear safety glasses to protect your eyes from debris.
- Use jack stands to support the vehicle securely after lifting it with a jack. Never work under a vehicle supported only by a jack!
Step-by-Step Replacement Procedure
Okay, let's get started. Here's a detailed, step-by-step guide to replacing the CKP sensor on your 2012 Nissan Frontier 4.0L.
Step 1: Accessing the Sensor
The crankshaft position sensor on the VQ40DE engine is typically located near the rear of the engine block, often on the passenger side. You'll likely need to access it from underneath the vehicle.
- Safely lift the vehicle using a jack and secure it with jack stands. Make sure the vehicle is stable before proceeding.
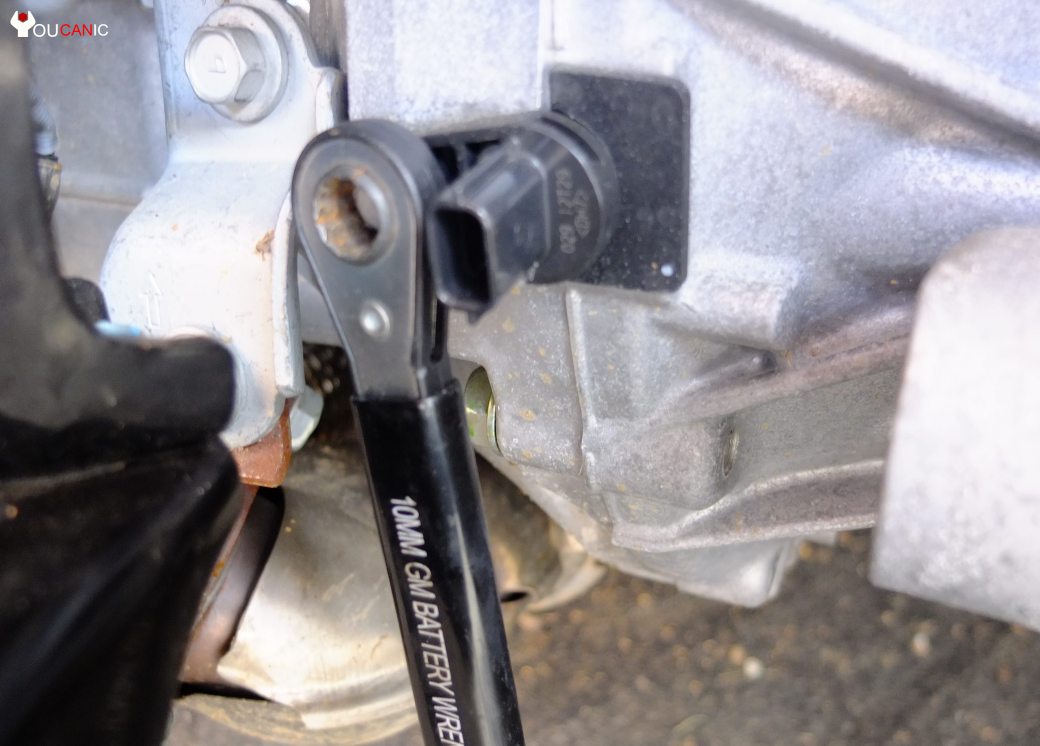
- Locate the CKP sensor. It will be a small, cylindrical sensor with a wiring harness connector attached. It's usually positioned near the crankshaft pulley or flywheel. Use a work light to get a better view.
Step 2: Disconnecting the Wiring Harness
Before removing the sensor, disconnect the wiring harness connector.
- Carefully detach the wiring harness connector from the CKP sensor. Most connectors have a retaining clip or locking tab that needs to be depressed or squeezed to release the connector. Be gentle; you don't want to break the connector.
- Inspect the connector for any signs of corrosion or damage. If the connector is corroded, clean it with an electrical contact cleaner. If it's damaged, you may need to replace the connector along with the sensor.
Step 3: Removing the Old Sensor
Now it's time to remove the old CKP sensor.
- Locate the mounting bolt that secures the sensor to the engine block. It's usually a 10mm or 12mm bolt.
- Apply penetrating oil to the bolt if it seems stuck. Let it soak for a few minutes.
- Use a socket and ratchet to carefully loosen and remove the mounting bolt.
- Gently wiggle and pull the old CKP sensor out of the engine block. Be careful not to damage the sensor mounting hole.
Step 4: Installing the New Sensor
With the old sensor removed, you can now install the new one.
- Inspect the sensor mounting hole for any debris or corrosion. Clean it if necessary.
- Apply a small amount of dielectric grease to the sensor's O-ring (if equipped). This will help to create a good seal and prevent corrosion.
- Carefully insert the new CKP sensor into the mounting hole. Ensure it's fully seated.
- Install the mounting bolt and tighten it to the manufacturer's specified torque. If you don't have the torque specification, a snug but not overtightened setting is generally acceptable. Over-tightening can damage the sensor or the engine block.
- Reconnect the wiring harness connector to the new CKP sensor. Make sure it clicks into place and is securely fastened.
Step 5: Final Checks and Testing
Before you button everything up, perform some final checks and testing.
- Double-check all connections to ensure they are secure.
- Lower the vehicle and remove the jack stands.
- Reconnect the negative battery terminal.
- Start the engine and listen for any unusual noises. The engine should start and run smoothly.
- Use a scan tool to check for any Diagnostic Trouble Codes (DTCs) related to the crankshaft position sensor. If there are any codes, clear them.
- Monitor the engine's performance for a few days to ensure the problem is resolved.
Troubleshooting Tips
Here are a few troubleshooting tips if you encounter any problems during the replacement process:
- Engine still won't start: Double-check the wiring harness connection to the CKP sensor. Ensure the sensor is properly seated and the mounting bolt is tightened. Verify the new sensor is the correct part for your vehicle.
- Rough running or stalling: This could indicate a problem with the new sensor itself. Consider testing the new sensor with a multimeter to check its resistance. Also, check for any vacuum leaks or other engine problems that could be causing the symptoms.
- Check Engine Light (CEL) comes back on: Use a scan tool to read the DTCs. If the same CKP sensor code returns, there may be a wiring problem or a problem with the ECM.
Important Considerations
- Genuine vs. Aftermarket Sensors: While aftermarket sensors can be cheaper, it's often recommended to use a genuine Nissan or a reputable OEM (Original Equipment Manufacturer) sensor. These sensors are typically more reliable and provide more accurate readings.
- Torque Specifications: Always try to find the correct torque specifications for the mounting bolt. Using the correct torque prevents damage to the sensor and the engine block. A service manual or online resource should provide this information.
- Wiring Issues: Pay close attention to the wiring harness and connector. Damaged or corroded wiring can cause intermittent problems and false sensor readings.
Replacing the crankshaft position sensor on your 2012 Nissan Frontier is a manageable task for the experienced DIYer. By following these steps and taking your time, you can save money and gain a better understanding of your vehicle's engine management system. Remember to always prioritize safety and consult a professional mechanic if you're unsure about any part of the process. Good luck!