2012 Nissan Versa Rear Brakes
The 2012 Nissan Versa, known for its affordability and fuel efficiency, relies on a straightforward rear braking system. Unlike many modern vehicles with disc brakes on all four wheels, the Versa often utilizes drum brakes in the rear. This article provides a practical guide to maintaining, troubleshooting, and addressing common issues with the 2012 Nissan Versa's rear brakes, aimed at both car owners and mechanics.
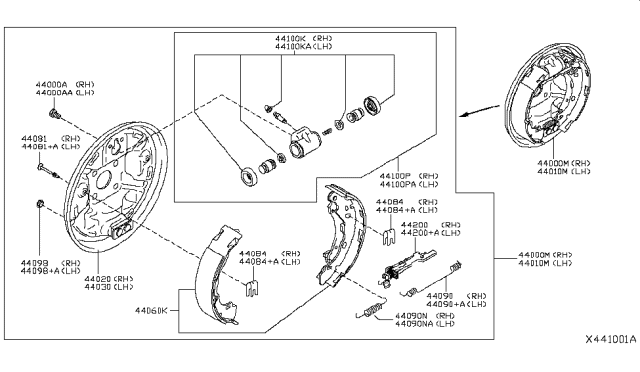
Understanding the 2012 Nissan Versa Rear Drum Brake System
Drum brakes operate using friction generated by brake shoes pressing against the inside surface of a rotating drum. When you press the brake pedal, hydraulic pressure forces a wheel cylinder to expand, pushing the brake shoes outwards. These shoes, lined with friction material, contact the drum, slowing or stopping the vehicle. The system also incorporates springs to retract the shoes when the brake pedal is released and a self-adjusting mechanism to compensate for wear.
Maintenance: Keeping Your Versa's Rear Brakes Healthy
Regular maintenance is crucial for the longevity and performance of your Versa's rear brakes. Here's a breakdown of essential tasks:
Inspection: The Foundation of Preventative Care
Inspect your rear brakes at least every 12,000 miles or during routine tire rotations. Look for the following:
- Drum Condition: Check for cracks, scoring (deep grooves), or excessive rust. Minor surface rust is normal, especially after rain or sitting for extended periods. Excessive scoring or cracks necessitate drum replacement.
- Brake Shoe Thickness: Measure the thickness of the brake shoe lining. If the lining is worn down to 1/16 inch (1.6mm) or less, replacement is required. Uneven wear indicates potential problems with the wheel cylinder or brake hardware.
- Hardware Condition: Examine the springs, retainers, and self-adjuster mechanism. Look for broken, corroded, or weak springs. Replace any damaged hardware.
- Wheel Cylinder Leaks: Carefully inspect the wheel cylinder for signs of brake fluid leakage. A leaking wheel cylinder indicates a seal failure and requires immediate replacement. Evidence of fluid inside the brake drum also points to a leak.
Cleaning: Removing Debris and Ensuring Smooth Operation
Brake dust accumulation can hinder the performance of your drum brakes. Clean the brakes periodically using a brake cleaner specifically designed for brake systems.
- Safety First: Wear a dust mask and eye protection to avoid inhaling brake dust.
- Disassembly: Carefully remove the brake drum. Familiarize yourself with the arrangement of the components before disassembly. Take pictures for reference if needed.
- Cleaning: Spray all components thoroughly with brake cleaner, paying close attention to the brake shoes, drum interior, and self-adjuster mechanism. Use a brush to remove stubborn debris.
- Reassembly: Reassemble the brake system, ensuring all components are properly seated and secured.
Important Note: Never use compressed air to clean brake components as this can aerosolize brake dust, which contains asbestos in older vehicles and other harmful particles in newer ones. Always use brake cleaner and proper respiratory protection.
Lubrication: Reducing Friction and Preventing Binding
Proper lubrication is essential for smooth brake operation. Apply a small amount of high-temperature brake grease to the following points:
- Backing Plate Contact Points: Where the brake shoes contact the backing plate.
- Self-Adjuster Threads: To ensure smooth adjustment.
- Parking Brake Lever: Where the parking brake lever contacts the brake shoe.
Caution: Avoid getting grease on the brake shoe lining or drum surface.
Adjustment: Maintaining Proper Brake Shoe Clearance
Drum brakes require periodic adjustment to maintain proper shoe-to-drum clearance. The 2012 Versa typically has a self-adjusting mechanism, but it may require manual adjustment if it's not functioning correctly. Here's how to manually adjust the brakes:
- Locate the Adjustment Slot: On the backing plate, you'll find a rubber plug covering an adjustment slot. Remove the plug.
- Use an Adjustment Tool: Insert a brake adjusting tool (or a small screwdriver) into the slot to turn the star wheel adjuster.
- Adjust the Shoes: Turn the star wheel adjuster until the brake shoes lightly contact the drum. You should feel a slight drag when rotating the drum by hand.
- Back Off Slightly: Back off the adjuster a few clicks until the drum rotates freely with minimal drag.
- Repeat on the Other Side: Adjust the brakes on the other side of the vehicle in the same manner.
- Test the Brakes: After adjustment, pump the brake pedal several times to center the shoes. Test the parking brake to ensure it engages properly.
Troubleshooting: Addressing Common Problems with the 2012 Versa Rear Brakes
Here are some common problems you might encounter with your Versa's rear brakes and how to diagnose and fix them:
Problem: Squealing or Grinding Noises
Symptoms: Loud squealing or grinding noises when braking, especially at low speeds.
Possible Causes:
- Worn Brake Shoes: The most common cause. The friction material has worn down, exposing the metal backing plate.
- Scored Brake Drums: Deep grooves or ridges on the drum surface.
- Foreign Objects: Grit, dirt, or small stones trapped between the shoes and the drum.
- Glazed Brake Shoes: The brake shoe friction material has become hardened and smooth due to excessive heat.
Solutions:
- Replace Brake Shoes: If the shoes are worn down to the wear indicators or are glazed, replace them.
- Resurface or Replace Brake Drums: If the drums are scored, have them resurfaced at a machine shop. If the scoring is too severe, replace the drums.
- Clean the Brakes: Remove the drums and clean the brake assembly to remove any foreign objects.
- Consider High-Performance Shoes: If glazing is a recurring issue, consider upgrading to high-performance brake shoes that are more resistant to heat.
Problem: Weak or Spongy Brake Pedal
Symptoms: The brake pedal feels soft or spongy, requires excessive travel to engage the brakes, or the vehicle takes longer to stop.
Possible Causes:
- Air in the Brake Lines: Air bubbles compress, reducing hydraulic pressure.
- Low Brake Fluid: Indicates a leak in the system.
- Leaking Wheel Cylinder: Brake fluid leaking from the wheel cylinder.
- Worn or Leaking Master Cylinder: The master cylinder is responsible for generating hydraulic pressure. A faulty master cylinder will result in a spongy pedal and reduced braking performance.
- Improperly Adjusted Rear Brakes: Excessive shoe-to-drum clearance.
Solutions:
- Bleed the Brakes: Bleed the brake lines to remove air. Start with the wheel farthest from the master cylinder (usually the right rear) and work your way closer.
- Check and Top Off Brake Fluid: Check the brake fluid reservoir and add fluid as needed.
- Replace Leaking Wheel Cylinder: Replace the wheel cylinder and bleed the brakes.
- Replace Master Cylinder: If the master cylinder is leaking or faulty, replace it and bleed the brakes.
- Adjust the Rear Brakes: Adjust the rear brakes to ensure proper shoe-to-drum clearance.
Problem: Parking Brake Not Holding
Symptoms: The parking brake lever pulls up too far, or the vehicle rolls when the parking brake is engaged.
Possible Causes:
- Stretched or Broken Parking Brake Cable: The cable that actuates the parking brake mechanism.
- Corroded or Binding Parking Brake Cable: Rust and corrosion can cause the cable to bind, preventing it from engaging the brakes properly.
- Worn Brake Shoes: If the brake shoes are severely worn, the parking brake may not have enough friction to hold the vehicle.
- Improperly Adjusted Parking Brake: The parking brake cable may be too loose.
Solutions:
- Replace Parking Brake Cable: If the cable is stretched or broken, replace it.
- Lubricate or Replace Parking Brake Cable: Lubricate the cable with a penetrating oil to free it up. If lubrication doesn't work, replace the cable.
- Replace Brake Shoes: If the brake shoes are worn, replace them.
- Adjust Parking Brake Cable: Adjust the parking brake cable at the adjuster located under the vehicle or inside the center console. Refer to your vehicle's service manual for specific instructions.
Example: Similar to the 2012 Nissan Versa, many older Honda Civics and Toyota Corollas also utilize rear drum brakes. The troubleshooting steps and solutions discussed above apply equally well to these vehicles.
Real-World Issues and Practical Tips
- Rust and Corrosion: Vehicles in areas with harsh winters and road salt are prone to rust and corrosion. Regularly inspect and clean the brakes to prevent rust from seizing components.
- Brake Fluid Contamination: Brake fluid absorbs moisture over time, which can lead to corrosion and reduced braking performance. Flush and replace the brake fluid every two to three years.
- Using the Correct Brake Shoes: Ensure you use the correct brake shoes for your vehicle. Using the wrong shoes can lead to poor braking performance and premature wear.
- Self-Adjuster Issues: Inspect the self-adjuster mechanism during brake service. Sometimes, they can seize up due to corrosion. Clean and lubricate them to ensure proper functionality.
Keeping Your Car in Top Condition: A Holistic Approach
Maintaining your 2012 Nissan Versa's rear brakes is just one piece of the puzzle. To keep your car in top condition, follow these general maintenance tips:
- Regular Oil Changes: Follow the manufacturer's recommended oil change intervals.
- Check and Maintain Fluid Levels: Regularly check and top off all fluid levels, including coolant, power steering fluid, and transmission fluid.
- Tire Maintenance: Maintain proper tire pressure and rotate your tires regularly.
- Scheduled Maintenance: Follow the manufacturer's recommended maintenance schedule for your vehicle.
- Listen to Your Car: Pay attention to any unusual noises, vibrations, or smells. These could be early warning signs of potential problems.
By following these maintenance and troubleshooting tips, you can keep your 2012 Nissan Versa's rear brakes in good working order, ensuring your safety and prolonging the life of your vehicle.