2013 Nissan Altima Valve Cover Gasket Replacement
The valve cover gasket, often an unsung hero of your engine, plays a critical role in maintaining optimal performance and preventing messy oil leaks. Its primary function is to seal the interface between the valve cover and the cylinder head, preventing oil from escaping and contaminants from entering the engine's top end. A leaking valve cover gasket can lead to reduced oil levels, potential engine damage, and an unsightly, oily engine bay. In this guide, we'll delve into the process of replacing the valve cover gasket on a 2013 Nissan Altima, providing a detailed, step-by-step procedure coupled with technical insights to help you understand the 'why' behind each action.
Understanding the System
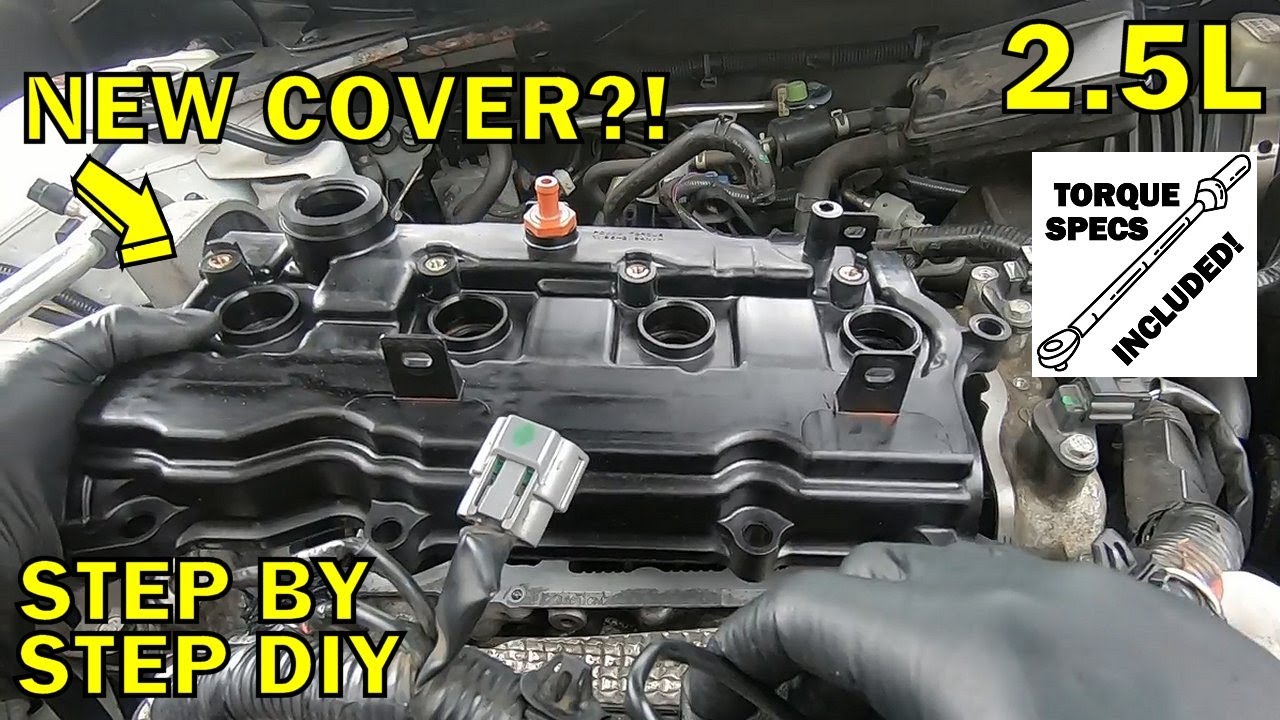
Before we pick up any tools, let's understand the basics. The 2013 Altima (specifically referring to models with the 2.5L QR25DE engine for this example) features a fairly straightforward overhead camshaft (OHC) engine design. The valve cover, typically made of either plastic or aluminum, sits atop the cylinder head. Inside, it houses the camshaft(s), which actuate the valves responsible for controlling the intake and exhaust processes within the cylinders. The gasket, usually made of rubber or silicone, sits between the valve cover and cylinder head, conforming to the slightly uneven surfaces to create a tight seal.
Over time, the valve cover gasket can deteriorate due to heat cycling, exposure to engine oil, and general aging. The rubber or silicone can become brittle, crack, or flatten, leading to a loss of sealing ability. Symptoms of a failing valve cover gasket include:
- Visible oil leaks around the valve cover.
- The smell of burning oil, especially after driving.
- Low engine oil levels.
- Oil pooling in the spark plug wells (a less common symptom, but one to watch for).
If you're experiencing any of these issues, it's time to consider replacing the valve cover gasket. While a professional mechanic can certainly handle this task, it's a job that a mechanically inclined individual with the right tools and a bit of patience can tackle at home.
Tools and Materials Required
Before beginning, gather the following tools and materials:
- New valve cover gasket (ensure it's the correct part for your specific engine).
- Socket set (typically metric, including a 10mm socket for valve cover bolts).
- Ratchet and extensions.
- Torque wrench.
- Screwdrivers (both flathead and Phillips head).
- Pliers.
- Clean rags or shop towels.
- Brake cleaner or degreaser.
- Oil-resistant sealant (RTV silicone).
- New spark plug tube seals (if applicable and recommended).
- Gloves.
- Safety glasses.
Step-by-Step Procedure
1. Preparation and Safety
Begin by ensuring the engine is completely cold. Working on a hot engine can cause burns and damage to components. Disconnect the negative battery cable to prevent any accidental electrical shorts during the process. This is a crucial safety step!
2. Accessing the Valve Cover
This is where things get specific to your Altima. Typically, you'll need to remove any components that obstruct access to the valve cover. This might include:
- Engine cover (usually held on by clips or bolts).
- Air intake hose and air filter housing.
- Wiring harnesses and connectors attached to the valve cover or nearby components. Be extremely careful when disconnecting electrical connectors. Note their positions and ensure you can easily reconnect them later.
- Any vacuum hoses connected to the valve cover or intake manifold.
Document the position of hoses and connectors with photos or labels to aid in reassembly. Proper organization at this stage will save you headaches later. Remove any brackets or wire stays that are in the way. Use extreme care disconnecting any hoses to prevent breaking any plastic connections.
3. Removing the Valve Cover
Now that you have clear access, carefully remove the valve cover bolts. These are usually 10mm bolts. Loosen them in a star pattern (opposite bolts) to distribute the pressure evenly and prevent warping the valve cover. Once all the bolts are loosened, remove them completely and set them aside in a safe place. Pay close attention to any washers or sleeves that accompany the bolts, noting their original positions.
With the bolts removed, gently pry the valve cover loose. It may be stuck in place due to the old gasket adhering to the cylinder head. Use a plastic scraper or a small, flathead screwdriver to carefully break the seal. Avoid using excessive force, as this could damage the valve cover or the cylinder head. Work your way around the perimeter of the valve cover until it's free.
Carefully lift the valve cover off the engine. Be prepared for some residual oil to spill out, so have your rags handy. Cover the open cylinder head with a clean rag to prevent any debris from falling inside.
4. Cleaning and Inspection
With the valve cover removed, thoroughly clean both the valve cover and the cylinder head mating surfaces. Use a plastic scraper to remove any remnants of the old gasket. Then, use brake cleaner or degreaser to remove any oil or grime. The goal is to create a clean, dry surface for the new gasket to seal against.
Inspect the valve cover for any cracks, damage, or warping. If the valve cover is damaged, it should be replaced. Also, inspect the cylinder head mating surface for any damage. Pay particular attention to the areas around the bolt holes. If you find any damage, consult with a professional mechanic.
If your valve cover has separate spark plug tube seals (small rubber seals that fit around the spark plug wells), inspect them for cracks or deterioration. If they are damaged, replace them. These seals prevent oil from leaking into the spark plug wells, which can cause misfires.
5. Installing the New Gasket
Install the new valve cover gasket into the groove on the valve cover. Ensure the gasket is properly seated and that it is the correct orientation. Some gaskets are directional, so pay attention to any markings or instructions that come with the new gasket.
In some cases, the manufacturer may recommend applying a small amount of RTV silicone sealant to specific areas of the gasket, such as the corners where the head and timing cover meet. This helps to ensure a tight seal in these high-stress areas. Consult the vehicle's service manual or the gasket manufacturer's instructions for guidance on where to apply sealant.
If you are replacing the spark plug tube seals, install them now. Lightly lubricate them with clean engine oil before installation to ease the process.
6. Reinstalling the Valve Cover
Carefully lower the valve cover onto the cylinder head, aligning it with the bolt holes. Ensure the gasket remains properly seated during installation. Install the valve cover bolts, tightening them by hand until they are snug. Do not overtighten at this stage.
Using a torque wrench, tighten the valve cover bolts to the manufacturer's specified torque. This is a critical step, as overtightening can damage the valve cover or cylinder head, while undertightening can lead to leaks. The torque specification is usually quite low, often around 8-10 Nm (Newton-meters) or 70-90 inch-pounds. Tighten the bolts in a star pattern to distribute the pressure evenly.
7. Reassembly and Final Checks
Reconnect all the components you removed earlier, including the air intake hose, wiring harnesses, and vacuum hoses. Double-check that all connections are secure and that all hoses are properly routed. Reinstall the engine cover.
Reconnect the negative battery cable. Start the engine and let it idle for a few minutes. Check for any oil leaks around the valve cover. If you see any leaks, stop the engine and re-inspect the gasket and bolts. You may need to tighten the bolts slightly (but do not exceed the specified torque). A slow leak may require redoing the entire procedure, to ensure the gasket is properly seated.
8. Post-Installation
Check and top off your engine oil to the appropriate level. Monitor the valve cover area for any signs of leaks over the next few days. If everything looks good, you've successfully replaced your valve cover gasket!
Important Considerations
- Torque is Key: Overtightening valve cover bolts is a common mistake that can lead to cracked valve covers, stripped threads, and leaks. Always use a torque wrench and adhere to the manufacturer's specifications.
- Cleanliness is Paramount: A clean mating surface is essential for a proper seal. Take your time to thoroughly clean both the valve cover and the cylinder head.
- Gasket Quality Matters: Invest in a high-quality valve cover gasket from a reputable manufacturer. A cheap gasket may not provide a reliable seal and could fail prematurely.
- Don't Reuse Hardware: If the bolts are damaged or corroded, replace them with new ones. This ensures proper torque and prevents leaks.
- Consult the Service Manual: This guide is intended as a general overview. Always refer to the specific service manual for your 2013 Nissan Altima for detailed instructions and torque specifications.
By following these steps carefully and paying attention to detail, you can successfully replace your 2013 Nissan Altima's valve cover gasket and restore its engine to optimal health and efficiency. Remember to prioritize safety and take your time to ensure a proper seal.